Setup CloudPanel As Reverse Proxy with Docker and Dockge
Use CloudPanel as a reverse proxy with Dockge for managing your Docker containers.

CloudPanel is a hosting panel that is light and packed with a lot of features. It will help you host PHP, Python or NodeJs apps with just one click. Besides this, it has also a feature that will allow use it as a reverse proxy for your docker apps.
You can use other alternatives as reverse proxy for your self-hosted apps but in case you want to host also websites that are not in docker this will be a good alternative.
If you are interested to see some free cool open source self hosted apps you can check toolhunt.net self hosted section.
Below is a list of what CloudPanel has to offer:
- File Manager
- IP & Bot Blocking
- Varnish Cache & Redis
- SSH/FTP
- Firewall
- Cron Jobs
- Vhost Editor
- Remote Backup with Rclone
- Free Let’s Encrypt Certificates
- Cloudflare Integration
- User Management
- System resources usage graphs
- Multiple PHP versions
- MySQL and MariaDB support
- Node.js, Python support
- Nginx Web Server
Minimum requirements:
- Minimum 1 core
- Minimum 2 GB RAM
- 10 GB of disk space
In this article, we are going to see how you can Install CloudPanel Docker and Dockge and make the most of your VPS. Dockge is a panel that can help you host docker apps with just one click I have made an article here: Dockge Install that will provide more details on the panel.
CloudPanel will be used as a proxy server that will send the traffic to your Docker containers and Dockge will be the app that will help you administrate these docker containers and deploy apps easily.
If you are interested to see some free cool open source self hosted apps you can check toolhunt.net self hosted section.
1. Create a VPS server
You will need a VPS server where you can host your docker containers I am recommending Hetzner, for more details check this Hetzner Review and you can check also: DigitalOcean vs Vultr vs Hetzner
DigitalOcean $100 Free Vultr $100 Free Hetzner €20 FreeThe VPS process is easy and you just need a Ubuntu server, CloudPanel and Dockge are working on ARM and x86_64 also.
2. Update the VPS server
First thing always is to update your Ubuntu to use the latest packages:
sudo apt update && sudo apt upgrade3. Install CloudPanel
I have also created a course that will help you get going with Cloudpanel if you are a beginner, check CloudPanel Setup Course
I use MariaDB 10.11 for this install and Hetzner as a cloud provider you can check Cloudpanel Install Doc to check the options:
curl -sS https://installer.cloudpanel.io/ce/v2/install.sh -o install.sh; \
echo "85762db0edc00ce19a2cd5496d1627903e6198ad850bbbdefb2ceaa46bd20cbd install.sh" | \
sha256sum -c && sudo CLOUD=hetzner DB_ENGINE=MARIADB_10.11 bash install.sh
4. Access CloudPanel Admin
You can access the CloudPanel admin with the https://serverIpAddress:8443 , here you will need to create an account that will be used. In the next steps, we are going to go and create a subdomain and use it to access CloudPanel in the future.
5. Create an Admin Subdomain:
To access CloudPanel securely and have an SSL certificate we need to create a subdomain and point it to the CloudPanel VPS server. I am using CloudFlare for this and I just go and add an A record under DNS on the domain I want to host. You can use what DNS provider you have, you just need to point the subdomain/domain A record to the server IP.
Next, we need to go and add it to the CloudPanel Admin area in Settings. And add it there to secure the admin area.
6. Install Docker and Docker Compose
Now that you have your VPS created and CloudPanel set, you will need to install docker, the below will need to be done to have docker UP and running:
sudo apt-get update
sudo apt-get install ca-certificates curl gnupg lsb-release
sudo mkdir -p /etc/apt/keyrings
curl -fsSL https://download.docker.com/linux/debian/gpg | sudo gpg --dearmor -o /etc/apt/keyrings/docker.gpg
echo \
  "deb [arch=$(dpkg --print-architecture) signed-by=/etc/apt/keyrings/docker.gpg] https://download.docker.com/linux/ubuntu \
  jammy stable" | sudo tee /etc/apt/sources.list.d/docker.list > /dev/null
sudo apt-get update
sudo apt-get install docker-ce docker-ce-cli containerd.io docker-compose-plugin docker-compose
Everything is also explained in Install Docker & Docker-compose for Ubuntu
7. Install Dockge
In the next part, we will go and install Dockge on a subdomain/domain in CloudPanel, under this user we are going to keep our Dockge installation and the future apps.
In this way, if you have CloudPanel external backup activated you will backup all the apps and Dockge at once.
7.1 Add Reverse Proxy in CloudPanel
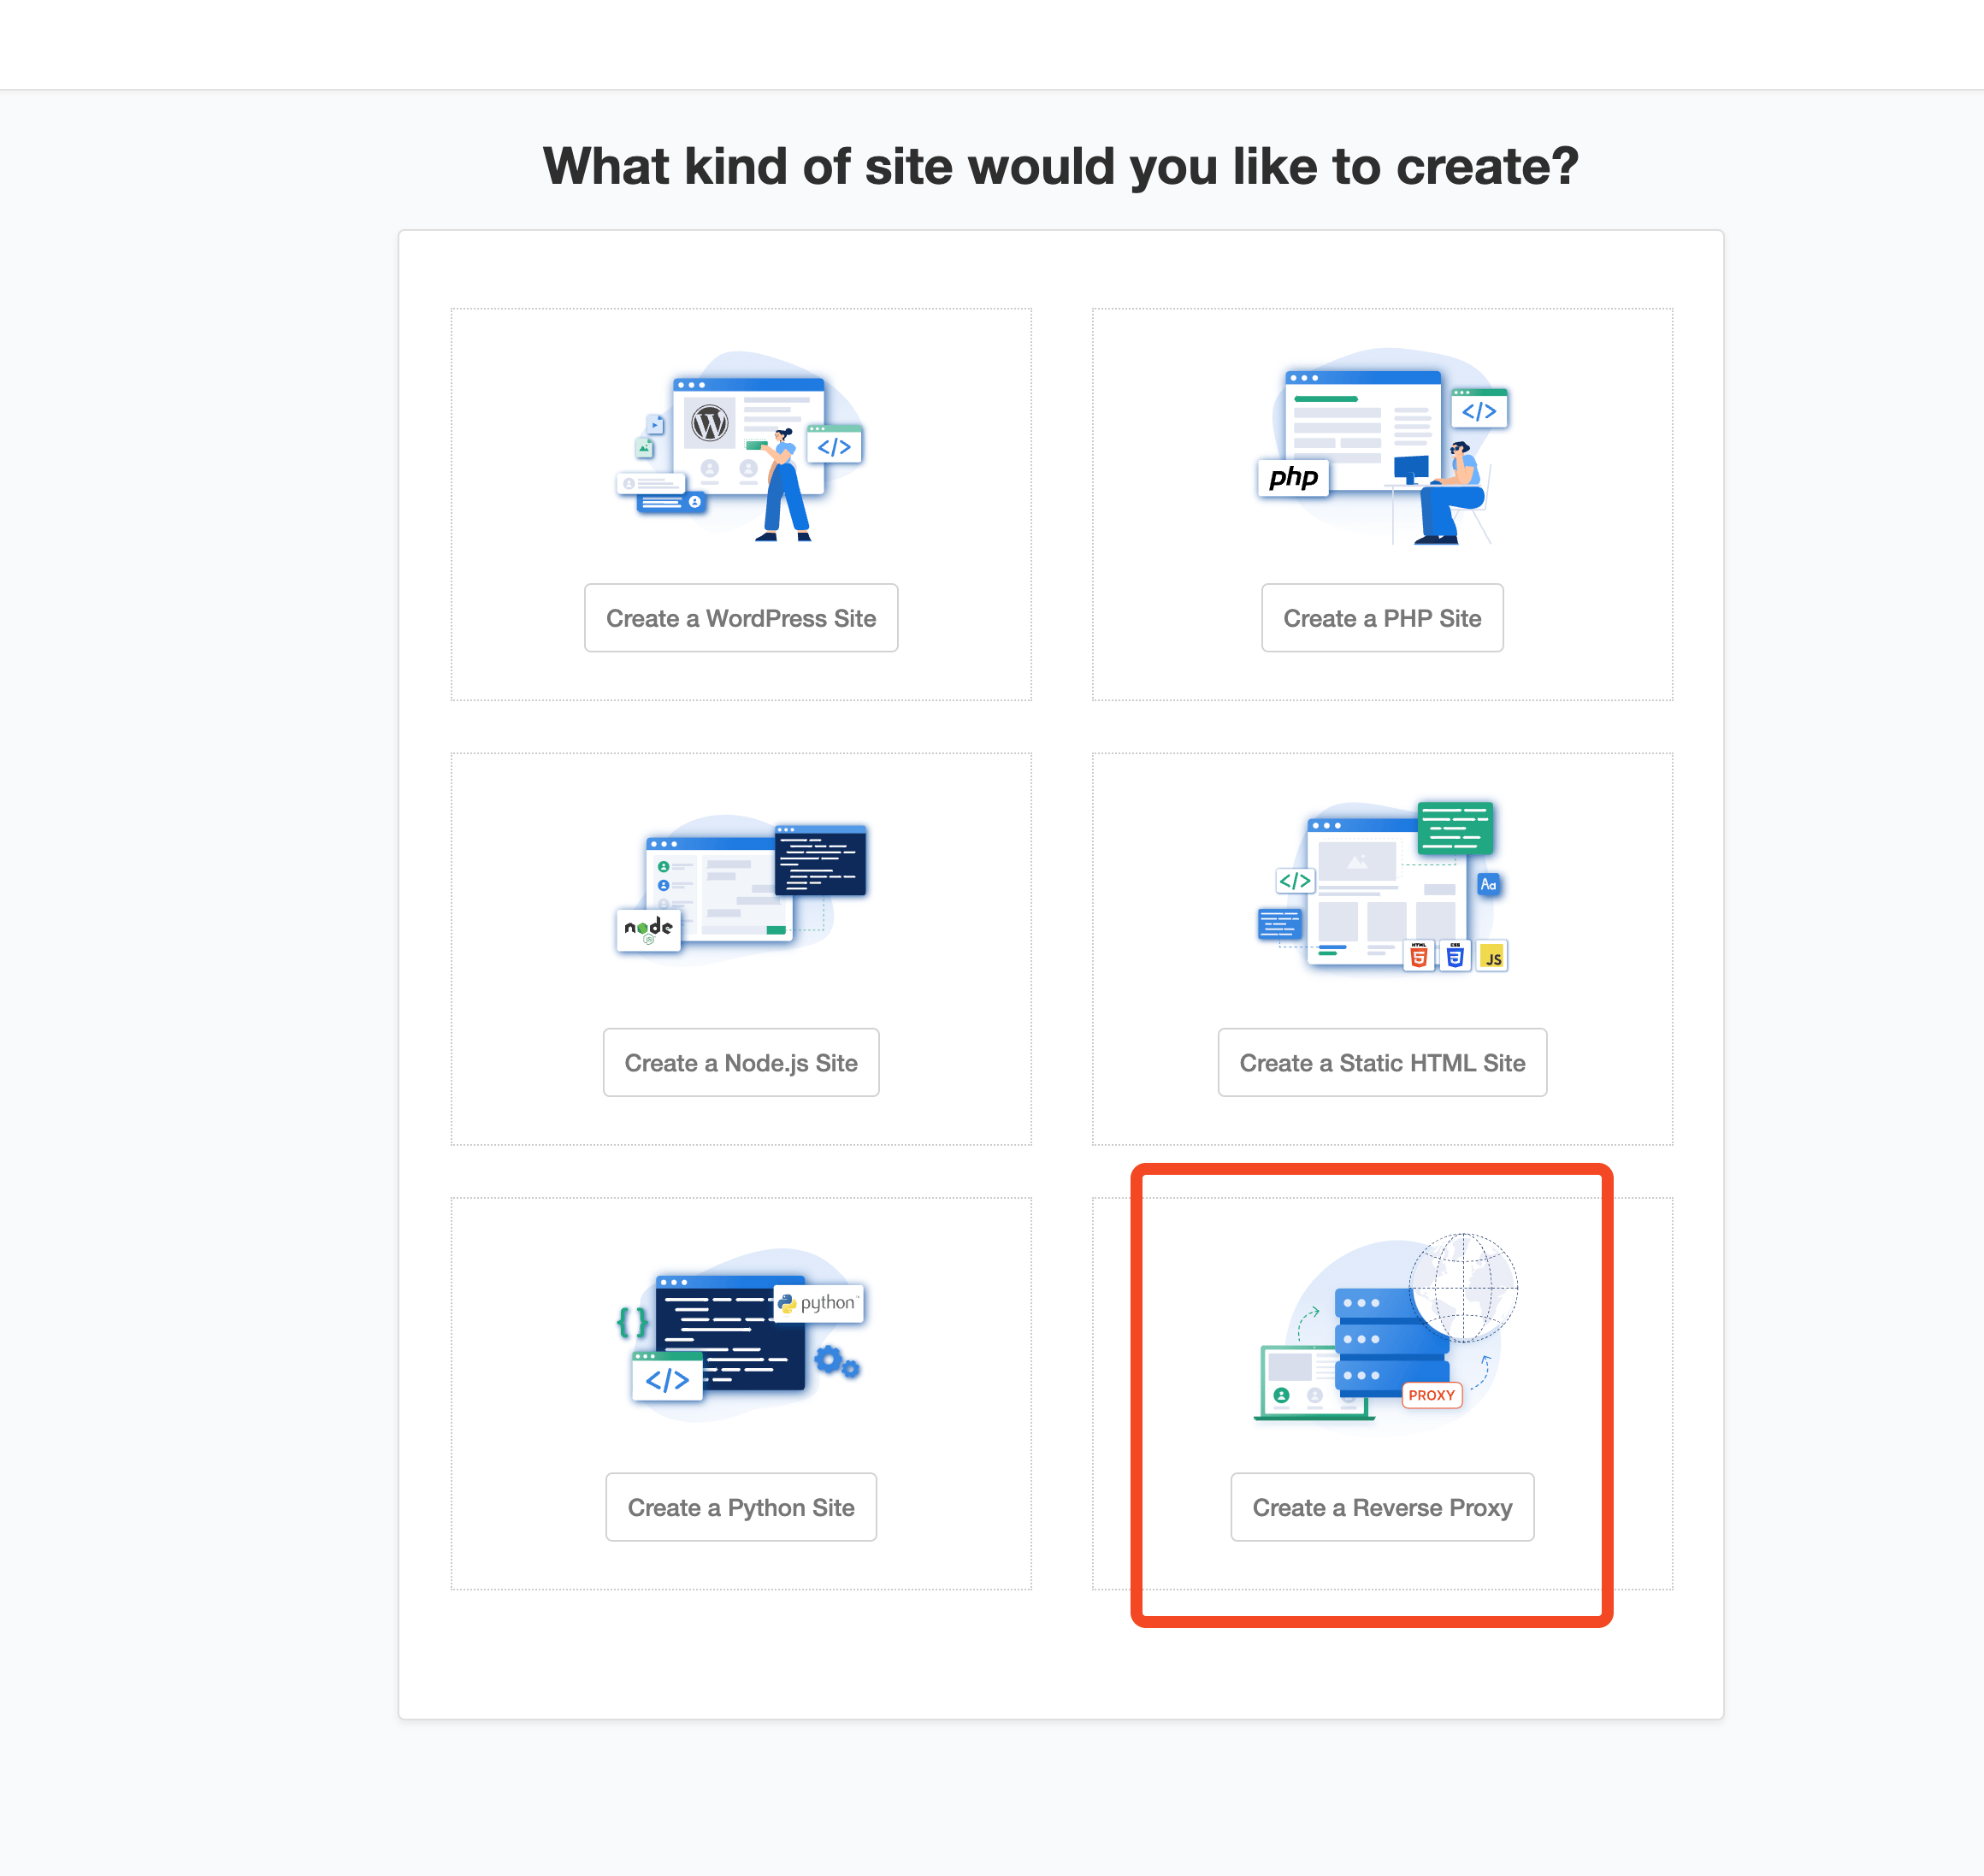
In this part, we are going to add the Reverse Proxy in CloudPanel with the port that we are going to use for Dockge. Under Sites - Add Site you choose Create a Reverse Proxy
In the next part you will add the domain with the user password and port that Dockge will use, in my case will be the 5000 port.
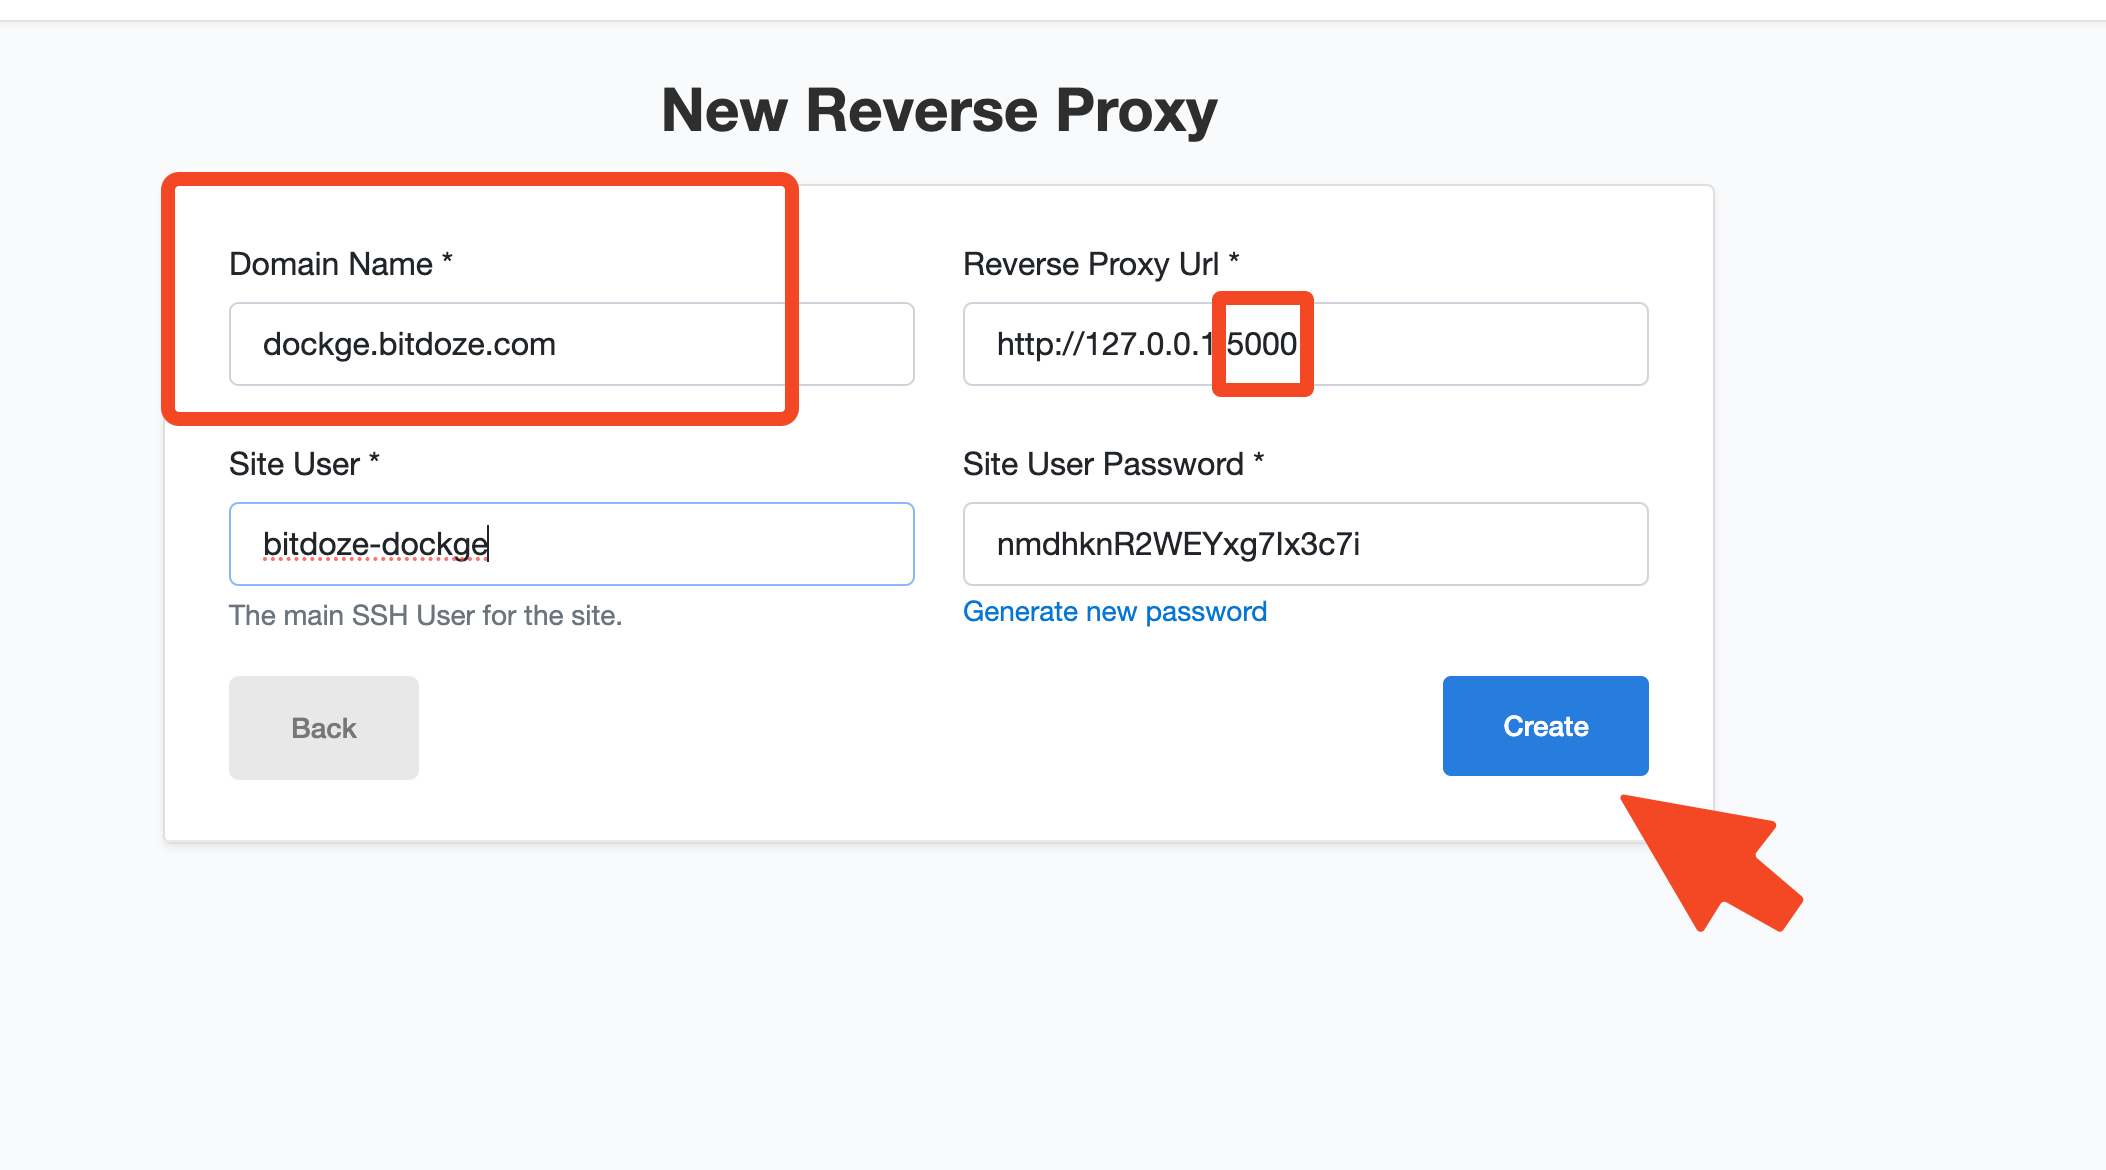
You choose what you want to use.
7.2 Create the Directories For Dockge
After you have the website added you will need to open a terminal to your server and under the path where website is created in CloudPanel you create the dockge directories:
cd /home/<user>/htdocs/<website>/
#eg:
cd /home/bitdoze-dockge/htdocs/dockge.bitdoze.com/
You just replace the <user> and <website> with your specific details, from point 7.1
Create the directories:
mkdir dockge-stacks
mkdir dockge- dockge - will be used to have the app installed
- dockge-stacks - will be the place where all the apps will reside
7.3 Install Dockge
version: "3.8"
services:
  dockge:
    image: louislam/dockge:1
    restart: unless-stopped
    ports:
      - 5000:5001
    volumes:
      - /var/run/docker.sock:/var/run/docker.sock
      - ./data:/app/data
      - /home/<user>/htdocs/<website>/dockge-stacks:/home/<user>/htdocs/<website>/dockge-stacks
    environment:
      # Tell Dockge where to find the stacks
      - DOCKGE_STACKS_DIR=/home/<user>/htdocs/<website>/dockge-stacks
In the above files you have to replace:
- Port - in my case I am using 5000 so you just replace with your port the left one
- Volumes -
/home/<user>/htdocs/<website>/dockge-stacks:/home/<user>/htdocs/<website>/dockge-stackswill need to be replaces with your paths from previous point - DOCKGE_STACKS_DIR - same as previous is the path where you will have your stacks.
A full example is:
version: "3.8"
services:
  dockge:
    image: louislam/dockge:1
    restart: unless-stopped
    ports:
      - 5000:5001
    volumes:
      - /var/run/docker.sock:/var/run/docker.sock
      - ./data:/app/data
      - /home/bitdoze-dockge/htdocs/dockge.bitdoze.com/dockge-stacks:/home/bitdoze-dockge/htdocs/dockge.bitdoze.com/dockge-stacks
    environment:
      # Tell Dockge where to find the stacks
      - DOCKGE_STACKS_DIR=/home/bitdoze-dockge/htdocs/dockge.bitdoze.com/dockge-stacks
Dokge Compose Create can help you create the exact docker-compose file.
After you save the file with the name compose.yaml and run:
docker compose up -dThis will bring up the Dockge app that will run on port 5000 in my case.
7.4 Point Domain/Subdomain to Dockge
In your DNS provider, you need to create an A record that will be sent to the server IP.
7.5 Create an SSL certificate
The domain that will be used for Dockge will need to be secured with SSL, you need to go into CloudPanel under Sites - Manage Site - SSL/TLS and generate an SSL certificate, a Let’s Encrypt one.
7.6 Access Dockge and Create a User and Password.
First time when you access Dockge you will be prompted to create a user and a password, you just need to create one. You access Dockge with the domain you have used for installation.
7.7 Open CloudPanel Firewall Ports
By default CloudPanel is activating a firewall and only a couple of ports are opened like 8443,443,22 and 80 if you want to not assign domains or subdomains to your docker apps you should go and open the ranges that you are going to use for your docker apps.
To open the ports you should go under Admin Area - Security - Add Rule and open the ranges as in the picture:
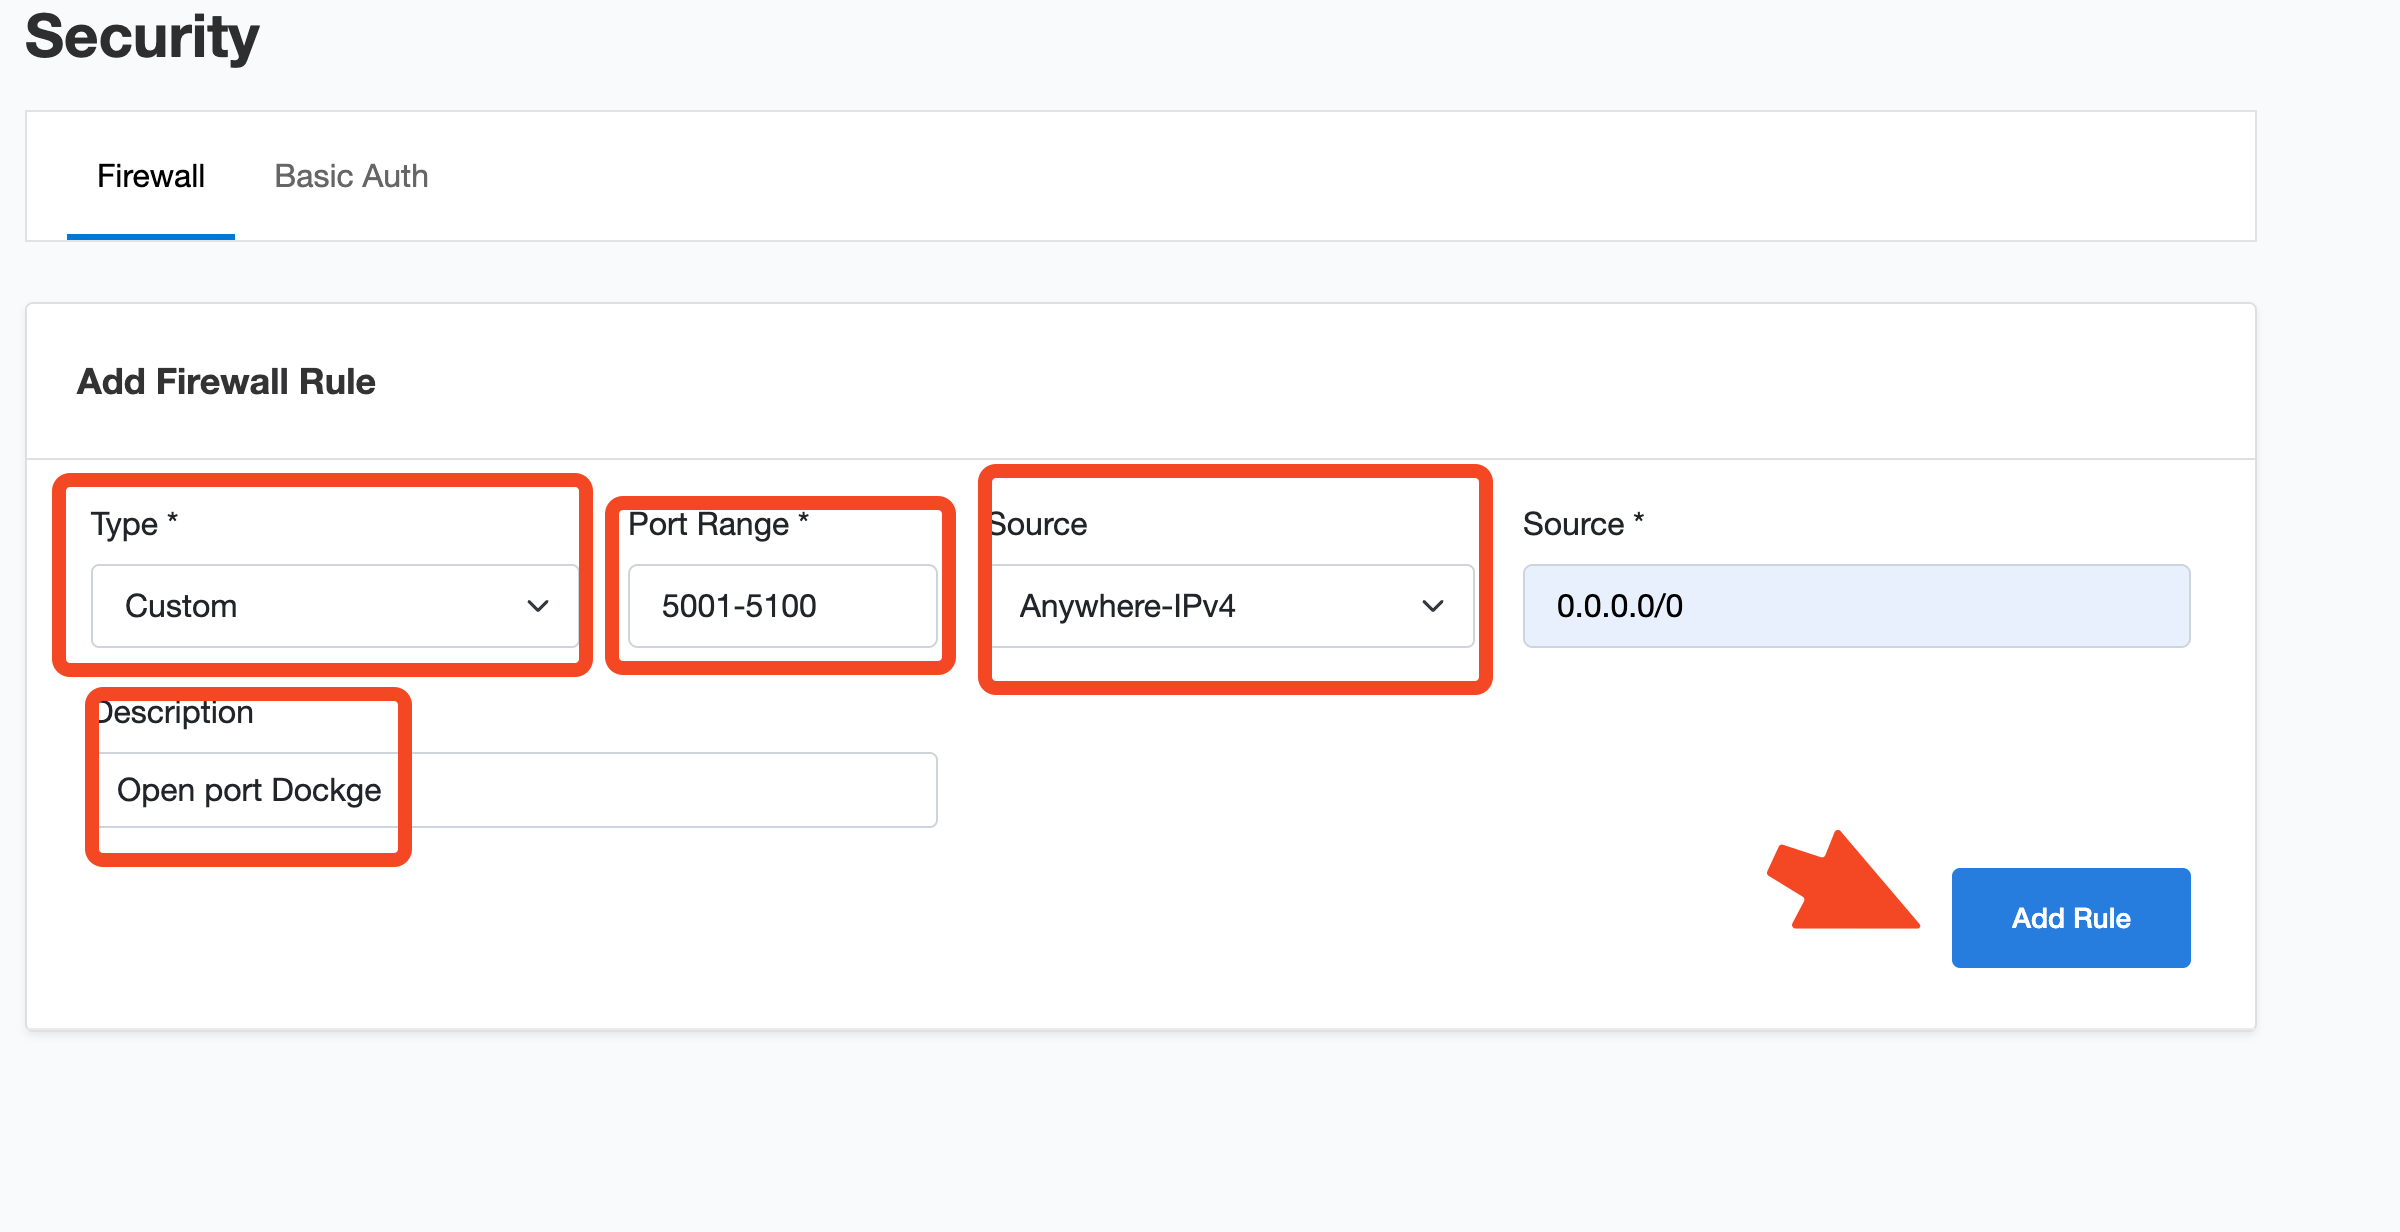
This will allow access to the ports from outside.
8. Secure The Proxy Configuration
8.1 restrict file Access
By default, CloudPanel adds a basic proxy configuration that looks like:
location / {
  try_files $uri @reverse_proxy;
}
This works for basic setups, but for applications like Dockge and other Docker containers, you should enhance the configuration with better proxy settings. To do this:
- Go to CloudPanel admin
- Navigate to Sites > Select your site > Vhost Editor
- Replace the default proxy configuration with the following more robust setup:
location / {
  proxy_pass {{reverse_proxy_url}};
  proxy_http_version 1.1;
  proxy_set_header X-Forwarded-Host $host;
  proxy_set_header X-Forwarded-Server $host;
  proxy_set_header X-Real-IP $remote_addr;
  proxy_set_header X-Forwarded-For $proxy_add_x_forwarded_for;
  proxy_set_header X-Forwarded-Proto $scheme;
  proxy_set_header Host $http_host;
  proxy_set_header Upgrade $http_upgrade;
  proxy_set_header Connection "Upgrade";
  proxy_pass_request_headers on;
  proxy_max_temp_file_size 0;
  proxy_connect_timeout 900;
  proxy_send_timeout 900;
  proxy_read_timeout 900;
  proxy_buffer_size 128k;
  proxy_buffers 4 256k;
  proxy_busy_buffers_size 256k;
  proxy_temp_file_write_size 256k;
}
This enhanced configuration provides a way to not have access to the files in the dokge stack like .env files and others secrets you may have there.
with the default configuration, you can still access the files in the dokge stack like .env files and others secrets you may have there, but you can protect them with this.
8.2 Protect sensitive files
For added security, you should also add a rule to prevent direct access to sensitive files that might contain configuration details, passwords, or other private information:
# Protect sensitive files
location ~* \.(php|sql|log|config|env)$ {
    deny all;
}
This rule blocks direct access to files with extensions like .php, .sql, .log, .config, and .env which often contain sensitive configuration data or credentials. By adding this to your site configuration, you ensure that even if someone discovers the path to these files, they won’t be able to download or view them directly through the web interface.
8.3 Add Basic Authentication
For an additional layer of security, you can enable basic authentication for your proxy sites:
- Navigate to CloudPanel admin
- Go to Sites > Select your site > Security
- Add a username and password for basic authentication
With basic authentication enabled, users will be prompted to enter credentials before they can access your application, adding an extra barrier against unauthorized access.
9. Deploy First App
Now you are set you can access Dockge and start deploy your apps.
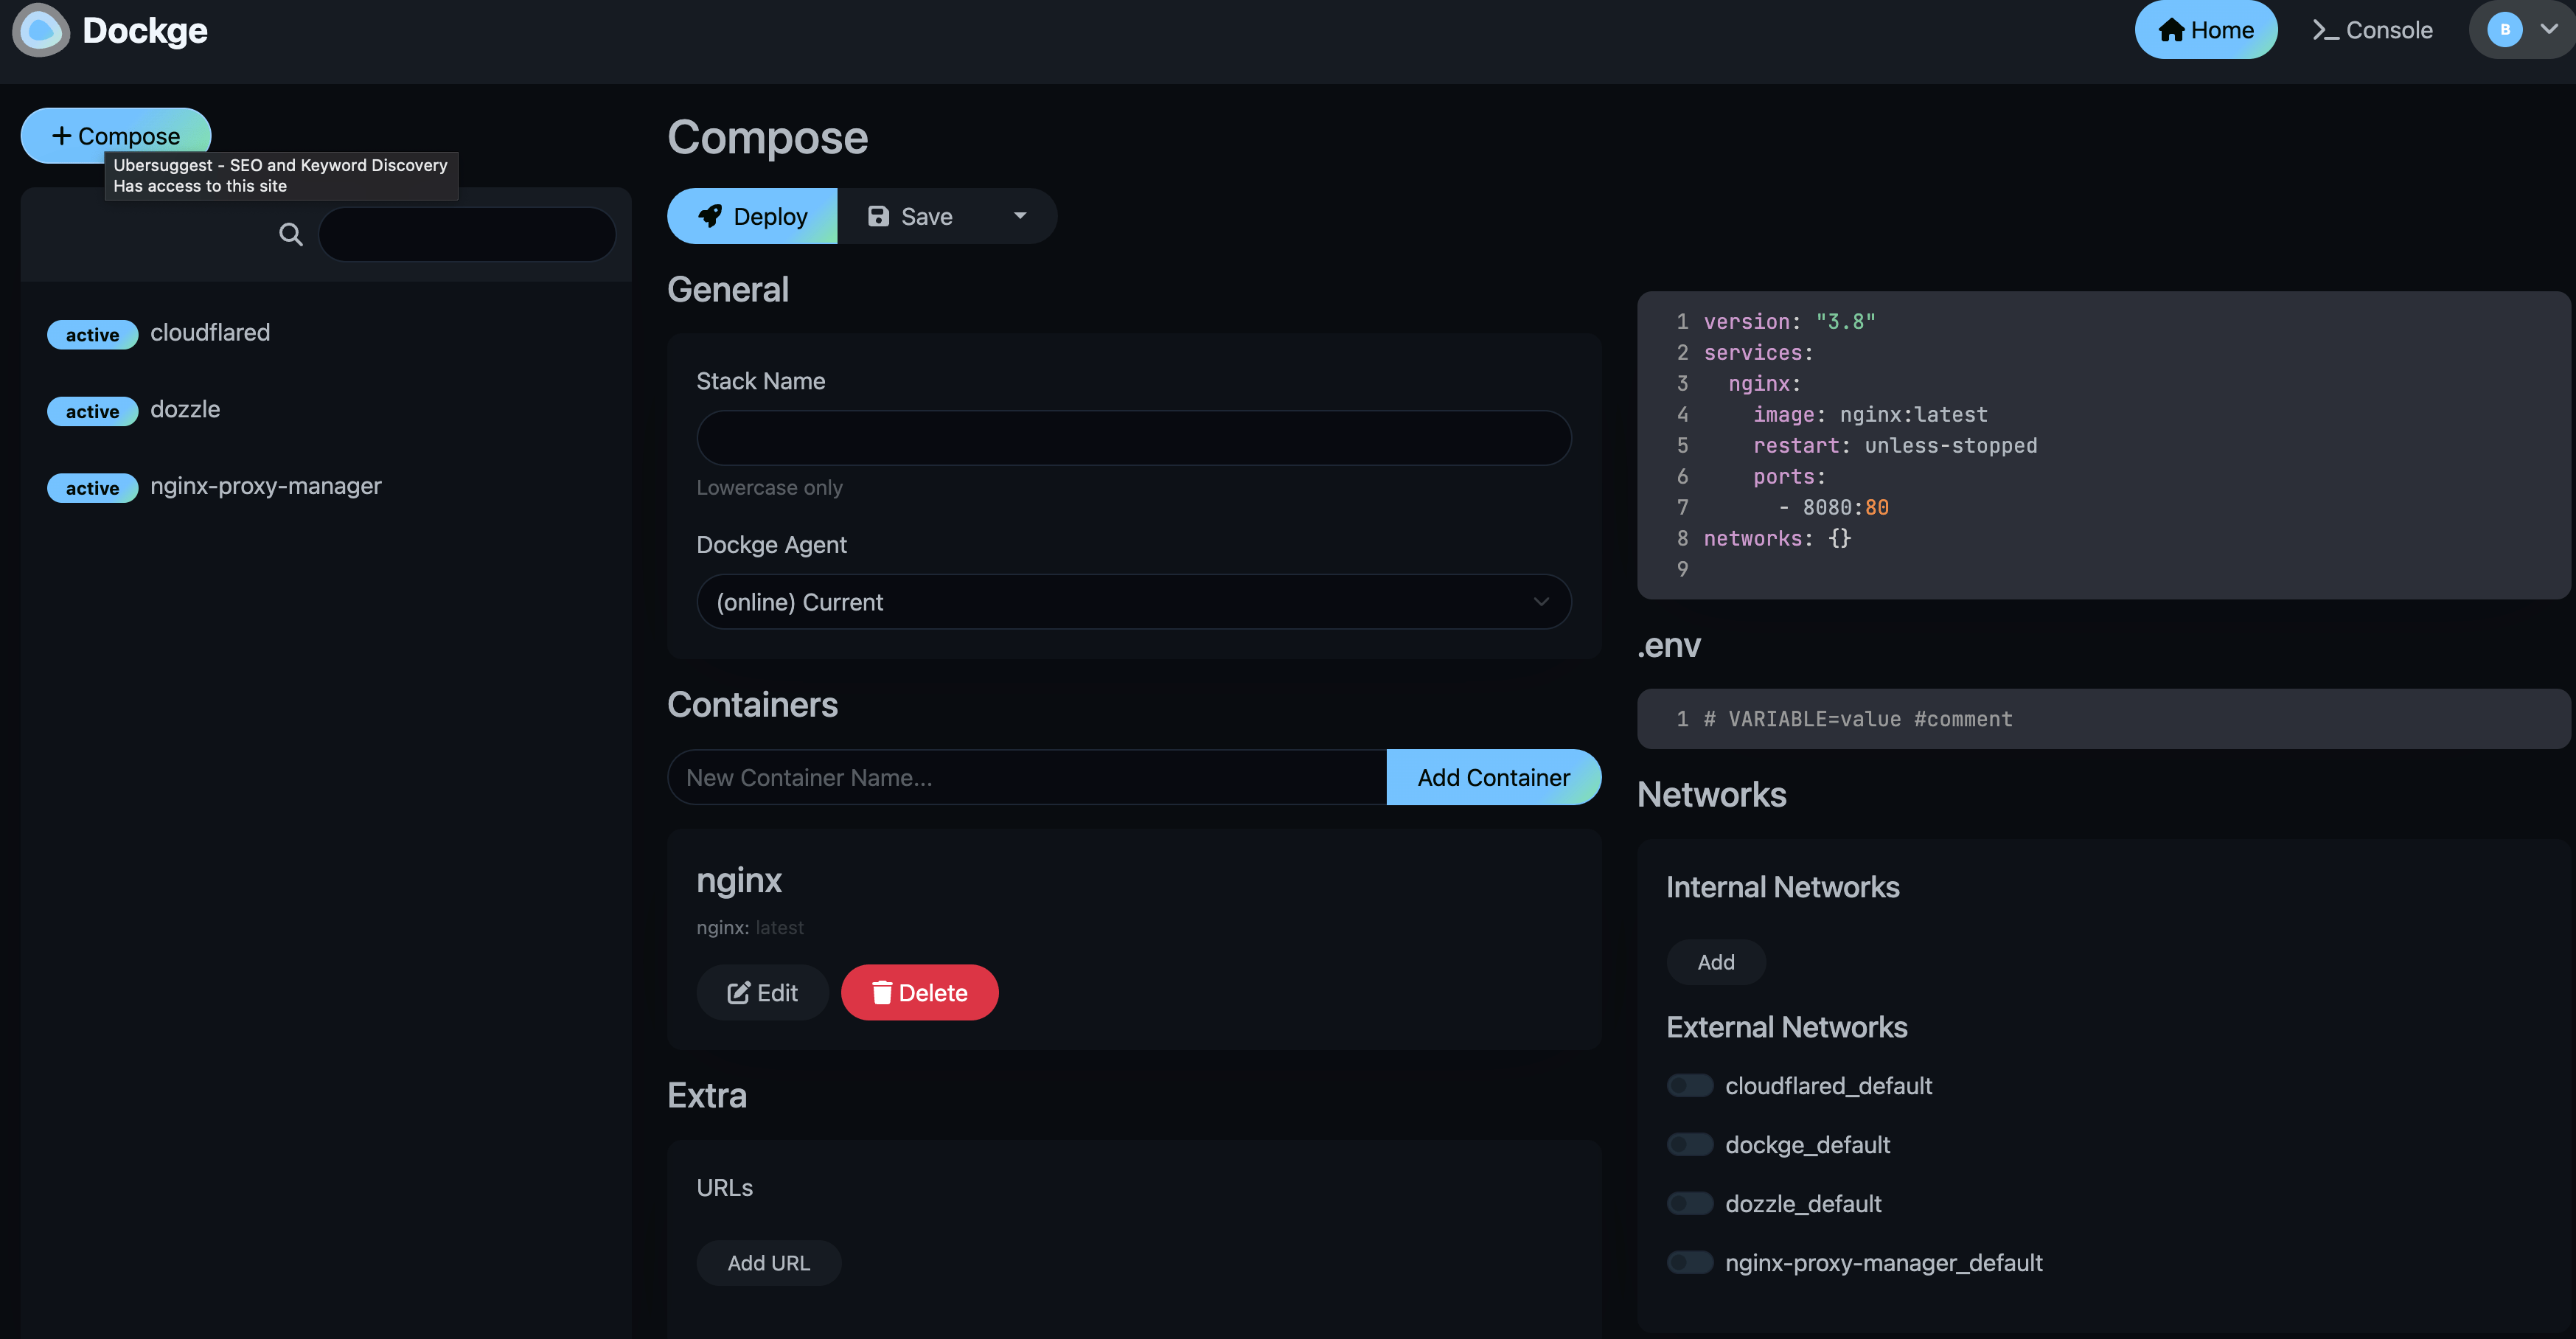
Below there are some articles with apps that you can deploy on Dockge:
At the end when the app is deployed you will need to:
- 1. Create a Reverse Proxy in CloudPanel - same as you did for Dockge you will need to Create a website in CloudPanel as a Reverse Proxy and add the domain/subdomain that you will use with the port you have given to that app.
- 2. Point the Subdomain/Domain to Server - In your DNS manager add A record to the server for domain or subdomain that you are going to use
- 3. Create SSL Certificate - your app will need to have an SSL certificate you need to go into CloudPanel under
Sites - Manage Site - SSL/TLSand generate an SSL certificate, a Let’s Encrypt one.
10. Activate backups
To secure your apps in case something happens you can go and activate CloudPanel external backups to Dropbox, S3, Google Drive or any SMTP you may have. You can go under Admin Area - Backups and activate the rClone backups to external source.
You can also enable Hetzner snapshots if you want to be better protected, in function of your VPS provider CloudPanel is offering integrations.
I have also created a course that will help you get going with Cloudpanel if you are a beginner, check CloudPanel Setup Course
Related Posts
Setup CloudPanel Remote Backups to OneDrive or Google Drive
See how you can easily setup remote backups in CloudPanel to OneDrive or Google Drive
How to Deploy Your Link Shortener with Slash, Docker, and Dockge
Learn how to deploy your link shortener with Slash, Docker, and Dockge, and enjoy the benefits of smart link management and easy application deployment.
Dockge Install - Portainer Alternative for Docker Management
Learn how Dockge can help you manage your Docker containers, stacks, and services with ease. Dockge is a web-based Docker manager that lets you self-host your own applications and services with minimal hassle.