How to Self-Host RustFS with Dokploy or Docker Compose
Complete guide to self-hosting RustFS, a high-performance S3-compatible object storage system written in Rust. Deploy with Dokploy or Docker Compose as a MinIO alternative.

Table of Contents
- What is RustFS?
- Prerequisites
- Understanding RustFS Ports
- Option 1: Deploy with Dokploy (Easiest Method)
- Option 2: Deploy with Docker Compose Only
- Option 3: Quick Start with Docker Run
- Using RustFS
- Integrating with Applications
- Configuration Options
- Maintenance and Backups
- Security Best Practices
- Migrating from MinIO
- Conclusion
- Frequently Asked Questions
Join BitBuddies
Level up your DevOps skills with hands-on courses on CloudPanel and Dockploy. Join our community of developers and get expert workshops to accelerate your online journey.
Start your journey to DevOps mastery today! 🚀
If you’ve been using MinIO for S3-compatible object storage, you may have noticed recent changes to its licensing and feature availability. The MinIO “Community Edition” has effectively entered maintenance mode, with key features like the web console and replication being gated behind the commercial “AIStor” product.
Enter RustFS — a blazing-fast, 100% S3-compatible object storage system written in Rust that’s specifically designed to be the MinIO replacement you’ve been looking for. In this guide, I’ll show you how to self-host RustFS on your own infrastructure using either Dokploy (the easiest method) or Docker Compose.
What is RustFS?
RustFS is a high-performance, distributed object storage system built in Rust. It was created explicitly to address the licensing and feature-gating issues users faced with MinIO while delivering even better performance.
Key Features of RustFS
- Blazing Fast Performance: 2.3x faster than MinIO for 4KB object payloads, thanks to Rust’s zero-cost abstractions and no garbage collection pauses
- 100% S3 Compatible: Works seamlessly with any S3-compatible application, SDK, or tool
- Built-in Web Console: Full-featured management interface for buckets, users, and objects
- Apache 2.0 License: Permissive licensing with no AGPL restrictions or “poison pill” clauses
- Memory Safe: Built with Rust for memory safety by design — no GC pauses or memory leaks
- Single Binary Deployment: Simple deployment with minimal dependencies
- Versioning Support: Full object versioning capabilities
- Event Notifications: Webhook support for object events
- Kubernetes Ready: Helm charts available for cloud-native deployments
RustFS vs MinIO vs Other Object Storage
| Feature | RustFS | MinIO | SeaweedFS | Garage |
|---|---|---|---|---|
| Primary Goal | Speed & MinIO drop-in replacement | Enterprise object storage | Scalability & billions of files | Reliability & self-hosting |
| Web Console | ✅ Built-in Console | ⚠️ Limited in Community Edition | ✅ Filer UI | ❌ External tools only |
| License | Apache 2.0 (Permissive) | AGPL v3 (Restrictive) | Apache 2.0 | AGPLv3 |
| Language | Rust (Memory safe, no GC) | Go (GC pauses) | Go | Rust |
| Performance | Extremely High (2.3x MinIO) | High | High | Moderate |
| Maturity | Alpha/Beta (Newer) | Very Stable | Very Stable | Stable |
Maturity Consideration
RustFS is much newer than SeaweedFS or MinIO. While it’s “batteries included” with a great web console, it hasn’t been battle-tested for as many years. For critical production data, run extensive tests or consider a hybrid approach during the evaluation period.
Why Choose RustFS?
The “MinIO Feel”: RustFS replicates the ease of use of MinIO, including a nice web console for managing buckets and users. If you’re migrating from MinIO, you’ll feel right at home.
Superior Performance: RustFS is designed to be incredibly fast. Rust avoids the “Garbage Collection” pauses that Go (MinIO’s language) suffers from, making it particularly excellent for small file operations.
Apache 2.0 License: This is crucial for businesses. Unlike MinIO (AGPL), you can use RustFS in commercial products without legal headaches or source code disclosure requirements.
Active Development: The project has gained significant traction with 13.8k+ GitHub stars and active community development.
Prerequisites
Before you begin, make sure you have:
- A VPS or Server: Minimum 2GB RAM and 2 CPU cores (4GB+ recommended for production)
- A Domain Name: For accessing your RustFS console (e.g.,
storage.yourdomain.com) - Docker Installed: Docker 20.10+ and Docker Compose
- Storage Space: Adequate disk space for your object storage needs
- Basic Command Line Knowledge: For running deployment commands
Hosting Recommendations
For production use, we recommend a VPS with at least 4GB RAM and SSD/NVMe storage. Avoid network file systems (NFS) for the data directory. Providers like Hetzner, DigitalOcean, or AWS work well.
Understanding RustFS Ports
RustFS uses two ports by default:
- Port 9000: S3 API endpoint — this is where your applications connect to interact with object storage
- Port 9001: Web Console — the management interface for creating buckets, managing users, and viewing objects
Option 1: Deploy with Dokploy (Easiest Method)
Dokploy is an open-source Platform as a Service that simplifies deploying Docker applications. If you haven’t set up Dokploy yet, check out our Dokploy Installation Guide.
Step 1: Install Dokploy
If not already installed:
curl -sSL https://dokploy.com/install.sh | shAccess Dokploy at http://your-vps-ip:3000 and complete the setup.
Step 2: Create a New Project
- Log in to Dokploy dashboard
- Click “Create Project” and name it (e.g., “RustFS”)
- Inside the project, click “Add Service” → “Compose”
- Select “Docker Compose” type (not Stack)
- Name it “rustfs-stack”
Step 3: Add Docker Compose Configuration
Go to the General tab and paste the following Docker Compose configuration:
services:
  rustfs:
    image: rustfs/rustfs:latest
    networks:
      - dokploy-network
    volumes:
      - rustfs-data:/data
      - rustfs-logs:/app/logs
    environment:
      - RUSTFS_VOLUMES=/data
      - RUSTFS_ADDRESS=0.0.0.0:9000
      - RUSTFS_CONSOLE_ADDRESS=0.0.0.0:9001
      - RUSTFS_CONSOLE_ENABLE=true
      - RUSTFS_ACCESS_KEY=${RUSTFS_ACCESS_KEY:-rustfsadmin}
      - RUSTFS_SECRET_KEY=${RUSTFS_SECRET_KEY}
      - RUSTFS_CORS_ALLOWED_ORIGINS=*
      - RUSTFS_CONSOLE_CORS_ALLOWED_ORIGINS=*
    healthcheck:
      test: ["CMD", "sh", "-c", "curl -f http://localhost:9000/health && curl -f http://localhost:9001/rustfs/console/health"]
      interval: 30s
      timeout: 10s
      retries: 3
      start_period: 40s
    restart: unless-stopped
    deploy:
      resources:
        limits:
          cpus: "2.0"
          memory: 4GB

networks:
  dokploy-network:
    external: true

volumes:
  rustfs-data:
  rustfs-logs:
Volume Explanation
rustfs-data:/data- Persists all object storage data (buckets and objects)rustfs-logs:/app/logs- Persists RustFS logs for debugging and monitoring
Using named volumes ensures data persists across Dokploy deployments.
Step 4: Configure the Domains
This Docker Compose configuration doesn’t include Traefik labels or exposed ports. Instead, configure domains through Dokploy’s Domain tab:
Be sure that they are pointing to the server.
- After deploying, go to the Domains tab for your compose service
- Click Add Domain and configure for the S3 API:
- Domain:
s3.yourdomain.com - Container: Select the
rustfsservice - Port:
9000 - Enable HTTPS for automatic SSL
- Domain:
- Add another domain for the Console:
- Domain:
storage.yourdomain.com - Container: Select the
rustfsservice - Port:
9001 - Enable HTTPS for automatic SSL
- Domain:
This approach is cleaner than inline Traefik labels and allows easy domain management through the Dokploy UI.
Important Notes
- The
dokploy-networkis required for Traefik routing - Don’t set
container_nameas it causes issues with Dokploy features - Generate a strong secret key for production use
Step 5: Configure Environment Variables
Go to the Environment tab and add these variables:
# RustFS Access Key (username)
RUSTFS_ACCESS_KEY=rustfsadmin

# RustFS Secret Key (password - generate a strong one!)
RUSTFS_SECRET_KEY=your-super-secure-secret-key-here

# Your domain (optional, for virtual-hosted style URLs)
SERVER_DOMAIN=s3.yourdomain.com
Generate a secure secret key:
openssl rand -base64 32Step 6: Configure DNS
Before deploying, set up your DNS A records:
s3.yourdomain.com→ Your VPS IP (for S3 API)storage.yourdomain.com→ Your VPS IP (for Web Console)
Step 7: Deploy and Access
- Click “Deploy” and wait for the service to start
- Monitor the logs in the Deployments or Logs tab
- Go to the Domains tab and add domains for each port (see notes above)
- Wait about 30 seconds for Traefik to generate SSL certificates
Once deployed, access the web console at https://storage.yourdomain.com with your configured credentials.
Option 2: Deploy with Docker Compose Only
For more manual control or if you prefer not to use Dokploy, here’s how to deploy with Docker Compose directly.
Step 1: Prepare Your Server
Update system and install Docker:
# Update packages
sudo apt update && sudo apt upgrade -y

# Install Docker
curl -fsSL https://get.docker.com -o get-docker.sh
sudo sh get-docker.sh

# Install Docker Compose plugin
sudo apt install docker-compose-plugin -y
Step 2: Create Project Directory and Set Permissions
RustFS container runs as a non-root user rustfs with UID 10001. You need to set the correct ownership for mounted directories:
mkdir -p ~/rustfs
cd ~/rustfs

# Create data and logs directories
mkdir -p data logs

# Change the owner to match the container user (UID 10001)
sudo chown -R 10001:10001 data logs
Logs Directory
RustFS stores logs in /app/logs inside the container. We mount ./logs to /app/logs for persistence.
Permission Required
If you skip the chown step, RustFS will encounter “permission denied” errors when trying to write data. The container runs as UID 10001 for security purposes.
Step 3: Create Docker Compose File
nano docker-compose.ymlPaste the following configuration:
services:
  rustfs:
    image: rustfs/rustfs:latest
    container_name: rustfs
    networks:
      - rustfs-network
    volumes:
      - ./data:/data
      - ./logs:/app/logs
    environment:
      - RUSTFS_VOLUMES=/data
      - RUSTFS_ADDRESS=0.0.0.0:9000
      - RUSTFS_CONSOLE_ADDRESS=0.0.0.0:9001
      - RUSTFS_CONSOLE_ENABLE=true
      - RUSTFS_ACCESS_KEY=${RUSTFS_ACCESS_KEY:-rustfsadmin}
      - RUSTFS_SECRET_KEY=${RUSTFS_SECRET_KEY}
      - RUSTFS_CORS_ALLOWED_ORIGINS=*
      - RUSTFS_CONSOLE_CORS_ALLOWED_ORIGINS=*
    ports:
      - "9000:9000"
      - "9001:9001"
    healthcheck:
      test: ["CMD", "sh", "-c", "curl -f http://localhost:9000/health && curl -f http://localhost:9001/rustfs/console/health"]
      interval: 30s
      timeout: 10s
      retries: 3
      start_period: 40s
    restart: unless-stopped
    deploy:
      resources:
        limits:
          cpus: "2.0"
          memory: 4GB

networks:
  rustfs-network:
    name: rustfs-network
Step 4: Create Environment File
nano .envAdd your configuration:
# RustFS Access Key (username)
RUSTFS_ACCESS_KEY=rustfsadmin

# RustFS Secret Key (password - CHANGE THIS!)
RUSTFS_SECRET_KEY=your-super-secure-secret-key-minimum-8-chars
Security Warning
Never use the default credentials in production! Generate a strong secret key using openssl rand -base64 32.
Step 5: Start RustFS
# Start services
docker compose up -d

# View logs
docker compose logs -f

# Check status
docker compose ps
You should see output indicating RustFS is running and the console is available.
Step 6: Set Up Reverse Proxy with Nginx
For production with custom domains and SSL:
sudo apt install nginx certbot python3-certbot-nginx -yCreate Nginx configuration:
sudo nano /etc/nginx/sites-available/rustfsPaste:
# RustFS S3 API
server {
    listen 80;
    server_name s3.yourdomain.com;

    # Allow large file uploads
    client_max_body_size 0;

    location / {
        proxy_pass http://localhost:9000;
        proxy_http_version 1.1;
        proxy_set_header Upgrade $http_upgrade;
        proxy_set_header Connection 'upgrade';
        proxy_set_header Host $host;
        proxy_set_header X-Real-IP $remote_addr;
        proxy_set_header X-Forwarded-For $proxy_add_x_forwarded_for;
        proxy_set_header X-Forwarded-Proto $scheme;
        proxy_cache_bypass $http_upgrade;

        # Timeouts for large uploads
        proxy_connect_timeout 300;
        proxy_send_timeout 300;
        proxy_read_timeout 300;
    }
}

# RustFS Console
server {
    listen 80;
    server_name storage.yourdomain.com;

    location / {
        proxy_pass http://localhost:9001;
        proxy_http_version 1.1;
        proxy_set_header Upgrade $http_upgrade;
        proxy_set_header Connection 'upgrade';
        proxy_set_header Host $host;
        proxy_set_header X-Real-IP $remote_addr;
        proxy_set_header X-Forwarded-For $proxy_add_x_forwarded_for;
        proxy_set_header X-Forwarded-Proto $scheme;
        proxy_cache_bypass $http_upgrade;
    }
}
Enable the site and get SSL certificates:
sudo ln -s /etc/nginx/sites-available/rustfs /etc/nginx/sites-enabled/
sudo nginx -t
sudo systemctl reload nginx

# Get SSL certificates
sudo certbot --nginx -d s3.yourdomain.com -d storage.yourdomain.com
Option 3: Quick Start with Docker Run
For quick testing without Docker Compose:
# Create directories and set permissions
mkdir -p data logs
sudo chown -R 10001:10001 data logs

# Run RustFS
docker run -d \
  --name rustfs \
  -p 9000:9000 \
  -p 9001:9001 \
  -v $(pwd)/data:/data \
  -v $(pwd)/logs:/app/logs \
  -e RUSTFS_VOLUMES=/data \
  -e RUSTFS_ADDRESS=0.0.0.0:9000 \
  -e RUSTFS_CONSOLE_ADDRESS=0.0.0.0:9001 \
  -e RUSTFS_CONSOLE_ENABLE=true \
  -e RUSTFS_ACCESS_KEY=rustfsadmin \
  -e RUSTFS_SECRET_KEY=your-secret-key-here \
  rustfs/rustfs:latest
Access the console at http://localhost:9001 with your credentials.
Using RustFS
Access the Web Console
Open your browser and navigate to:
- Local:
http://localhost:9001 - With Domain:
https://storage.yourdomain.com
Log in with your configured access key and secret key (default: rustfsadmin / rustfsadmin).
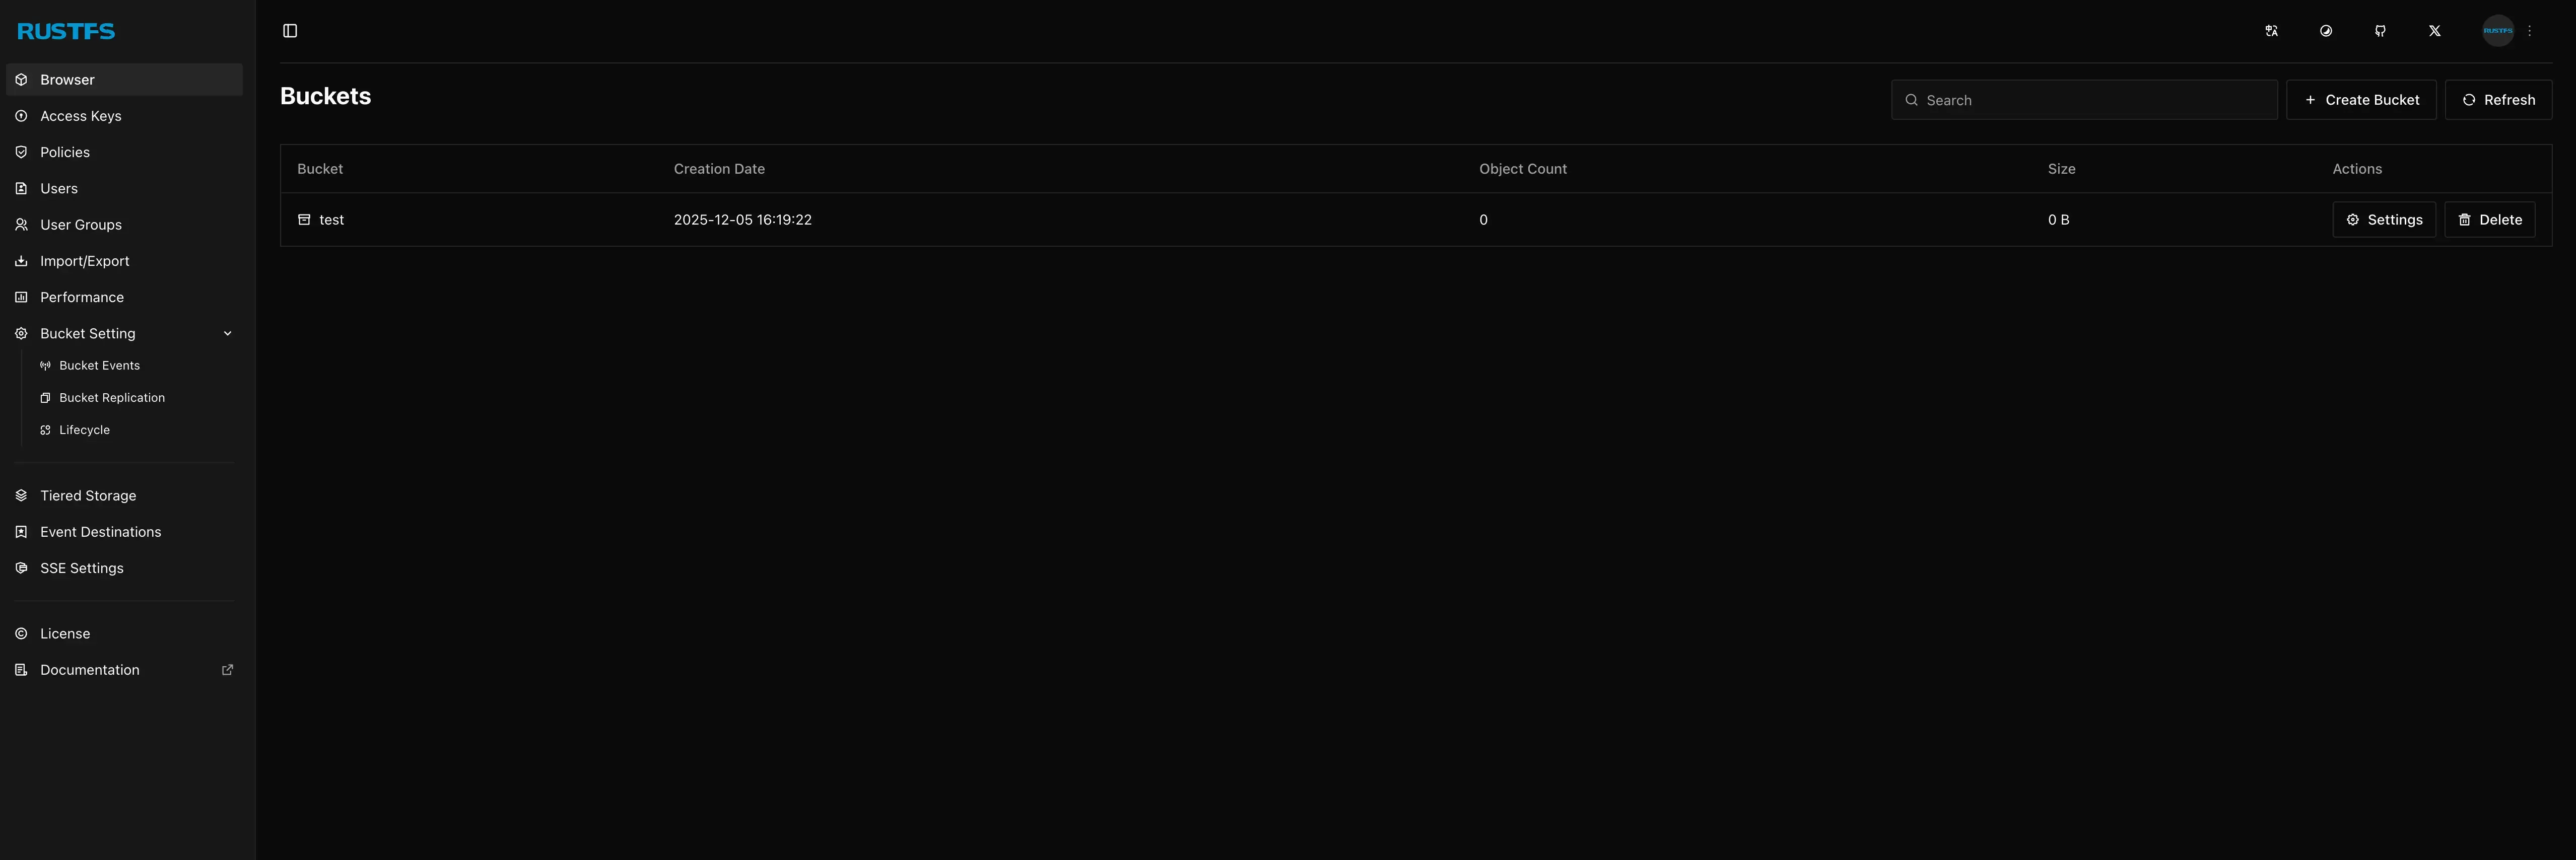
Create a Bucket
- In the console, click “Create Bucket”
- Enter a bucket name (e.g.,
my-first-bucket) - Configure versioning and locking options as needed
- Click “Create Bucket”
Upload Objects
- Click on your bucket name
- Click “Upload” or drag and drop files
- Your files are now stored in RustFS!
Using S3 CLI (mc)
RustFS is fully compatible with MinIO Client (mc) and AWS CLI:
# Install MinIO Client
curl https://dl.min.io/client/mc/release/linux-amd64/mc -o mc
chmod +x mc
sudo mv mc /usr/local/bin/

# Configure alias
mc alias set rustfs http://localhost:9000 rustfsadmin your-secret-key

# Or with domain
mc alias set rustfs https://s3.yourdomain.com rustfsadmin your-secret-key

# Create bucket
mc mb rustfs/my-bucket

# Upload file
mc cp myfile.txt rustfs/my-bucket/

# List objects
mc ls rustfs/my-bucket

# Download file
mc cp rustfs/my-bucket/myfile.txt ./downloaded.txt
Using AWS CLI
# Configure AWS CLI
aws configure
# Access Key ID: rustfsadmin
# Secret Access Key: your-secret-key
# Region: us-east-1 (or any)
# Output format: json

# Use with endpoint URL
aws --endpoint-url http://localhost:9000 s3 ls

# Create bucket
aws --endpoint-url http://localhost:9000 s3 mb s3://my-bucket

# Upload file
aws --endpoint-url http://localhost:9000 s3 cp myfile.txt s3://my-bucket/

# List objects
aws --endpoint-url http://localhost:9000 s3 ls s3://my-bucket/
Integrating with Applications
Using with Backup Tools
RustFS works with any S3-compatible backup tool. Here’s an example with Restic:
# Set environment variables
export AWS_ACCESS_KEY_ID=rustfsadmin
export AWS_SECRET_ACCESS_KEY=your-secret-key
export RESTIC_REPOSITORY=s3:http://localhost:9000/backups

# Initialize repository
restic init

# Create backup
restic backup /path/to/data
Using with Docker Registry
Configure Docker Registry to use RustFS as storage backend:
services:
  registry:
    image: registry:2
    environment:
      REGISTRY_STORAGE: s3
      REGISTRY_STORAGE_S3_ACCESSKEY: rustfsadmin
      REGISTRY_STORAGE_S3_SECRETKEY: your-secret-key
      REGISTRY_STORAGE_S3_REGION: us-east-1
      REGISTRY_STORAGE_S3_BUCKET: docker-registry
      REGISTRY_STORAGE_S3_REGIONENDPOINT: http://rustfs:9000
Using with Applications
Most applications that support S3 can use RustFS. Common environment variables:
S3_ENDPOINT=http://localhost:9000
S3_ACCESS_KEY=rustfsadmin
S3_SECRET_KEY=your-secret-key
S3_BUCKET=my-bucket
S3_REGION=us-east-1
Configuration Options
Environment Variables
| Variable | Description | Default |
|---|---|---|
RUSTFS_VOLUMES | Storage volume path(s) | — |
RUSTFS_ACCESS_KEY | Access key (username) | rustfsadmin |
RUSTFS_SECRET_KEY | Secret key (password) | rustfsadmin |
RUSTFS_ADDRESS | S3 API bind address | 0.0.0.0:9000 |
RUSTFS_CONSOLE_ADDRESS | Console bind address | 0.0.0.0:9001 |
RUSTFS_CONSOLE_ENABLE | Enable web console | false |
RUSTFS_CORS_ALLOWED_ORIGINS | CORS allowed origins for S3 API | — |
RUSTFS_CONSOLE_CORS_ALLOWED_ORIGINS | CORS allowed origins for console | — |
RUSTFS_EXTERNAL_ADDRESS | External address for redirects | — |
RUSTFS_TLS_PATH | Path to TLS certificates | — |
RUSTFS_OBS_ENDPOINT | OpenTelemetry endpoint | — |
RUSTFS_OBS_LOGGER_LEVEL | Log level (info, debug, etc.) | info |
Command Line Arguments
RustFS can also be configured via command line arguments, though environment variables are recommended for Docker deployments:
rustfs [OPTIONS] <VOLUMES>

Options:
  --address <ADDRESS>              S3 API bind address (default: :9000)
  --console-address <ADDRESS>      Console bind address (default: :9001)
  --console-enable                 Enable the web console
  --access-key <KEY>               Set access key
  --secret-key <KEY>               Set secret key
  --server-domains <DOMAINS>       Set server domains
TLS Configuration
For native TLS without a reverse proxy:
services:
  rustfs:
    image: rustfs/rustfs:latest
    volumes:
      - ./data:/data
      - ./certs:/certs
    environment:
      - RUSTFS_TLS_PATH=/certs
    command: ["--address", ":9000", "/data"]
Place your public.crt and private.key in the ./certs directory.
Maintenance and Backups
Backup Strategy
For RustFS data, back up the entire data directory:
# Stop RustFS (optional, for consistent backup)
docker compose stop rustfs

# Backup data directory
tar -czvf rustfs-backup-$(date +%Y%m%d).tar.gz ./data

# Restart RustFS
docker compose start rustfs
For automated backups, create a cron job:
# Edit crontab
crontab -e

# Add daily backup at 2 AM
0 2 * * * cd /home/user/rustfs && tar -czvf /backups/rustfs-$(date +\%Y\%m\%d).tar.gz ./data
Updating RustFS
# Pull latest image
docker compose pull

# Recreate container with new image
docker compose up -d

# Clean up old images
docker image prune -f
Version Pinning
For production, consider pinning to a specific version:
image: rustfs/rustfs:1.0.0.alpha.68Check the RustFS releases for the latest version.
Monitoring
RustFS supports observability through Prometheus metrics. The official docker-compose includes Grafana, Prometheus, and Jaeger:
# Clone RustFS repository
git clone https://github.com/rustfs/rustfs.git
cd rustfs

# Start with observability stack
docker compose --profile observability up -d
This starts:
- Grafana on port 3000
- Prometheus on port 9090
- Jaeger on port 16686
Security Best Practices
- Change Default Credentials: Never use
rustfsadmin/rustfsadminin production - Use Strong Secret Keys: Generate with
openssl rand -base64 32 - Enable TLS: Use HTTPS for all connections (via reverse proxy or native TLS)
- Restrict Network Access: Use firewall rules to limit access to ports 9000/9001
- Regular Backups: Implement automated backup strategy
- Monitor Logs: Check logs regularly for suspicious activity
- Keep Updated: Regularly update to the latest RustFS version
- Use Named Volumes: For Docker deployments, use named volumes for data persistence
Migrating from MinIO
RustFS is designed as a drop-in replacement for MinIO. For most applications, you can:
- Export your data from MinIO using
mc mirror - Deploy RustFS with the same bucket structure
- Import your data using
mc mirror - Update your application’s S3 endpoint URL
# Export from MinIO
mc mirror minio/my-bucket ./backup/

# Import to RustFS
mc mirror ./backup/ rustfs/my-bucket/
Conclusion
RustFS provides an excellent self-hosted alternative to MinIO with better performance, a permissive Apache 2.0 license, and a familiar user experience. While it’s still newer than MinIO or SeaweedFS, its rapid development and strong community make it worth considering for your object storage needs.
Key Takeaways
- Performance: 2.3x faster than MinIO for small object operations
- License: Apache 2.0 — no AGPL restrictions
- Compatibility: 100% S3 compatible with built-in web console
- Easy Deployment: Single container with minimal configuration
- Active Development: Rapidly growing with strong community support
Next Steps
- Explore the RustFS Documentation for advanced configuration
- Set up automated backups for your data
- Configure monitoring with Prometheus and Grafana
- Join the GitHub Discussions community
- Consider contributing to the project
Frequently Asked Questions
RustFS is currently in alpha/beta stage. While it’s feature-complete for basic object storage operations and performs excellently in benchmarks, it hasn’t been battle-tested as long as MinIO or SeaweedFS. For critical production workloads, consider running extensive tests first or maintaining backups on a proven system during the evaluation period.
Yes! RustFS is designed as a drop-in replacement for MinIO. You can use mc mirror to copy data between MinIO and RustFS. Since both are 100% S3 compatible, your applications should work without code changes — just update the endpoint URL.
- Port 9000: The S3 API endpoint — this is where applications connect to upload/download objects
- Port 9001: The web console — a management interface for creating buckets, managing users, and browsing objects
For applications, you’ll typically only expose port 9000. The console (9001) can be restricted to internal access.
RustFS runs as a non-root user inside the container for security purposes. This user has UID 10001. If you mount a host directory, it needs to be owned by this UID so RustFS can write data. This is a security best practice that prevents the container from running as root.
Both are excellent S3-compatible storage systems:
- RustFS: Focuses on performance and being a MinIO drop-in replacement with a web console
- SeaweedFS: More mature, focuses on scalability with billions of small files
Choose RustFS if you want the MinIO experience with better performance. Choose SeaweedFS if you need proven stability and massive scale.
Distributed mode is currently under testing in RustFS. For production cluster deployments, you may want to wait for the feature to stabilize or use the single-node mode with proper backups. Check the RustFS GitHub for the latest status on distributed mode.
Yes! RustFS provides official Helm charts for Kubernetes deployment. Check the helm/ directory in the RustFS repository for installation instructions. The charts support various configurations including resource limits, persistence, and ingress.
You have two options:
- Reverse Proxy (Recommended): Use Nginx, Traefik, or Caddy in front of RustFS to handle TLS termination
- Native TLS: Mount certificates to the container and set
RUSTFS_TLS_PATH=/certs
For Dokploy deployments, HTTPS is automatically handled by Traefik when you configure domains.
Related Posts
Install WordPress in a Docker Container with Docker Compose
Use docker to install WordPress in a container with Docker Compose with phpMyAdmin and Database backups.
How to Install LangFlow with Docker Compose and Add SSL Over CloudFlare Tunnels
Learn how you can install LangFlow with docker compose and Postgres DB and take advantage of no-code AI flows. Add SSL over CloudFlare tunnels
How to Deploy Your Link Shortener with Slash, Docker, and Dockge
Learn how to deploy your link shortener with Slash, Docker, and Dockge, and enjoy the benefits of smart link management and easy application deployment.