Getting Started with uv: Python Project Setup in 2026
Getting started with uv? Learn to install uv, set up a Python project, and manage dependencies, virtual environments, and Python versions in this 2026 guide.
 Dragos19 min read
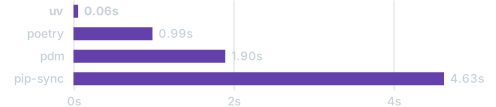
If you’ve spent any time fighting with pip, venv, and pyenv to get a Python project running, this getting-started-with-uv guide is for you. uv is a Python package and project manager written in Rust by the Astral team (the same people behind the ruff linter). Since its launch in February 2024, it has grown to ~88,800 GitHub stars and replaced a patchwork of five or six tools with a single binary that’s 10-100x faster than pip.
In this article I’ll walk through how to install uv, set up a Python project from scratch, manage dependencies and Python versions, build and deploy, and avoid the common gotchas I see people hit. All commands are current as of uv 0.12.5 (August 2026).
What is uv?
uv is an all-in-one Python package and project manager that replaces pip, venv, pipx, poetry, and pyenv in a single Rust binary. It uses PEP 621 pyproject.toml for configuration and a cross-platform uv.lock file for reproducible builds.
Key differentiators:
- Speed: 10-100x faster than
pipthanks to a Rust-built dependency resolver and aggressive caching. - Unified workflow: Packages, virtual environments, Python versions, script execution, and build/publish all in one tool.
- Standards-compliant: Uses
pyproject.toml(PEP 621) and[dependency-groups](PEP 735) — not proprietary config files. - No manual activation:
uv runhandles the virtual environment automatically. No moresource .venv/bin/activate.
uv replaces more than you think
uv is not just a package installer. It replaces pip, venv, pipx, poetry, and pyenv in a single Rust binary. If you’re installing it, you can skip all those other tools.
Setting up your Python project with uv
In this section we’ll install uv and create a new Python project from scratch.
Deploy Your uv Project
To see how to deploy a uv project to your VPS, check out Deploying a Python uv Project with Git and Railpack in Dokploy.
Step 1: Installing uv
uv doesn’t require a pre-existing Python installation — it can manage Python versions itself. Install it directly (not via pip) to avoid dependency conflicts with your system Python.
macOS/Linux
curl -LsSf https://astral.sh/uv/install.sh | shThis downloads and installs uv as a standalone binary. You’ll see output like:
downloading uv 0.12.5 aarch64-apple-darwin
no checksums to verify
installing to /Users/user/.local/bin
  uv
  uvx
everything's installed!
Windows
powershell -ExecutionPolicy ByPass -c "irm https://astral.sh/uv/install.ps1 | iex"Verify installation
uv --versionYou should see something like uv 0.12.5. Also verify the companion binary:
uvx --versionTo confirm managed Python versions are available:
uv python listThis shows all CPython versions uv can download and manage for you — no system Python required.
PATH issues?
If the installer warns about $HOME/.local/bin not being in your PATH, or says commands are “shadowed by other commands,” restart your terminal or run:
source $HOME/.local/bin/envTo persist the fix, run uv python update-shell. On Windows, uv tool update-shell does the same.
To keep uv current when installed via the standalone installer:
uv self updateIf you’re on a Mac and need to install or upgrade Python itself separately, see install and upgrade Python on your Mac.
Step 2: Initializing a new project with uv init
Since uv 0.12.0 (July 2026), uv init creates a packaged application by default — with a src/ layout, a build system, and a script entry point. This is a significant change from older versions.
uv init my-python-project
cd my-python-project
The generated project structure:
my-python-project/
├── .gitignore
├── .python-version
├── pyproject.toml
├── README.md
└── src/
    └── my_python_project/
        └── __init__.py
The pyproject.toml now includes a build system and a script entry point:
[project]
name = "my-python-project"
version = "0.1.0"
description = "Add your description here"
readme = "README.md"
requires-python = ">=3.13"
dependencies = []

[project.scripts]
my-python-project = "my_python_project:main"

[build-system]
requires = ["uv_build>=0.12.1,<0.13"]
build-backend = "uv_build"
The src/my_python_project/__init__.py contains a starter function:
def main():
    print("Hello from my-python-project!")


if __name__ == "__main__":
    main()
Run it using the script entry point:
uv run my-python-projectYou should see Hello from my-python-project! printed to the terminal. Note: you run the entry point name, not main.py.
uv init layout history
The default layout has changed several times. v0.3 defaulted to a packaged layout (hatchling), v0.4 switched to a flat main.py layout, and v0.12 restored packaged using Astral’s own uv_build backend. If you see older tutorials showing uv init creating a main.py in the root, that’s why.
Prefer the old flat main.py layout?
If you want the simpler flat layout without a package structure:
uv init --no-package my-python-projectThis creates the older layout:
my-python-project/
├── .python-version
├── main.py
├── pyproject.toml
└── README.md
With this layout, you run code directly with uv run main.py. No [build-system] or [project.scripts] is generated.
Other uv init variants:
uv init --lib my-project— creates a library (no entry point, propersrc/layout for publishing).uv init --bare my-project— generates only apyproject.toml, nothing else.
Step 3: Setting up a virtual environment
uv creates a virtual environment automatically when you add dependencies, but you can also create one explicitly:
uv venvThis creates a .venv directory in your project root. The key thing: you don’t need to activate it. uv run handles the virtual environment for every command:
uv run python -c "print('Running inside the venv')"If you do want to activate manually (e.g., for an IDE that needs it):
# macOS/Linux
source .venv/bin/activate

# Windows
.venv\Scripts\activate
Recreating a virtual environment?
Since uv 0.10.0, uv venv will not overwrite an existing .venv without the --clear flag. If you need to start fresh:
uv venv --clearFor non-venv directories, use uv venv --force.
Step 4: Adding dependencies
The easiest way to add dependencies is with uv add, which updates pyproject.toml and creates/updates uv.lock in one step:
uv add requestsFor dev-only dependencies (testing, linting):
uv add --dev pytestThis uses the PEP 735 [dependency-groups] table in pyproject.toml:
[project]
dependencies = [
    "requests",
]

[dependency-groups]
dev = [
    "pytest",
]
You can also edit pyproject.toml manually and then sync:
uv syncThis reads pyproject.toml, resolves dependencies, and installs everything into .venv. Speed is remarkable — usually completing in under a second.
For production-only installs (skip dev dependencies):
uv sync --no-devNote: The legacy
[tool.uv] dev-dependenciessyntax is deprecated. Use[dependency-groups]as shown above.
Step 5: Writing and running code
With the new packaged layout, your code lives in src/my_python_project/. Edit src/my_python_project/__init__.py:
import requests


def main():
    response = requests.get("https://api.github.com")
    print(response.json())


if __name__ == "__main__":
    main()
Run it via the entry point:
uv run my-python-projectOr run Python directly inside the project environment:
uv run python -c "from my_python_project import main; main()"For quick one-off scripts with temporary dependencies (no project needed):
uv run --with rich python -c "from rich import print; print({'hello': 'world'})"Advanced Script Execution
Want to run standalone Python scripts without creating a full project? Check out Running Test Scripts with uv: No Dependencies Management Required for PEP 723 inline metadata and uv run --with techniques.
Step 6: Managing your project
Update dependencies to their latest compatible versions:
uv sync --upgradeExport to requirements.txt (modern form, infers format from the extension):
uv export -o requirements.txtYou can also export to the PEP 751 standard lockfile format:
uv export -o pylock.tomlInspect the dependency tree:
uv treeRun any command in the project environment:
uv run pytestStep 7: Managing Python versions
uv can download and manage Python versions without a system installation. List available versions:
uv python listInstall a specific version:
uv python install 3.14Pin it for your project:
uv python pin 3.14This writes the version to .python-version.
Upgrade to the latest patch release:
uv python upgradeuv python upgrade (stable since uv 0.10.0) moves to the latest patch release transparently. Patch-level upgrades happen automatically; minor-level upgrades (e.g., 3.13 to 3.14) are never automatic — you must opt in.
As of August 2026, Python 3.14 is the current stable feature release (use the latest 3.14.x patch). Python 3.15 is in release candidate.
Side note: Free-threaded Python (no-GIL) is available for 3.13+ via
uv python install 3.14tif you want to experiment.
Step 8: Removing packages with uv
Remove a package from pyproject.toml, .venv, and uv.lock in one command:
uv remove requestsFor a dev dependency:
uv remove --dev pytestAfter removal, your pyproject.toml is updated and the package is uninstalled from the virtual environment. uv.lock is also updated to keep things reproducible.
If you manually edit pyproject.toml to remove a dependency, run uv sync afterward. uv won’t automatically uninstall it from .venv otherwise. Stick to uv remove to keep things clean.
Build, publish, and deploy
Since uv 0.12.0, uv init creates a packaged project by default, which means building and publishing is a natural next step.
Build your project:
uv buildThis produces dist/*.whl (wheel) and dist/*.tar.gz (source distribution).
Publish to PyPI:
uv publishYou’ll need a PyPI API token. uv publish also supports private indexes.
Reproducibility and CI
Always commit uv.lock to git. It pins exact dependency versions across platforms.
For CI pipelines, use --frozen to install exactly what uv.lock says (errors if the lockfile would change):
# GitHub Actions example
- uses: astral-sh/setup-uv@v9
- run: uv sync --frozen
Other useful CI flags:
uv lock --check— verify the lockfile is in sync withpyproject.toml(exit code based, good for pre-commit).uv sync --check— verify.venvmatches the lockfile.
Docker
The official Docker image is ghcr.io/astral-sh/uv. A typical multi-stage build:
FROM ghcr.io/astral-sh/uv:latest AS uv
FROM python:3.14-slim

COPY --from=uv /uv /usr/local/bin/uv
COPY pyproject.toml uv.lock ./
RUN uv sync --frozen --no-dev
COPY . .
CMD ["uv", "run", "my-python-project"]
For deploying to a VPS with Dokploy, see Deploying a Python uv Project with Git and Railpack in Dokploy. If you need affordable VPS hosting with Hetzner for your CI runners or production deployment, that’s what I use for most of my personal projects.
For a broader Docker primer on running Python in containers, see run your Python app in Docker.
Why choose uv in 2026?
uv has gone from an experimental package installer to a complete Python project management tool. With ~88,800 GitHub stars and adoption by major projects (FastAPI, and others), it’s mainstream now.
The speed difference is real: 10-100x faster than pip for dependency installation and resolution. But the bigger win is workflow simplification. One binary replaces pip, venv, pipx, poetry, and pyenv. The uv.lock file gives you reproducible builds without the fragility of pinned requirements.txt files.
For beginners, uv removes the friction of managing Python environments. For experienced developers, the CI-friendly flags (--frozen, --locked, --check), managed Python versions, and built-in build/publish pipeline save real time. Whether you’re building a small script or scaling to one of the best Python web frameworks, uv handles the tooling so you can focus on the code.
What’s Next?
Now that you’ve got the basics down, here are more things you can do with uv:
- Script Execution: Run standalone Python scripts without creating full projects — Running Test Scripts with uv: No Dependencies Management Required
- Text-to-Speech: Build an audio generation script — Text-to-Speech with uv: Create Audio from Text in Python
- URL Checker: Build a bulk URL checker with uv
- Deployment: Deploying a Python uv Project with Git and Railpack in Dokploy
- AI Agents: Build AI agents with Agno and uv
- AI Research Squad: Build an AI research squad with Agno, Streamlit, and uv
- Web UI: Build a UI for your Python app with FastHTML
- Docker: Run your Python app in Docker
Conclusion
Getting started with uv is straightforward: install the binary, run uv init, add dependencies with uv add, and execute with uv run. The whole workflow takes minutes, not the afternoon you’d spend wrestling with pip and venv manually.
In 2026, uv is the fastest way to manage Python projects. It handles packages, virtual environments, Python versions, scripts, and even build/publish. One tool, one lockfile, reproducible builds across machines and CI.
To stay updated, check the official documentation at docs.astral.sh/uv or the GitHub repo at github.com/astral-sh/uv.
Install uv, initialize a project, and see the difference for yourself.
Troubleshooting and common issues
uv: command not found after install
The installer adds uv to $HOME/.local/bin, which may not be in your PATH. Fix:
source $HOME/.local/bin/envTo persist it, run uv python update-shell and restart your terminal. On Windows, use uv tool update-shell.
The following commands are shadowed by other commands
This means another uv or uvx binary exists earlier in your PATH (e.g., from a pip install uv or Homebrew). Options:
- Reorder your PATH so
$HOME/.local/bincomes first. - Use the full path:
~/.local/bin/uv. - Remove the other installation (
pip uninstall uvorbrew uninstall uv).
No solution found when resolving dependencies
This means uv can’t find a set of package versions that satisfy all your constraints. Common causes:
- Version pin too strict:
"requests>=2.31.0,<=2.31.5"might conflict with another package. - You need a pre-release: add
--preto allow pre-release versions, or specify"pkg>=Xa0"in your dependency.
Since uv 0.12.0, the default pre-release policy is if-necessary — uv will install pre-releases only if no stable version satisfies the constraints.
uv venv won't recreate my virtual environment
Since uv 0.10.0, uv venv will not overwrite an existing .venv directory. Use:
uv venv --clear    # removes and recreates .venv
uv venv --force    # for non-venv directories
TLS/certificate errors with private indexes
Since uv 0.11.0, the --native-tls flag is deprecated. For corporate or self-hosted package indexes with custom certificates:
- Use
--system-certsto trust your system’s certificate store. - Set
SSL_CERT_FILEorSSL_CERT_DIRenvironment variables to point to your custom CA.
Disk space / cache management
uv uses a global cache to deduplicate downloaded packages. On a VPS with limited storage:
uv cache dir    # find the cache location
uv cache clean  # reclaim disk space
The cache is shared across all projects, so cleaning it affects everything.
FAQ
How fast is uv compared to pip?
10-100x faster, depending on the workload. The Rust-built dependency resolver and aggressive caching make the biggest difference on projects with many dependencies.
Can I use uv with existing projects?
Yes. Run uv sync in any project with a pyproject.toml or requirements.txt to install dependencies. uv reads standard Python project files — no migration needed.
Does uv replace pip, venv, and pyenv?
Yes. uv handles package installation, virtual environments, Python version management, script execution, and build/publish in a single binary. You can uninstall pip, venv, pipx, poetry, and pyenv if you switch to uv for everything.
Is uv production-ready?
Yes. ~88,800 GitHub stars, adopted by major projects, and widely used in CI/CD pipelines. The uv.lock file ensures reproducible builds across platforms. The --frozen and --locked CI flags are designed for production pipelines.
How do I check for security vulnerabilities?
uv audit (currently in preview) checks your dependencies for known vulnerabilities and malware. It’s worth running periodically, especially before deploying.