VPS Setup for AI Coding Agents: Secure, Accessible, Ready to Code
Set up a VPS to run AI coding agents like opencode, lock it down with CrowdSec, and access it from your Mac through Zed, VS Code, or a browser terminal.

14 min read
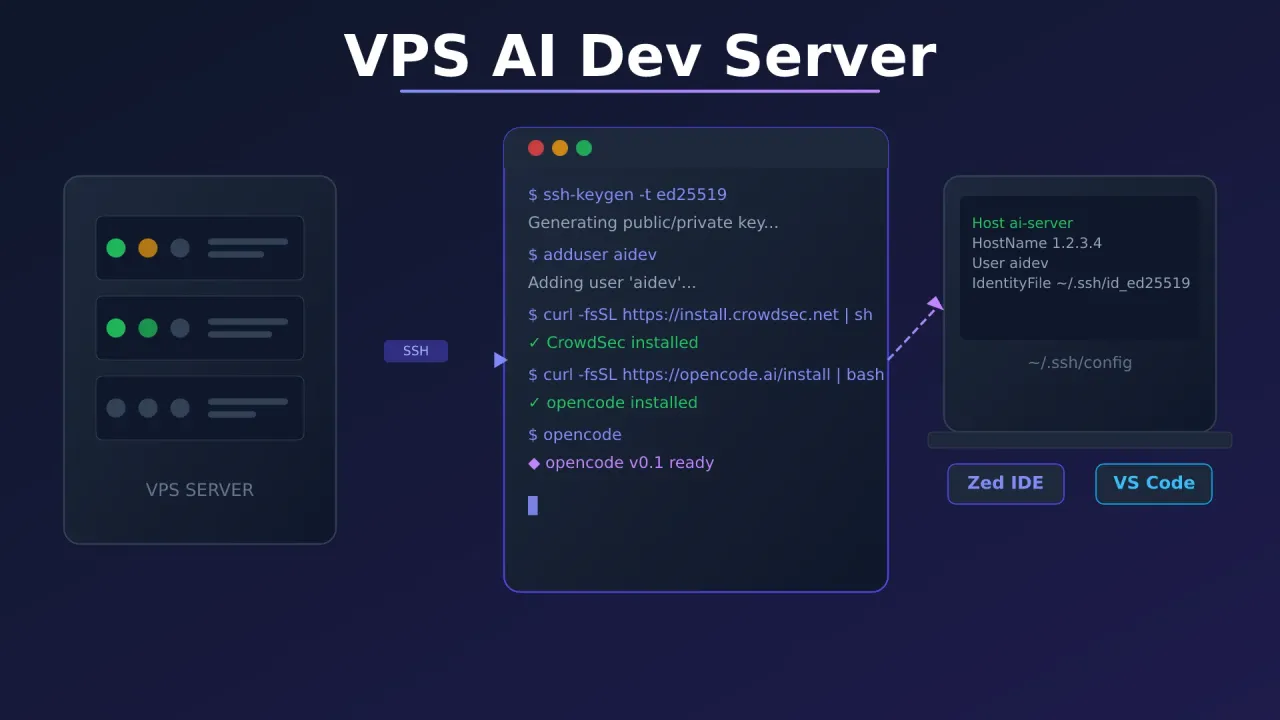
Running AI coding agents on your laptop is fine until your fan sounds like a jet engine and your battery drops 30% in an hour. A VPS fixes all of that. You get a machine that runs 24/7, handles the compute load, and lets you connect from anywhere — your desk, a café, or your phone.
This guide walks through the full setup: creating SSH keys, adding a locked-down user, securing the server with CrowdSec, setting up a nice terminal with Starship, installing opencode, and connecting from your Mac through Zed, VS Code, or a browser terminal with Termix.
Hetzner €20 Free Credit Hostinger VPSVPS prices jumped across the board in 2026 — if you’re rethinking a rented box, see what changed and when a mini PC wins.
A VPS with 2 vCPUs and 4 GB RAM is enough to get started. opencode itself is lightweight — the heavy lifting happens in the LLM APIs, not on your server.
What you need before starting
- A VPS running Ubuntu 22.04 or 24.04 (any provider works)
- A Mac as your local machine
- An API key for at least one LLM provider (Anthropic, OpenAI, Google, etc.)
- Basic comfort with the terminal
Step 1: Create SSH keys on your Mac
Before touching the server, generate a key pair on your local machine. You’ll use this key to log in without passwords.
Open Terminal on your Mac and run:
ssh-keygen -t ed25519 -C "[email protected]"Press Enter to accept the default path (~/.ssh/id_ed25519), then set a passphrase when asked. You can leave it blank, but a passphrase adds a useful layer of protection if someone gets your laptop.
Check that the keys were created:
ls ~/.ssh/
# id_ed25519  id_ed25519.pub
The .pub file is your public key. That goes on the server. The other file never leaves your machine.
Add the key to your SSH agent
So you don’t have to type the passphrase every time:
eval "$(ssh-agent -s)"
ssh-add --apple-use-keychain ~/.ssh/id_ed25519
Step 2: First login and server prep
Log into your VPS as root using the temporary password or key your provider gave you:
ssh root@your_server_ipUpdate the system first:
apt update && apt upgrade -yAdd swap space
Most budget VPS plans have limited RAM. Swap prevents out-of-memory crashes:
fallocate -l 4G /swapfile
chmod 600 /swapfile
mkswap /swapfile
swapon /swapfile
echo '/swapfile none swap sw 0 0' | tee -a /etc/fstab
Step 3: Create a user and add them to sudo
Running everything as root is asking for trouble. Create a regular user for daily work:
adduser aidevFollow the prompts — set a password, skip the rest of the fields.
Add the user to the sudo group:
usermod -aG sudo aidevAllow sudo without a password (since you’ll be using SSH key auth, not passwords):
echo "aidev ALL=(ALL) NOPASSWD:ALL" | tee /etc/sudoers.d/aidev
chmod 0440 /etc/sudoers.d/aidev
Copy your SSH public key to the new user
mkdir -p /home/aidev/.ssh
cp /root/.ssh/authorized_keys /home/aidev/.ssh/
chown -R aidev:aidev /home/aidev/.ssh
chmod 700 /home/aidev/.ssh
chmod 600 /home/aidev/.ssh/authorized_keys
If your root account didn’t have an authorized_keys file (you logged in with a password), paste the contents of your local ~/.ssh/id_ed25519.pub into /home/aidev/.ssh/authorized_keys manually.
Test the new user before doing anything else
Open a second terminal on your Mac and verify the connection works:
ssh aidev@your_server_ipOnce inside, confirm sudo works:
sudo whoami
# root
Keep both terminal windows open until you’ve finished locking things down.
Step 4: Harden SSH access
Switch to the aidev session for the rest of this guide. Now tighten SSH so it only accepts keys and ignores passwords.
sudo nano /etc/ssh/sshd_configFind and set these lines:
PermitRootLogin no
PasswordAuthentication no
PubkeyAuthentication yes
Also add a 15-minute idle timeout so abandoned sessions don’t pile up:
ClientAliveInterval 900
ClientAliveCountMax 0
Save the file, then restart SSH:
sudo systemctl restart sshTry connecting again from your Mac to confirm it still works. If it does, your key auth is solid.
Step 5: Secure the server with CrowdSec
CrowdSec watches your logs for brute-force attempts, port scans, and other bad behavior. When it spots something suspicious, it blocks the source IP. It’s free and surprisingly effective.
Install CrowdSec
curl -s https://install.crowdsec.net | sudo sh
sudo apt update && sudo apt install crowdsec -y
Install the firewall bouncer
The bouncer is what actually drops traffic from blocked IPs:
sudo apt install crowdsec-firewall-bouncer-iptables -ySet up firewall rules
Allow only what you need:
# Keep existing connections alive
sudo iptables -A INPUT -m conntrack --ctstate ESTABLISHED,RELATED -j ACCEPT

# Allow loopback
sudo iptables -A INPUT -i lo -j ACCEPT

# Allow SSH
sudo iptables -A INPUT -p tcp --dport 22 -j ACCEPT

# Allow HTTP and HTTPS (if you later add a web service)
sudo iptables -A INPUT -p tcp --dport 80 -j ACCEPT
sudo iptables -A INPUT -p tcp --dport 443 -j ACCEPT

# Drop everything else
sudo iptables -P INPUT DROP
Make firewall rules survive reboots
sudo apt install iptables-persistent -y
# Select Yes when asked to save IPv4 and IPv6 rules
sudo netfilter-persistent save
Verify CrowdSec is running
sudo systemctl status crowdsec
sudo cscli collections list   # should show crowdsecurity/sshd
sudo cscli bouncers list       # should show the firewall bouncer
CrowdSec automatically monitors SSH login attempts. Anything that looks like a brute-force attack gets banned without you lifting a finger.
Useful commands to check on it later:
sudo cscli decisions list   # active bans
sudo cscli alerts list      # recent events
Step 6: Set up Starship with Catppuccin theme
A good prompt makes a big difference when you’re spending hours in a terminal. Starship is fast, informative, and easy to customize.
Install Starship as the aidev user:
curl -sS https://starship.rs/install.sh | shAdd it to your shell’s config. For bash:
echo 'eval "$(starship init bash)"' >> ~/.bashrcApply the Catppuccin Mocha theme
Download the theme palette directly into your Starship config:
mkdir -p ~/.config
curl -o ~/.config/starship.toml \
  https://raw.githubusercontent.com/catppuccin/starship/refs/heads/main/themes/mocha.toml
Reload your shell:
source ~/.bashrcYour prompt now shows Git status, the current directory, language versions, and exit codes — all in Catppuccin Mocha colors. The full setup walkthrough, including Ghostty terminal configuration, is in this guide.
Step 7: Install opencode
opencode is an open-source AI coding agent that runs in your terminal. It supports Anthropic, OpenAI, Google, and 70+ other LLM providers.
curl -fsSL https://opencode.ai/install | bashOnce installed, set your API key. For Anthropic:
export ANTHROPIC_API_KEY="your-key-here"To make it permanent:
echo 'export ANTHROPIC_API_KEY="your-key-here"' >> ~/.bashrc
source ~/.bashrc
Start opencode in any directory:
opencodeIt opens an interactive terminal UI where you can ask it to write code, explain errors, refactor files, or anything else you’d use an AI coding assistant for.
Run opencode in a persistent session with tmux
If you want opencode to keep running after you disconnect, use tmux:
sudo apt install tmux -yStart a named session:
tmux new -s codingRun opencode inside it, then detach with Ctrl+B, D. When you reconnect later, reattach with:
tmux attach -t codingYour session and whatever opencode was doing will be exactly where you left it.
Step 8: Configure SSH on your Mac
Now make connecting to the server as easy as typing its name. Edit your local SSH config:
nano ~/.ssh/configAdd this block:
Host ai-server
    HostName your_server_ip
    User aidev
    IdentityFile ~/.ssh/id_ed25519
    AddKeysToAgent yes
    UseKeychain yes
Now you can connect with just:
ssh ai-serverNo IP address, no username, no key path to remember.
Step 9: Connect with Zed IDE
Zed has built-in remote development support. Your Mac runs the editor UI, while the actual files and processes live on the server. This means the editor is fast and responsive even if the server is across the world.
- Download and install Zed on your Mac
- Open Zed and press
Cmd+Shift+P, then search for “Remote Projects” - Click Connect New Server
- Enter your SSH host:
ssh://ai-server(using the alias you set in~/.ssh/config) - Zed installs a small headless server on your VPS automatically
- Once connected, choose a folder to open (e.g.,
/home/aidev/projects)
You get a full editor experience — file tree, terminal, AI features — but all the heavy work happens on the server. You can also open it from the terminal:
zed ssh://ai-server/home/aidev/projects/my-projectThe terminal inside Zed connects directly to your server, so you can run opencode right there alongside your editor.
Step 10: Connect with VS Code
If you prefer VS Code, the Remote SSH extension gives you a similar experience.
- Install the Remote - SSH extension from the extensions panel
- Press
Cmd+Shift+Pand search for Remote-SSH: Connect to Host - Select
ai-server(it reads your~/.ssh/configautomatically) - VS Code installs its server component on the VPS and opens a remote window
- Open a folder on the server and you’re in
The integrated terminal connects to the server, so you can run opencode, git, or anything else right alongside your editor. Extensions run on the server side, so Python linting, formatters, and language servers work exactly as they would locally.
Step 11: Access from anywhere with Termix
Zed and VS Code are great when you’re at your computer, but sometimes you want to jump into a terminal from a browser or another device without installing anything. Termix is a self-hosted web terminal you can run on your VPS.
The full setup is covered in the Termix self-hosting guide. The short version: deploy Termix on your server, put it behind a reverse proxy with HTTPS, and you get a full terminal in any browser.
Once it’s running, you can:
- SSH into sessions from your iPad or phone
- Share a terminal link with a collaborator
- Access your opencode sessions without installing anything on the client
Security note
Put Termix behind authentication. The guide covers this, but worth emphasizing: a web terminal with no auth is a wide-open door. Use HTTP basic auth, an auth proxy, or Termix’s built-in token system.
What to do next
With the server running, here are a few things worth setting up:
Nerd Fonts for Starship icons — Starship uses icons that only render correctly with a Nerd Font. Install one like FiraCode Nerd Font in your terminal and configure it in Zed or VS Code.
Node.js or other runtimes — If you’re working on JavaScript projects, install Node.js via nvm so you can switch versions easily:
curl -o- https://raw.githubusercontent.com/nvm-sh/nvm/v0.39.7/install.sh | bash
source ~/.bashrc
nvm install --lts
Git configuration — Set your name and email on the server so commits look right:
git config --global user.name "Your Name"
git config --global user.email "[email protected]"
Automatic security updates — Keep the server patched without thinking about it:
sudo apt install unattended-upgrades -y
sudo dpkg-reconfigure --priority=low unattended-upgrades
Wrapping up
What you have now:
- A VPS with a locked-down user, key-only SSH, and CrowdSec watching for threats
- A clean terminal with Starship and Catppuccin Mocha
- opencode ready to run AI coding tasks with any LLM provider
- SSH config on your Mac so connecting takes one command
- Zed and VS Code wired up for full remote development
- Termix for browser-based access when you’re away from your machine
The whole setup takes about 30 minutes. After that, your laptop stays cool, the AI agent keeps running whether you’re connected or not, and you can pick up where you left off from any device.