How To Deploy An Astro.JS Blog On Cloudflare
Deploy an Astro.JS blog or website to CloudFlare Pages for free.

Table of Contents
I am a WordPress user for years and lately, I have wanted to try something new and see how different it is. I have another website WP Doze where I write about WordPress things but wanted to try something different. After searching online I found Gatsby a static website generator that can help you have a blog or website fast, did a lot of Gatsby courses to find out what is about and eventually came across Astro.
Astro is not around for a long time but it is here to stay, I like it as it is fast and it is easy to set it up. Same as with Gatsby in the beginning I have searched online for a lot of Astro.js Trainings to see what is about and modify some aspects myself if I need it.
In this article, we will see how you can deploy your Astro website on Cloudflare pages and have a free blog or website in the function of your needs.
I will use the GitHub Bit Doze blog theme for the deployment and guide you through what you need to change to host your blog. The Theme is built on AstroWind theme and you can install either as it’s the same and you should change the same thing just mine has only the blog things active.
How To Deploy An Astro.Js Blog On Cloudflare
You can check this tutorial showing how you can deploy Astro on your VPS with a Heroko or Netlify alternative Coolify: Coolify Install A Free Heroku and Netlify Self-Hosted Alternative or How to Deploy Astro on Your VPS with EasyPanel
1. Setup Node.js and Github
Cloudflare Pages are using GitHub to fetch the details and node.js is needed so you can view the project before deploying it on Cloudflare to be sure is working to prepare your laptop just follow the below 2 tutorials to get you going:
2. Fetch the AstroWind theme or Bit Doze simpified theme
To do this you need to open the GitHub project and hit Use this template button. Be sure you are logged in to have this enabled.
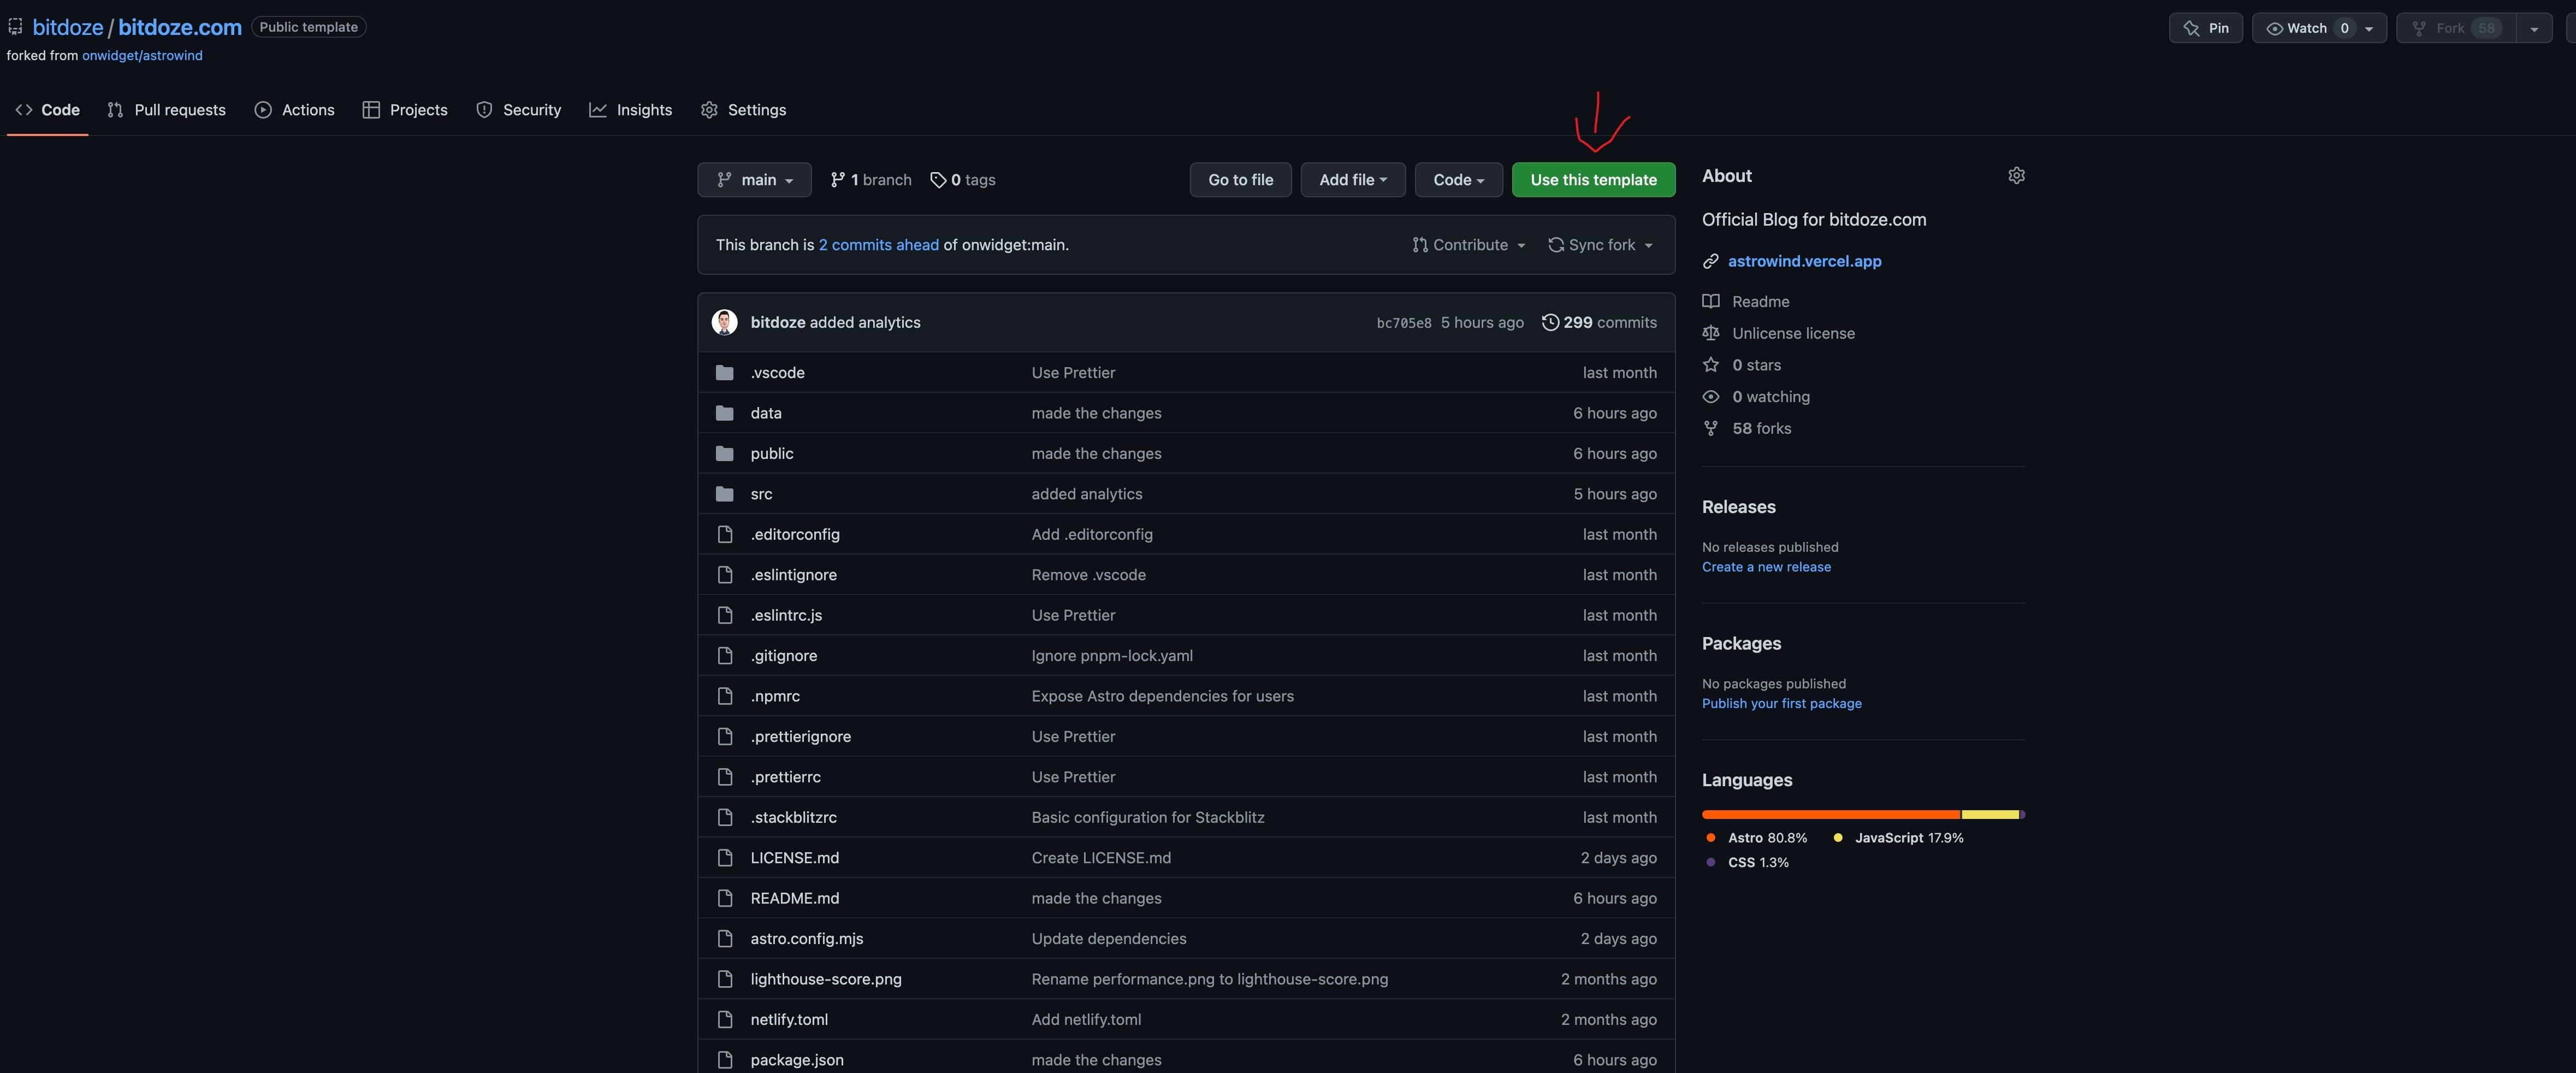
After you just need to go and clone the project on your laptop with:
git clone <path to the repo you have>
#Example:
git clone [email protected]:bitdoze/bitdoze.com.git
Then you will need to go and install all the packages and update them if you want. To do That you should do:
npm install
npm update
Video With Astro.js Deploy
3. Modify the theme files
3.1 Modify URL with Title and Description
AstroWind theme or Bit Doze simplified theme has a config file that you need to modify it and change the details for your website. The location is under src/config.mjs
Here replace the:
- name - with your website name
- origin - with the URL for your website
- basePathname - add something in case this is using a subdirectory
- title - will be used in the main URL
- description - website description
- googleAnalyticsId - in case you want analytics added to the website
- googleSiteVerificationId- for Google Web Central ( I recommend the use of DNS verification instead)
Other changes are for the url, category, tags. You can let them like this if you want. Below is the file used for bitdoze.com:
export const SITE = {
  name: "Bit Doze",

  origin: "https://www.bitdoze.com",
  basePathname: "/",

  title: "Bit Doze Website",
  description:
    "An Website about Linux, blogging, CMS and other internet news..",

  googleAnalyticsId: false, // or "G-XXXXXXXXXX",
  googleSiteVerificationId: "jyQEUqY6oYZKY6ZhkHatU7g4vVBBSb7z3Zw5bA",
};

export const BLOG = {
  disabled: false,
  postsPerPage: 9,

  blog: {
    disabled: false,
    pathname: "blog", // blog main path, you can change this to "articles" (/articles)
  },

  post: {
    disabled: false,
    pathname: "", // empty for /some-post, value for /pathname/some-post
  },

  category: {
    disabled: false,
    pathname: "", // set empty to change from /category/some-category to /some-category
  },

  tag: {
    disabled: false,
    pathname: "tag", // set empty to change from /tag/some-tag to /some-tag
  },
};
3.2 Modify Header Links
The themes is using by default my blog categories so you need to add the categories you want and pages in the menu. To alter them you just need to open the file under src/components/widgets/Header.astro
In here just add or delete the li by modifying the href with the path you have, eg:
<li>
  <a
    class="font-medium hover:text-gray-900 dark:hover:text-white px-4 py-3 flex items-center transition duration-150 ease-in-out"
    href="/cms/"
    >CMS</a
  >
</li>
To add a new thing just add a new li and change the url and name.
3.3 Modify the footer links
In the footer I have some links to my twitter and GitHub profile, you should change them or delete them as per your needs. This can be done from src/components/widgets/Footer.astro
<li>
  <a
    class="text-gray-500 dark:text-gray-400 hover:bg-gray-100 dark:hover:bg-gray-700 focus:outline-none focus:ring-4 focus:ring-gray-200 dark:focus:ring-gray-700 rounded-lg text-sm p-2.5 inline-flex items-center"
    aria-label="Twitter"
    href="https://twitter.com/bitdozecom"
  >
    <Icon name="tabler:brand-twitter" class="w-5 h-5" />
  </a>
</li>
3.4 Modify the Logo
Logo is a text one, created from a gradient colour of primary and secondary, to modify it you just need to go under src/components/atoms/Logo.astro and modify the text:
<span
  class="bg-clip-text font-bold text-4xl text-transparent bg-gradient-to-r from-primary-500 to-secondary-500 sm:whitespace-nowrap"
>
  Bit Doze</span
>
3.5 Modify the Hero with your description and social links
In the front page I have Hero with the welcome and social links, to modify the text icons and links you should alter the src/components/widgets/Hero.astro In here you have the h1 and div with text and ul with the social icons. This is using Astra Icon so you can add anything you want.
<h1
  class="text-5xl md:text-[3.50rem] font-bold leading-tighter tracking-tighter mb-4 font-heading"
>
  Welcome to
  <span
    class="bg-clip-text text-transparent bg-gradient-to-r from-primary-500 to-secondary-500 sm:whitespace-nowrap"
    >Bit Doze</span
  >
</h1>
<div class="max-w-3xl mx-auto">
  <p class="text-xl text-gray-600 mb-8 dark:text-slate-400">
    Join the community to find out more about, VPS, blogging, CMS.
  </p>
</div>

<ul
  class="flex justify-center items-center mb-4 md:order-1 -ml-2 md:ml-4 md:mb-0"
>
  <li>
    <a
      class="text-gray-500 dark:text-gray-400 hover:bg-gray-100 dark:hover:bg-gray-700 focus:outline-none focus:ring-4 focus:ring-gray-200 dark:focus:ring-gray-700 rounded-lg text-sm p-2.5 inline-flex items-center"
      aria-label="Twitter"
      href="https://twitter.com/bitdoze"
    >
      <Icon name="tabler:brand-twitter" class="w-20 h-20" />
    </a>
  </li>
</ul>
3.5 Modify the main colours
The theme is coming with the main colour that is used around the components to change the color you can take a look on tailwind colors and modify the tailwind.config.cjs under colors primary and secondary
colors: {
				primary: colors.blue,
				secondary: colors.indigo,
			},
3.6 Cleanup Assets folder and data folder
Currently, the theme has my mdx posts and images, you may want to clean up the src/assets/images/ and data/blog/ to add your md files with articles and things.
3.7 Add You Articles to the first page Blog Roll
After you added your own articles with picture to modify the first page articles you need to go under src/components/blog/HighlightedPosts.astro and add your articles. Just replace the below with your own:
const ids = [
  "deploy-astrojs-cloudflare",
  "best-astrojs-online-courses",
  "link-github-with-ssh-maco-linux",
  "install-nodejs-using-nvm-macos-ubuntu",
  "gatsby-js-online-courses",
  "embed-youtube-videos-to-gatsby",
];
4. Preview the changes and update the GitLab project with the latest changes
After we confirm the project and have added our article we can see if everything is OK and we can push the project to GitLab to host it in Cloudflare Pages.
To preview the changes just run:
npm run devOpen the localhost:3000 or the link specified to see if you have everything in order. In case everything looks good you should proceed and push the project to GitLab:
git add .
git commit -m "configured my website"
git push
5. Host the project in CloudFlare
Cloudflare can be used to host Astro, they have also this documentation Deploy Astro Sites
With the free account, you have 500 monthly builds and you benefit from their CDN so the website is very fast. These 500 builds are more than enough to host a blog or have a few. Every time you push an article or a change to GitHub Cloudflare will pick the latest change and will count it as a build.
You need to go under Pages and add create a project. There you connect it to your git repo and begin the setup.
You choose:
- Production branch: main
- Build command: npm run build
- Build directory: dist
- Environment Variables NODE_VERSION: 16
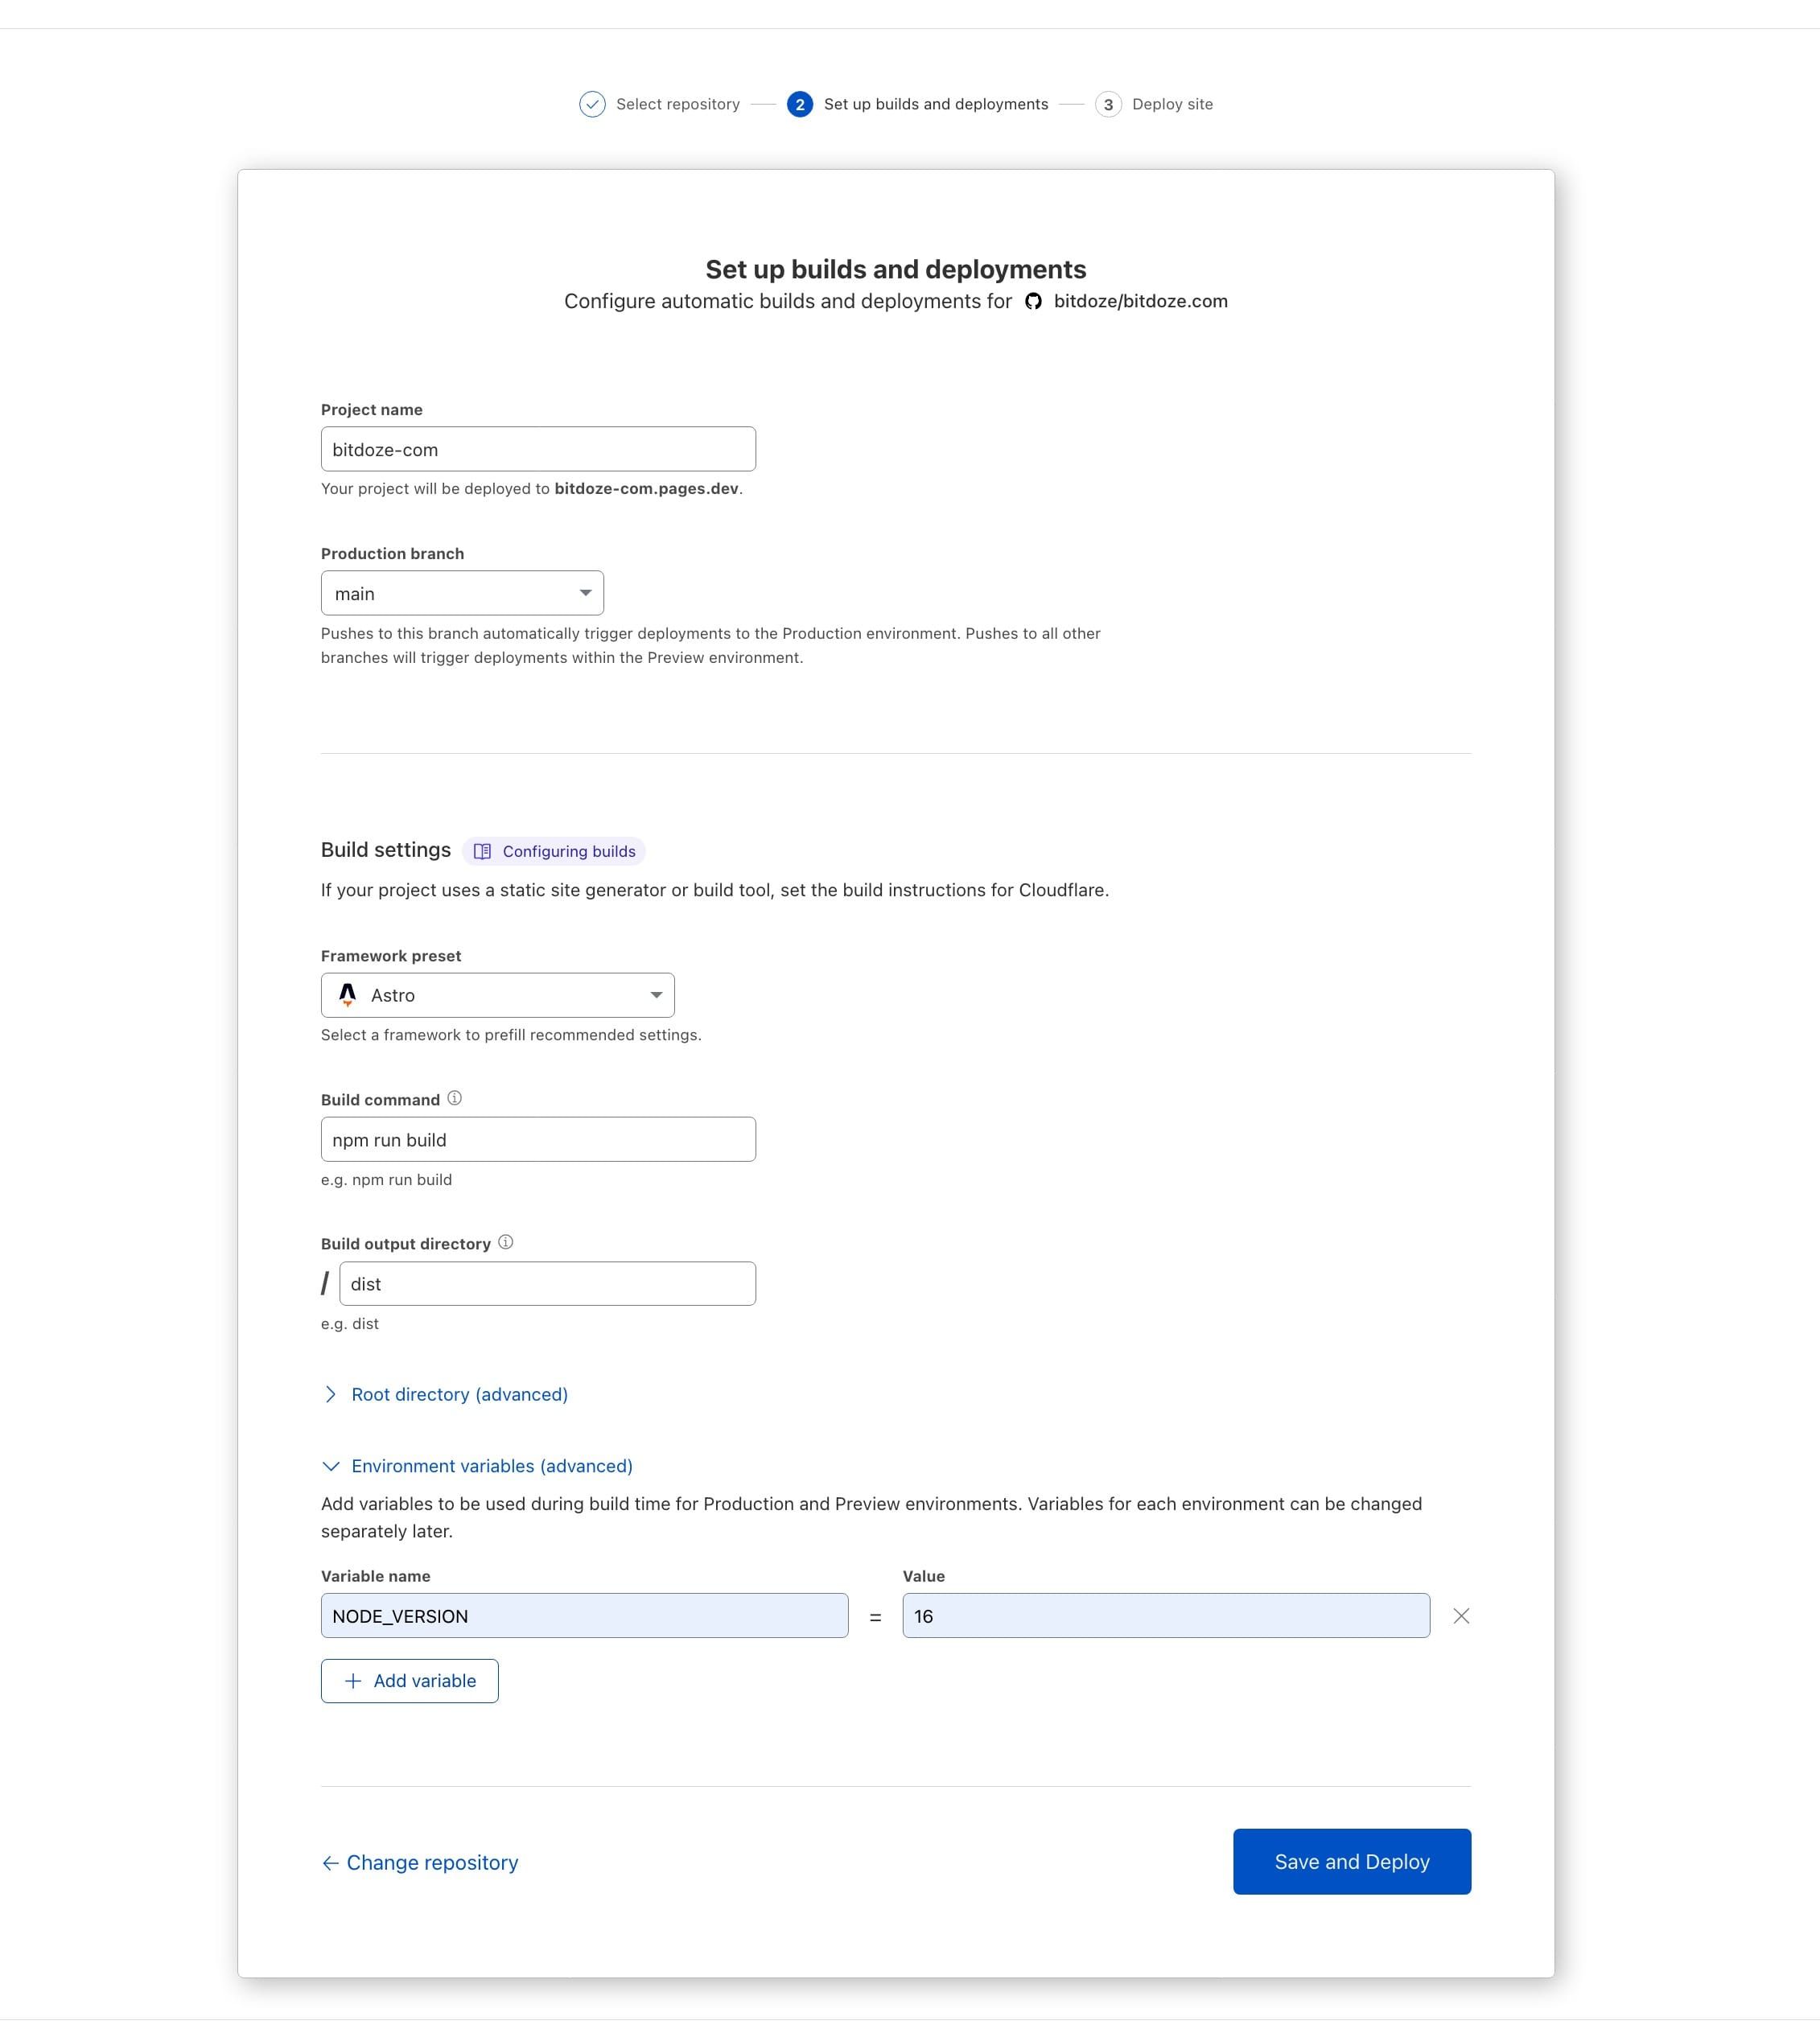
Then you hit save and deploy and that is all. When you want to add an article you just need to push the change and Cloudflare will do the rest.
Next, you can check the below articles about Astro:
Related Posts

How To Extract Text From PDF In Command Line On Linux
Learn how to extract text from PDF files in command line on Linux using a simple and powerful tool called poppler-utils.
How to Deploy Astro on Your VPS with EasyPanel
Learn how to deploy Astro static website on your own VPS with EasyPanel

How to Install Node.js using NVM on MacOS and Ubuntu
Tutorial of how Node.js can be installed on MacOS and Ubuntu to start your node projects.