How To Install CloudPanel and Host Node.js Apps (2026)
Install CloudPanel on a VPS and host Node.js apps step by step: Nginx + SSL setup, deploying Strapi 5, and keeping it online with PM2. Updated for 2026.

34 min read
This guide shows you how to install CloudPanel on a VPS and host Node.js apps end to end: a fresh VM, a Node.js site behind Nginx with SSL, a Strapi 5 deployment, and PM2 so the app survives reboots. CloudPanel is a free hosting panel with no licensing fees and no per-site limits. The current release is v2.5.4 (July 2026), which adds Node.js 24 LTS, MariaDB 12.3, and Ubuntu 26.04 support, and the steps below match that stack.
If you are still shopping around for a panel, I keep a separate rundown of the best self-hosted server panels and what each one is good at.
- A fresh VPS that is a real VM (not LXC/LXD/OpenVZ) with root SSH access
- Ubuntu 26.04, 24.04, or 22.04 LTS, or Debian 13/12
- 1 CPU core, 2 GB RAM, 10 GB disk at minimum (4 GB RAM if you will build Strapi on the box)
- A domain or subdomain you can point at the VPS IP
- 20 to 30 minutes
Related CloudPanel guides
Want CloudPanel as a reverse proxy for Docker containers? See Setup CloudPanel with Docker and Dockge. For off-site backups of your sites and databases, see CloudPanel remote backups. Looking for free self-hosted apps? Check the toolhunt.net self hosted section.
The default setup for this guide is a Hetzner CX22/CX32-class VM running Ubuntu 24.04. The commands below match CloudPanel’s Hetzner installer docs as of September 2026.
What CloudPanel offers
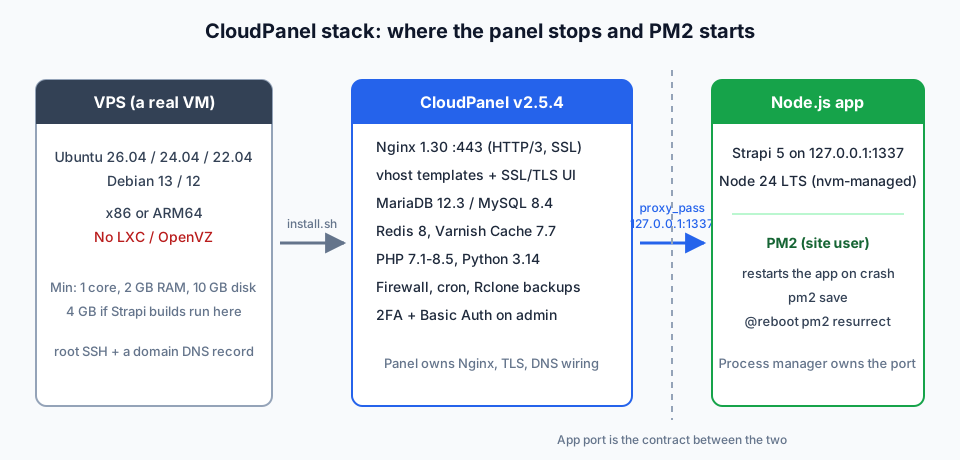
You get a lot for $0. Versions below are what the current v2.5.x line ships:
- Nginx 1.30 with HTTP/3 and the PageSpeed module
- Node.js 12 to 24 (LTS versions only, including 24)
- PHP 7.1 to 8.5 and Python 3.14
- MySQL 8.0/8.4 and MariaDB up to 12.3
- Redis 8 and Varnish Cache 7.7 (useful for WordPress, see speed up WordPress with CloudPanel Varnish Cache)
- Free Let’s Encrypt certificates and Cloudflare integration
- Remote backups with Rclone
- Firewall, cron jobs, vhost editor, and 30+ configured vhost templates
- SSH/FTP access, file manager, IP and bot blocker
- Two-Factor Authentication and Basic Auth on the admin area
- User management and system resource usage graphs
The panel is open-core. The cloudpanel-io/cloudpanel-ce repository has around 1.9k stars and the last push landed on 2026-07-01, so it is still actively maintained.
The split of responsibilities matters for the rest of this guide. CloudPanel owns Nginx, TLS, and the database. It proxies traffic to your app’s port and stops there. Your Node.js process, and keeping it alive, is your job (PM2 handles that in section 3):
Minimum requirements
- 1 CPU core (2+ recommended for production). Both x86 and ARM64 work, so cheap ARM boxes like Hetzner CAX or Oracle Ampere shapes are fair game.
- 2 GB RAM (4 GB+ recommended for production)
- 10 GB disk space
No Linux container support
CloudPanel supports virtual machines only. LXC, LXD, and OpenVZ containers are not supported and will break in weird ways. A lot of the cheapest VPS offers are container-based under the hood, so check what you are buying before you order.
If you want to monitor server resources like CPU, memory, and disk space, check: How To Monitor Server and Docker Resources. If you want email alerts when load spikes: Monitor CPU Usage and Send Email Alerts in Linux.
Cost order of magnitude for a box that fits this stack: Hetzner runs about EUR 4 to 8 per month, DigitalOcean and Vultr land around USD 10 to 12 for comparable specs, and Hostinger is often cheaper on a longer term. Strapi plus MariaDB is comfortable on 4 GB, so that USD 10 to 15 per month class is the sweet spot.
Choosing a VPS
CloudPanel has direct cloud integrations with DigitalOcean, Vultr, Hetzner, Hostinger, AWS, Google Cloud, Donweb, Microsoft Azure, and Oracle Cloud. On supported providers you can create and manage snapshots straight from the CloudPanel UI.
This article uses Hetzner with Ubuntu 24.04. If you are picking a provider, my comparison of DigitalOcean vs Vultr vs Hetzner goes into the price/performance tradeoffs, and how to benchmark cloud servers shows how to check a VPS before you commit workloads to it.
VPS prices jumped across the board in 2026. If you are rethinking a rented box, see what changed and when a mini PC wins - a small box like the ASUS DC510 mini PC class of hardware can pay for itself against years of VPS invoices if you are comfortable hosting at home.
DigitalOcean $100 Free Vultr $100 Free Hetzner €20 Free Hostinger VPSVideo walkthrough
Video is from 2023
The walkthrough was recorded in February 2023. The installer hash, OS list, and Node.js version in the written steps below are current and canonical - use those when they differ from the video.
If you want a web panel that also works as a reverse proxy, check this course:
CloudPanel Setup CourseUpdating an existing CloudPanel install
If you installed CloudPanel after the 2023 version of this article and just need to get current: CloudPanel ships as a deb package and updates with one command as root.
Snapshot first
Take a snapshot or backup before you update. clp-update has been smooth in practice, but a snapshot is the only real rollback path. See CloudPanel remote backups for an off-site option.
sudo clp-updateVerify the new version in the panel footer after the update (you want v2.5.4 or newer).
If you want to test releases before they hit everyone else, there is a test channel:
clpctl cloudpanel:set:release-channel --channel='test'What recent releases shipped: v2.5.4 (2026-07-01) added Node.js 24 LTS, MariaDB 12.3, and Ubuntu 26.04 support; v2.5.3 (2025-12-04) added PHP 8.5 and Debian 13 install fixes; v2.5.2 (2025-08-05) added MySQL 8.4; v2.4.2 (2024-05-21) added HTTP/3 and Node.js 22.
Note: the installer hash in the next section is for new installs. Existing installs just run clp-update; you never re-run the installer.
1. Install CloudPanel
After your VPS is created, SSH in and run the commands below.
1.1 Update the OS
Do this on a fresh VM as root before anything else:
apt update && apt -y upgrade && apt -y install curl wget sudoConfirm you are on a supported OS before moving on:
cat /etc/os-releaseCloudPanel supports Ubuntu 26.04 LTS, 24.04 LTS, 22.04 LTS, and Debian 13 (Trixie) or 12 (Bookworm). Debian 11 is no longer supported.
1.2 Install CloudPanel
The installer hash below is current as of September 2026. Always check the CloudPanel install docs for the latest hash and the full list of database options.
Hetzner + MariaDB 12.3
curl -sS https://installer.cloudpanel.io/ce/v2/install.sh -o install.sh; \
echo "8146dbe0a488e7088b04071b0c34d59aa0ab1fe9dcec382d395fd155c9e6c476  install.sh" | \
sha256sum -c && sudo CLOUD=hetzner DB_ENGINE=MARIADB_12.3 bash install.sh
Hetzner + MySQL 8.4
curl -sS https://installer.cloudpanel.io/ce/v2/install.sh -o install.sh; \
echo "8146dbe0a488e7088b04071b0c34d59aa0ab1fe9dcec382d395fd155c9e6c476  install.sh" | \
sha256sum -c && sudo CLOUD=hetzner DB_ENGINE=MYSQL_8.4 bash install.sh
For new installs on Ubuntu 24.04 or 26.04, take MariaDB 12.3 as the default. MySQL 8.4 is fine if you already run MySQL everywhere else. Which database engines are available depends on your OS:
| OS | Database options |
|---|---|
| Ubuntu 26.04 | MySQL 8.4, MariaDB 12.3, MariaDB 11.8 |
| Ubuntu 24.04 | MySQL 8.4/8.0, MariaDB 12.3/11.4/10.11 |
| Ubuntu 22.04 | MySQL 8.0, MariaDB 11.4/10.11/10.6 |
| Debian 13 | MySQL 8.4/8.0, MariaDB 12.3/11.8 |
| Debian 12 | MySQL 8.4/8.0, MariaDB 12.3/11.4 |
For providers other than Hetzner, change the CLOUD= value (for example CLOUD=aws) or omit it entirely.
The hash rotates
The SHA-256 changes whenever CloudPanel ships a new installer. If sha256sum prints FAILED, the install command did not run and you have a stale hash. Grab the current one from the install docs linked above and re-run.
Failure modes:
sha256sum: FAILED- stale hash, copy the current one from the docs.- Installer aborts immediately - unsupported OS. Re-check
cat /etc/os-releaseagainst the list in 1.1. - Installer errors on
DB_ENGINE- the value is an exact enum string (MARIADB_12.3,MYSQL_8.4, …). Copy it from the docs rather than typing it from memory.
Verify: the installer prints a success message with the https://serverIpAddress:8443 URL. You can also run systemctl status cloudpanel and expect it to be active.
1.3 Access CloudPanel admin
Open https://serverIpAddress:8443. Your browser will complain about a self-signed certificate - click through the warning.
Create the admin user immediately
There is a short window after install where bots could claim the admin account first. Create your admin user right away, and restrict port 8443 to your IP in the firewall until the password is set. Don’t leave 8443 world-open long term. For a fuller lock-down (fail2ban-style blocking on SSH and web ports), see secure a VPS server with CrowdSec.
Hardening checklist once you are in: enable Two-Factor Authentication on the admin area (CloudPanel supports it natively), optionally add Basic Auth on top, and keep 8443 restricted to the IPs you use.
1.4 Create an admin subdomain
To access CloudPanel with a proper SSL certificate instead of the self-signed one, create a subdomain (for example admin.yourdomain.com) and point it to your VPS IP. If you use Cloudflare, add an A record under DNS.
Then go to Settings in the CloudPanel admin and register the subdomain there to secure the admin area.
Verify: https://admin.yourdomain.com loads with a valid certificate (padlock, no browser warning).
2. Deploy a Node.js app on CloudPanel
We will deploy Strapi, an open-source headless CMS built on Node.js. The same process works for any Node.js application. One heads-up: CloudPanel’s own docs still cover Strapi 4 with npx create-strapi-app@latest. This guide uses Strapi 5.55.x (npx create-strapi@latest) on Node 24 LTS.
2.1 Add a Node.js site in CloudPanel
Click Add Site and choose Create a Node.js Site. Fill in your domain, pick a Node.js version, set the app port, and create your site user credentials.
Pick Node.js 24. It is the Active LTS (codename “Krypton”, supported until April 2028), and Strapi 5.55.x supports Node >=20 <=26, so 24 is fully covered. CloudPanel offers Node 12, 14, 16, 18, 20, 22, and 24 (LTS versions only). Node 26 becomes LTS on 2026-10-28 but is not in the panel yet as of v2.5.4.
Set the app port to 1337 for Strapi and remember that number. A mismatch between this value and the port your app listens on is the number one cause of 502 errors later.
CloudPanel UI
Add Site -> Create a Node.js Site, then fill the form:
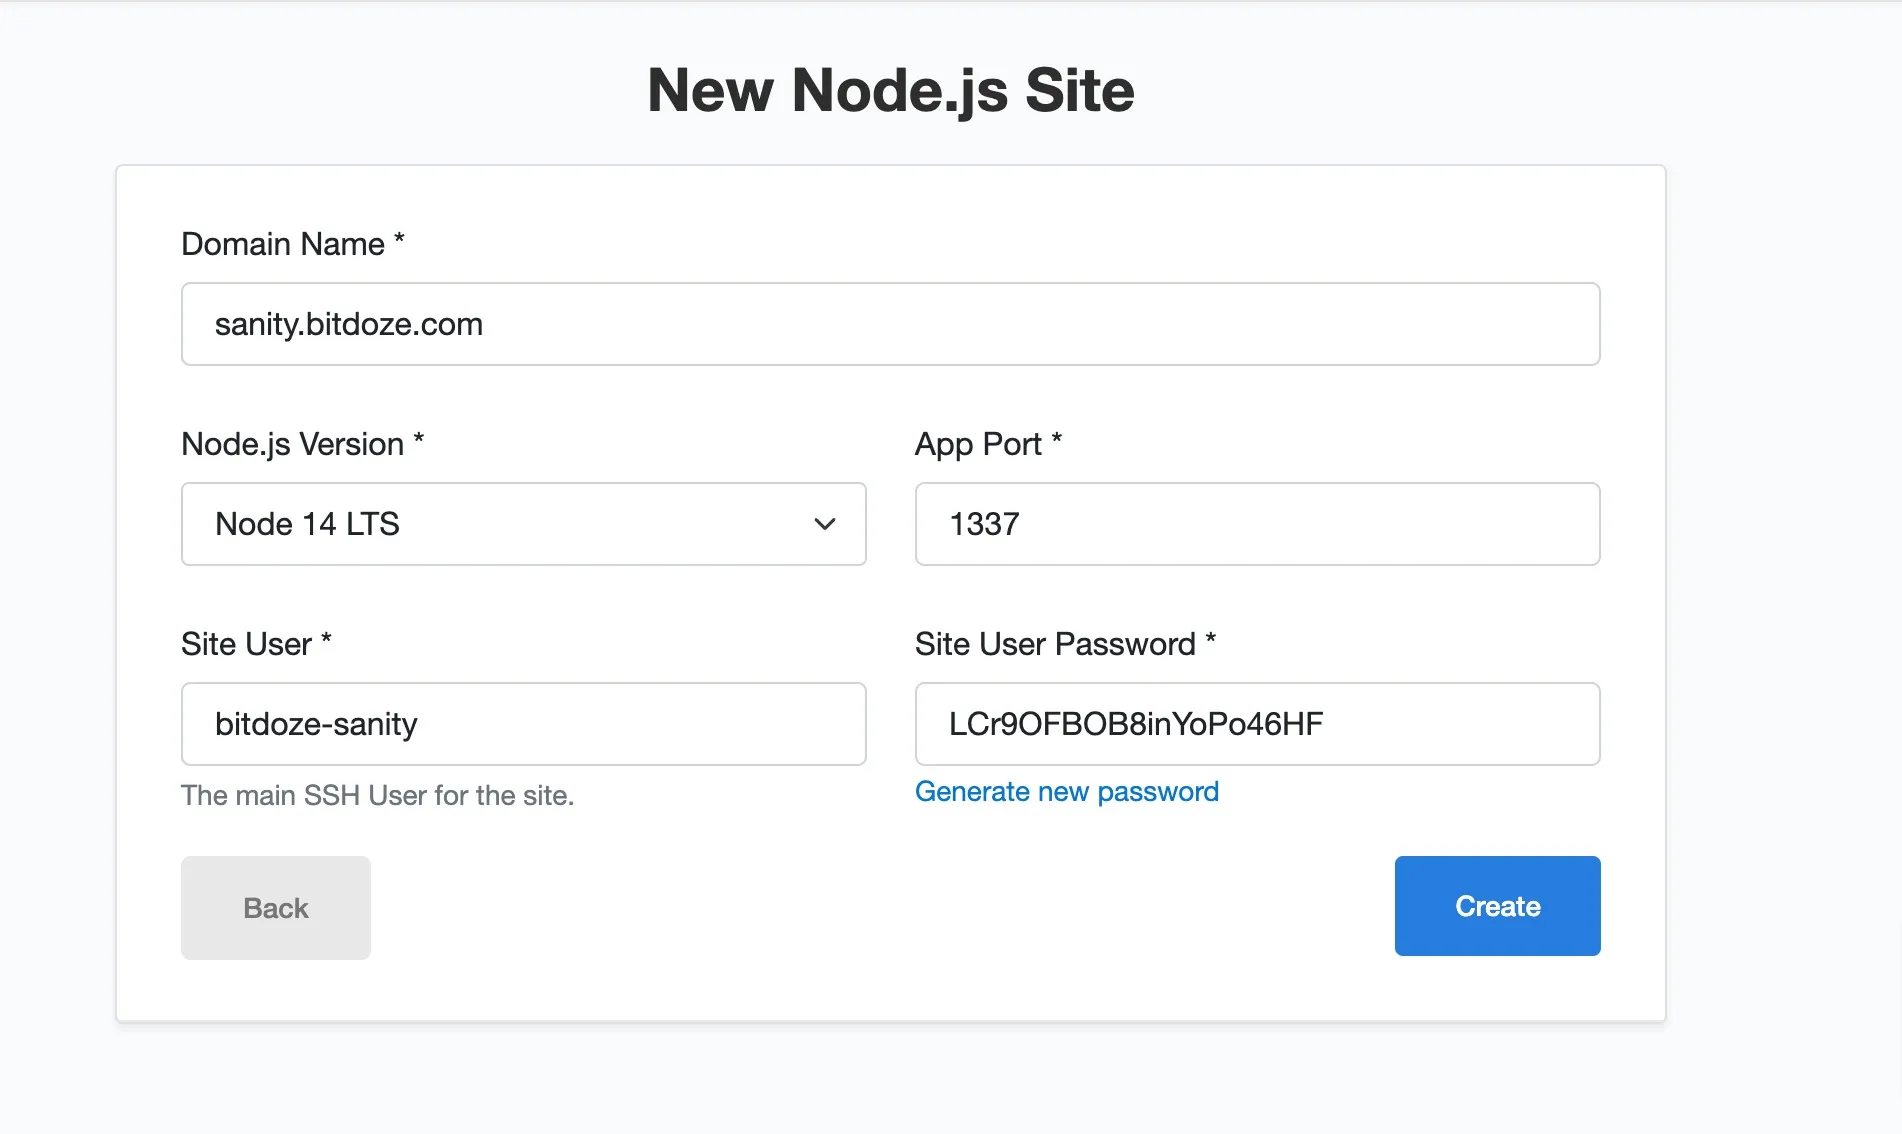
The screenshot predates Node 24 support - the version dropdown now also lists Node.js 24 LTS.
clpctl CLI
If you prefer the terminal, run this as root:
clpctl site:add:nodejs --domainName=www.yourdomain.com --nodejsVersion=24 --appPort=1337 \
  --siteUser='youruser' --siteUserPassword='!secretPassword!'
2.2 Point the domain to CloudPanel
Add an A record in your DNS (for example in Cloudflare) pointing your domain or subdomain to the VPS IP. Enable the Cloudflare proxy if you want CDN benefits. Let’s Encrypt HTTP validation passes through the Cloudflare proxy fine, so no special config is needed for the certificate step.
Verify:
dig +short www.yourdomain.comIt should return the VPS IP.
2.3 Generate the SSL certificate
Go to SSL/TLS for your site in CloudPanel and generate a Let’s Encrypt certificate so the site works over HTTPS.
Verify:
curl -I https://www.yourdomain.comYou should get a response from Nginx. A 502 or 503 at this stage is normal - the app is not running yet. That gets fixed in 2.6.
2.4 Install Strapi
SSH in as the site user (not root):
sudo su - <your-site-username>
cd htdocs && rm -rf www.yourdomain.com
npx create-strapi@latest www.yourdomain.com --skip-cloud
[email protected] is the current release as of September 2026. The CLI asks a few questions (TypeScript or JavaScript, database choice, and so on).
SQLite (quick start)
Accept the defaults. Strapi v5 uses SQLite by default, which is fine for a first deploy:
npx create-strapi@latest www.yourdomain.com --skip-cloudMySQL / MariaDB
To use the database CloudPanel already has running, pass the database flags:
npx create-strapi@latest www.yourdomain.com --skip-cloud \
  --dbclient=mysql \
  --dbhost=127.0.0.1 \
  --dbport=3306 \
  --dbname=strapi_db \
  --dbusername=strapi_user \
  --dbpassword=your_password
Create the database and user first in CloudPanel under Databases or this step fails with a connection error.
Failure modes:
npxdownload failures - node or network problem. Checknode -vand your connectivity.- Permission denied writing files - you are probably still root, or the
htdocs/ownership is wrong. Confirm the prompt shows your site user before runningcreate-strapi.
2.5 Build Strapi for production
cd htdocs/www.yourdomain.com/
NODE_ENV=production npm run build
Strapi builds can OOM on 2 GB
In practice, a Strapi 5 production build can run a 2 GB VM out of memory and the build gets killed. Use a 4 GB VM, or add a swap file before you run npm run build. If you see “JavaScript heap out of memory” or the build just dies with no error, this is why.
If you want to understand how NODE_ENV and other variables reach the app under PM2, see PM2 environment variables.
2.6 Start Strapi
NODE_ENV=production npm startYou’ll see output like:
 Project information

┌────────────────────┬──────────────────────────────────────────┐
│ Time               │ ...                                      │
│ Launched in        │ 1047 ms                                  │
│ Environment        │ production                               │
│ Process PID        │ 121469                                   │
│ Version            │ 5.x.x (node v24.x.x)                    │
│ Database           │ sqlite                                   │
└────────────────────┴──────────────────────────────────────────┘

 Create your first administrator by going to:
 http://0.0.0.0:1337/admin
Verify: the “Launched in” line and the http://0.0.0.0:1337/admin URL mean the app is up. Port 1337 must match the App Port you set in 2.1.
2.7 Create the admin user
Visit https://www.yourdomain.com/admin and fill in your admin credentials to set up the Strapi dashboard. Do this right after the first start, for the same bot-claim reason as CloudPanel’s own admin user.
Verify: the Strapi dashboard loads over HTTPS through your domain.
3. Enable auto-start with PM2
A Node.js app won’t restart on its own after a server reboot, and a crashed process stays crashed. PM2 handles both. Note that CloudPanel manages Node.js versions via nvm, which is why the PATH line in the cron job below matters.
3.1 Install PM2
Run this as the site user, not root (same as CloudPanel’s official PM2 guide):
npm install pm2@latest -gPM2 7.0.3 is current as of September 2026 and needs Node 18+. For a complete PM2 guide, check Manage Applications with PM2.
3.2 Start the app and save the config
From the app directory (htdocs/www.yourdomain.com/):
pm2 start npm --name strapi-app -- start
pm2 save
pm2 save writes the process list to disk. Without it, the reboot step below has nothing to restore. For multi-core production you can later weigh fork vs cluster mode in PM2, but Strapi’s default fork mode is fine to start.
3.3 Add a cron job to restore PM2 on reboot
Get the current PATH (it contains your nvm-managed Node version):
echo $PATHEdit the user crontab:
crontab -eAdd these lines, replacing the PATH value with your actual output:
PATH=/home/your-site-user/.nvm/versions/node/v24.x.x/bin:/usr/local/bin:/usr/bin:/bin:/usr/local/games:/usr/games
@reboot pm2 resurrect &> /dev/null
That PATH line is required because cron runs with a minimal environment and would otherwise not find pm2 in your nvm directory. If the nvm pattern is new to you, see how to install Node.js using nvm.
Verify it was saved:
crontab -lReboot the server and confirm the app comes back:
sudo reboot
# after the server is back:
pm2 status
You should see the status as online:
┌─────┬───────────────┬─────────────┬─────────┬─────────┬──────────┬────────┬──────┬───────────┬──────────┬──────────┬──────────┬──────────┐
│ id  │ name          │ namespace   │ version │ mode    │ pid      │ uptime │ ↺    │ status    │ cpu      │ mem      │ user     │ watching │
├─────┼───────────────┼─────────────┼─────────┼─────────┼──────────┼────────┼──────┼───────────┼──────────┼──────────┼──────────┼──────────┤
│ 0   │ strapi-app    │ default     │ 5.x.x   │ fork    │ 1521     │ 50s    │ 0    │ online    │ 0%       │ 56.7mb   │ bit…     │ disabled │
└─────┴───────────────┴─────────────┴─────────┴─────────┴──────────┴────────┴──────┴───────────┴──────────┴──────────┴──────────┴──────────┘
Verify and troubleshoot
Run this three-command check before you call the deploy done:
pm2 status- the app shows onlinepm2 logs strapi-app- the boot log looks clean, no stack tracescurl -I https://www.yourdomain.com- returns 200 or 302 from Nginx, not 502
502 Bad Gateway = app port mismatch
Almost every 502 on this stack means the app is not listening on the App Port CloudPanel forwards to. The app thinks it is on 1337 (or 3000), CloudPanel forwards to a different number. Make them match, then restart the app with PM2.
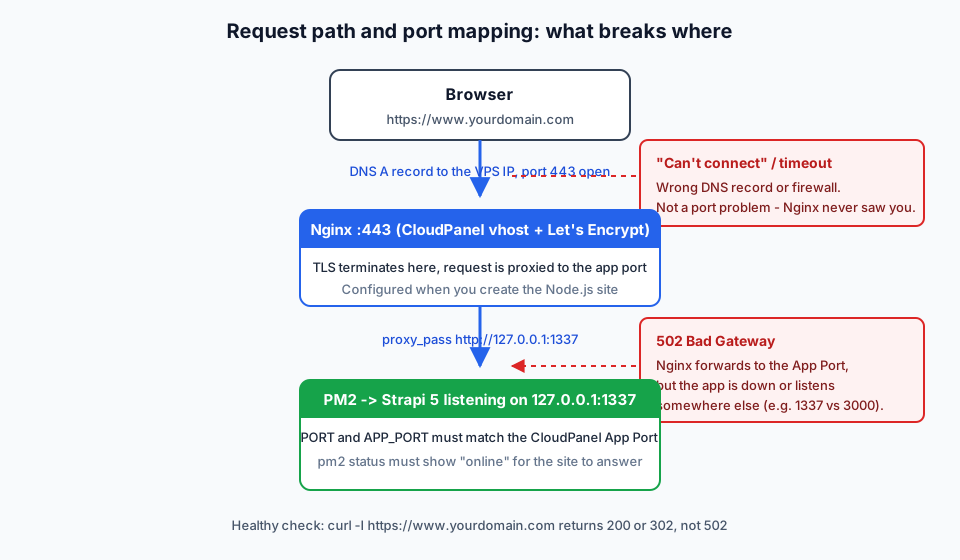
Common failure modes:
| Symptom | Cause | Fix |
|---|---|---|
| 502 Bad Gateway | App port mismatch, or the app is down | Match the app port to the CloudPanel App Port, pm2 restart strapi-app |
| App offline after reboot | Cron PATH wrong, or pm2 save was never run |
crontab -l must show both lines; re-run pm2 save |
| Blank page, missing CSS/JS | Production build was skipped | NODE_ENV=production npm run build |
sha256sum: FAILED |
Stale installer hash (section 1.2) | Copy the current hash from the install docs |
| Build killed, “heap out of memory” | OOM on a 2 GB box (section 2.5) | Add swap or resize to 4 GB, re-run the build |
| “address already in use” | Another process owns the port | ss -tlnp | grep 1337 and stop it, or change the port everywhere |
Rollback / undo:
- Remove the app from PM2:
pm2 delete strapi-app && pm2 save - Delete the site in CloudPanel - that removes the vhost, site user, and (if you let it) the database
- If you are abandoning the panel entirely, prefer rebuilding the VM from a snapshot over
apt purge cloudpanel. Purging leaves Nginx and database state behind that is annoying to reason about later.
FAQ
Can I run CloudPanel in an LXC or OpenVZ VPS?
No. CloudPanel supports virtual machines only - no LXC, LXD, or OpenVZ. Many budget offers are containers under the hood, so verify you are getting a KVM (or similar) VM before you order.
When will Node 26 be available in CloudPanel?
Not in v2.5.4. Node 26 becomes LTS on 2026-10-28; expect a later CloudPanel release to add it. Until then, Node 24 is the newest LTS in the panel and the right default.
MariaDB or MySQL for a new install?
MariaDB 12.3 is the sensible default on current Ubuntu releases. MySQL 8.4 is fine and fully supported - pick it if your tooling or habits lean MySQL. Both are one command change in section 1.2.
Should I use PM2 or dploy for deployments?
PM2 is the safe default and what this guide uses. CloudPanel also documents dploy (github.com/cloudpanel-io/dploy), a MIT-licensed tool for zero-downtime deployments of PHP, Node.js, Python, and static sites. It is largely dormant since 2023, so treat it as an experiment, not the backbone of production.
Does this work on an ARM VPS?
Yes. CloudPanel runs on x86 and ARM64. Hetzner CAX and Oracle Ampere shapes work, and the install steps are identical.
How do I update CloudPanel later?
Run sudo clp-update as root, after taking a snapshot. The full steps, plus the test channel option, are in the Updating an existing CloudPanel install section above.
Conclusions
That is the full loop: install CloudPanel on a VM-sized VPS, add a Node.js site (Node 24, app port 1337), deploy Strapi 5 behind Nginx with a Let’s Encrypt certificate, then put PM2 in charge of the process with pm2 save and an @reboot pm2 resurrect cron. Verify with pm2 status and curl -I, and remember that a 502 is nearly always a port mismatch.
CloudPanel has been reliable in my experience. It’s free, actively maintained, and covers most use cases for developers who want a simple server management panel without the overhead of cPanel or Plesk. If you just want to host Node.js apps on a VPS with sane defaults, this stack is boring in the best way.
One forward-looking note: Node 26 becomes LTS in October 2026. When CloudPanel ships it, clp-update and pick it on the next site you create.