
NFS Linux Setup: Complete Shareable Network Drive Guide
NFS Linux setup guide: configure an NFS server and mount shares on clients with systemd automount, secure NFSv4.2, and fix common fstab permission errors.

Updated Published 28 min read
I run NFS on my N100 mini PC. It serves Jellyfin media, handles backups for every machine on my network, and stores shared documents. This NFS Linux setup guide walks you through configuring an NFS server and mounting shares on Linux clients, from a basic working setup through to NFSv4.2 lockdown, systemd automount, and container integration.
NFSv4.2 is the default on modern Linux clients (they negotiate 4.2 first), so this guide locks it in from the start. NFS is free, kernel-built-in, and the most efficient way to share files across a Linux-only home network. If you’re still shopping for hardware, check the best mini PCs for home servers.
What is NFS and why use it?
Understanding NFS
Network File System (NFS) is a protocol that lets you access files over a network the same way you access local storage. NFSv4.2 is the current standard. It adds sparse-file operations, server-side copy, and space reservation. All major Linux distributions ship with NFS support built into the kernel.
Key benefits of NFS
- Native Linux support: Built into all major distributions, no extra software to install on clients beyond
nfs-common - High performance: Kernel-level implementation with minimal overhead; modern clients negotiate 1 MiB read/write buffers automatically
- Scalability: Handles multiple concurrent connections; tune server threads for heavier loads
- Flexibility: Supports various mount options, security configurations, and automount strategies
- Cost-effective: Open source with no licensing fees, the real costs are hardware and electricity
NFS vs SMB: which file-sharing protocol should you use?
| Protocol | Best for | Performance | Security | Complexity |
|---|---|---|---|---|
| NFS | Linux-only environments | High (kernel-level) | Moderate (IP-based trust) | Low |
| SMB/CIFS | Mixed Windows/Linux | Moderate | High (user auth) | Moderate |
| FTP | Legacy file transfers | Low | Variable | Low |
| SSH/SFTP | Secure one-off transfers | Moderate | High | High |
| WebDAV | HTTP-based file access | Moderate | Moderate | Moderate |
Recommendation: Use NFS for Linux-only home networks. It’s faster and simpler than SMB. For mixed Windows/Linux environments, use SMB/CIFS. See how to set up Samba for mixed Windows/Linux networks. For HTTP-based file access, check our WebDAV on Nginx guide.
Prerequisites and network planning
Before starting, make sure you have:
- Two or more Linux machines (server and one or more clients)
- Root or sudo access on all machines
- Network connectivity between devices on the same LAN
- Static IP addresses on server and clients (saves headaches later)
- Firewall configuration knowledge for your distro (UFW or firewalld)
Never expose NFS to the internet
NFS has no user authentication. It trusts IP addresses. Never expose NFS ports to the public internet. If you need NFS across remote networks, tunnel it through a VPN like WireGuard. Consider self-hosting your own Tailscale control server with Headscale for a managed VPN mesh.
Network architecture overview
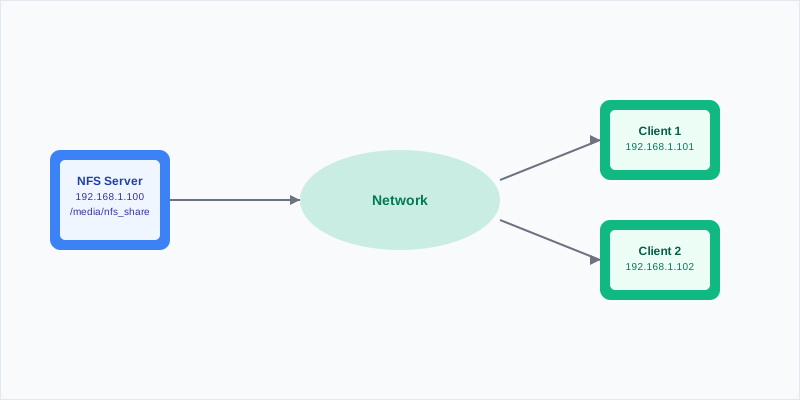
Step 1: Set up the NFS server on Linux
Install the NFS server package
Ubuntu/Debian
sudo apt update && sudo apt install nfs-kernel-server -yUbuntu 24.04 ships nfs-utils 2.6.4. The service name is nfs-kernel-server.
RHEL/Fedora
sudo dnf install nfs-utils -yOn older CentOS systems use yum install nfs-utils -y. The service name is nfs-server.
Create shared directories
Set up a directory structure for your NFS shares. I organize by purpose:
# Create main NFS directory (FHS-compliant location)
sudo mkdir -p /srv/nfs

# Create specific share directories
sudo mkdir -p /srv/nfs/media
sudo mkdir -p /srv/nfs/backups
sudo mkdir -p /srv/nfs/documents
Directory location
Using /srv/nfs follows Linux filesystem hierarchy standards. Don’t use /media or /mnt for NFS exports. Those are reserved for temporary mounts.
Configure permissions and understand UID/GID mapping
Set ownership and permissions:
# Set ownership to nobody:nogroup for security
sudo chown -R nobody:nogroup /srv/nfs

# Set permissions (755 for directories)
sudo chmod -R 755 /srv/nfs
The UID/GID write trap
This is the #1 “permission denied” surprise with NFS. With default root_squash, a client root user gets mapped to nobody (UID 65534). Since nobody owns the share, root clients can write. But a normal client user (e.g. UID 1000) becomes “others” with r-x permissions and cannot write.
NFS uses AUTH_SYS, which trusts client-supplied UIDs. The server and client must agree on UIDs/GIDs, or you need to map them explicitly.
Fixing permissions for normal users
Two approaches to let normal users write:
1. Match UIDs across machines: Create the same user with the same UID on both server and clients, then chown the share to that user.
2. Use all_squash with explicit UID/GID: Map all client users to one UID/GID on the server:
# In /etc/exports, squash everyone to UID 1000, GID 1000
/srv/nfs/media  192.168.1.0/24(rw,sync,no_subtree_check,all_squash,anonuid=1000,anongid=1000)
This is the simplest approach for home networks where all clients trust each other.
Configure NFS exports in /etc/exports
The /etc/exports file defines which directories are shared and with what permissions:
sudo nano /etc/exportsAdd your export configurations:
# Media share, read-write for the whole LAN (root_squash is the default)
/srv/nfs/media     192.168.1.0/24(rw,sync,no_subtree_check)

# Backup share, read-write for the whole LAN
/srv/nfs/backups   192.168.1.0/24(rw,sync,no_subtree_check)

# Documents, read-write for one machine, read-only for another
/srv/nfs/documents 192.168.1.101(rw,sync,no_subtree_check) 192.168.1.102(ro,sync,no_subtree_check)

# Container share, squash all users to UID/GID 1000
/srv/nfs/appdata   192.168.1.0/24(rw,sync,no_subtree_check,all_squash,anonuid=1000,anongid=1000)

# Optional: NFSv4 root export (lets clients mount server:/media instead of server:/srv/nfs/media)
/srv/nfs           192.168.1.0/24(rw,sync,no_subtree_check,fsid=0,crossmnt)
Avoid no_root_squash
Do not use no_root_squash unless you have a specific reason (like diskless clients). With no_root_squash, a remote root user can change any file on the share and plant trojaned or setuid binaries. The Red Hat Security Guide explicitly warns against it. root_squash is the default, rely on it.
Export options explained
| Option | Description | Use case |
|---|---|---|
rw |
Read-write access | Full access for trusted clients |
ro |
Read-only access | Sharing read-only content |
sync |
Synchronous writes | Data integrity (default since nfs-utils 1.0.0) |
async |
Asynchronous writes | Better performance on spinning disks, but risks data loss on crash |
no_subtree_check |
Disable subtree checking | Improved reliability (default since nfs-utils 1.1.0) |
root_squash |
Map root to anonymous user | Security (default, always use this) |
no_root_squash |
Allow root access | Diskless clients only, security risk on shared networks |
all_squash |
Map all users to anonymous | Maximum security or container shares |
anonuid |
Set anonymous UID | Use with all_squash to control ownership |
anongid |
Set anonymous GID | Use with all_squash to control group ownership |
fsid=0 |
NFSv4 root export | Lets clients mount shorter paths |
crossmnt |
Follow mount points | Required with fsid=0 for subdirectories |
Apply exports and start the service
After configuring exports, apply the changes live, no service restart needed:
# Apply exports (re-exports all directories, re-reads /etc/exports)
sudo exportfs -arv
Expected output:
exporting 192.168.1.0/24:/srv/nfs/media
exporting 192.168.1.0/24:/srv/nfs/backups
exporting 192.168.1.101:/srv/nfs/documents
exporting 192.168.1.102:/srv/nfs/documents
Enable the service so it starts on boot:
sudo systemctl enable --now nfs-kernel-serverVerify active exports:
sudo exportfs -vYou should see each share listed with its options (rw, sync, no_subtree_check, root_squash).
Configure the firewall
NFSv4 needs only TCP port 2049. The old ports 111 (rpcbind), mountd, statd, and lockd are NFSv2/v3-era, you don’t need them if you’re running NFSv4-only.
UFW (Ubuntu/Debian)
sudo ufw allow from 192.168.1.0/24 to any port 2049 proto tcp
sudo ufw reload
firewalld (RHEL/Fedora)
sudo firewall-cmd --permanent --add-service=nfs
sudo firewall-cmd --reload
Only add nfs3, mountd, and rpc-bind services if you still run NFSv3.
Verify the port is listening:
sudo ss -tuln | grep :2049Lock down to NFSv4 and tune the server
Ubuntu 22.04+ uses /etc/nfs.conf
On Ubuntu 22.04+, Debian 12+, and modern distros, NFS configuration uses /etc/nfs.conf (INI format). The old /etc/default/nfs-kernel-server NEED_* flags have no effect on systemd-based installations.
Edit /etc/nfs.conf to disable older NFS versions and tune the server:
sudo nano /etc/nfs.confAdd or update the [nfsd] section:
[nfsd]
# Disable NFSv2 and NFSv3, NFSv4 only
vers3=n
# Optional: disable NFSv4.0 and 4.1 if you only need 4.2
vers4.0=n
vers4.1=n
# Increase worker threads (default is 8; raise for multiple clients)
threads=16
# Bind to LAN IP only (replace with your server's IP)
host=192.168.1.100
Restart the NFS server to apply:
sudo systemctl restart nfs-kernel-serverVerify the enabled versions:
cat /proc/fs/nfsd/versionsExpected output:
-2 -3 +4 +4.1 +4.2Query the effective configuration:
sudo nfsconf --dumpOn a v4-only server, you can mask rpcbind since NFSv4 doesn’t use it:
sudo systemctl mask rpcbind.service rpcbind.socketNote: masking rpcbind breaks showmount -e on the server. Unmask if you need it.
Step 2: Mount NFS shares on Linux clients
Install the NFS client package
On client machines:
sudo apt update && sudo apt install nfs-common -yFor RHEL/Fedora clients:
sudo dnf install nfs-utils -yVerify the server exports
Before mounting, verify the server is reachable and exports are visible:
# List exports from the server
showmount -e 192.168.1.100
Expected output:
Export list for 192.168.1.100:
/srv/nfs        192.168.1.0/24
/srv/nfs/media  192.168.1.0/24
/srv/nfs/backups 192.168.1.0/24
Note: if you masked rpcbind on the server, showmount may fail, that’s OK. The mount itself uses port 2049 directly.
Create mount points and test a manual NFS mount
# Create mount points
sudo mkdir -p /mnt/server-media
sudo mkdir -p /mnt/server-backups
sudo mkdir -p /mnt/server-docs
Test a manual mount:
sudo mount -t nfs 192.168.1.100:/srv/nfs/media /mnt/server-mediaVerify the mount:
df -h | grep nfs
ls -la /mnt/server-media
Verification
If the NFS mount appears in df -h output and you can list files in the mounted directory, the basic setup works. Check the negotiated NFS version and buffer sizes:
grep server-media /proc/mountsYou should see nfsvers=4.2 and rsize=1048576,wsize=1048576 (1 MiB, the modern default).
Persistent NFS mounts with /etc/fstab
Edit /etc/fstab for automatic mounting on boot:
sudo nano /etc/fstabAlways-on mount
Use this when the NFS server is always available (e.g., same machine as your router or always-on NAS):
# NFS mounts, always-on
192.168.1.100:/srv/nfs/media     /mnt/server-media    nfs  _netdev,nfsvers=4.2,hard,timeo=600,retrans=2  0 0
192.168.1.100:/srv/nfs/backups   /mnt/server-backups  nfs  _netdev,nfsvers=4.2,hard,timeo=600,retrans=2  0 0
192.168.1.100:/srv/nfs/documents /mnt/server-docs     nfs  _netdev,nfsvers=4.2,hard,timeo=600,retrans=2,ro  0 0
On-demand automount
Use this when the NFS server might not be running at boot, prevents boot hangs and unmounts after idle:
# NFS mounts, on-demand automount via systemd
192.168.1.100:/srv/nfs/media     /mnt/server-media    nfs  _netdev,noauto,x-systemd.automount,x-systemd.mount-timeout=30,x-systemd.idle-timeout=10min,nfsvers=4.2,hard,timeo=600,retrans=2  0 0
192.168.1.100:/srv/nfs/backups   /mnt/server-backups  nfs  _netdev,noauto,x-systemd.automount,x-systemd.mount-timeout=30,x-systemd.idle-timeout=10min,nfsvers=4.2,hard,timeo=600,retrans=2  0 0
192.168.1.100:/srv/nfs/documents /mnt/server-docs     nfs  _netdev,noauto,x-systemd.automount,x-systemd.mount-timeout=30,x-systemd.idle-timeout=10min,nfsvers=4.2,hard,timeo=600,retrans=2,ro  0 0
After editing fstab, reload systemd and test:
sudo systemctl daemon-reload
sudo mount -a
mount | grep nfs
Mount options explained
| Option | Description | Notes |
|---|---|---|
_netdev |
Network device | Waits for network before mounting (implied for nfs by systemd, but safe to include) |
nfsvers=4.2 |
Pin NFS version | Modern default; client negotiates 4.2 first anyway, but pinning avoids surprises |
hard |
Hard mount | Retries indefinitely on server failure, recommended for data integrity |
soft |
Soft mount | Returns error after timeout, see warning below |
timeo=600 |
Timeout in tenths of seconds | 60 seconds; good default for LAN |
retrans=2 |
Number of retries | 2 retries before reporting error |
nconnect=4 |
Multiple TCP connections | Higher throughput on modern NICs (1 to 16, default 1) |
noauto |
Don’t mount at boot | Used with x-systemd.automount |
x-systemd.automount |
systemd automount | Mounts on first access, unmounts after idle |
x-systemd.mount-timeout=30 |
Mount timeout | Seconds to wait for mount |
x-systemd.idle-timeout=10min |
Idle timeout | Unmounts after this period of inactivity |
soft mounts can corrupt data
From the nfs(5) man page: “A so-called ‘soft’ timeout can cause silent data corruption in certain cases. Use the soft or softerr option only when client responsiveness is more important than data integrity.”
Use hard for backup and document shares. soft is acceptable for read-only media shares where a timeout is preferable to a hung process.
Note on rsize/wsize: modern kernels negotiate the maximum supported buffer size (1 MiB) automatically. Do not force rsize=8192 or rsize=32768, this actually reduces throughput. Leave them unset and verify with grep server-media /proc/mounts.
Automount NFS with systemd
The x-systemd.automount option shown above is the modern way to handle NFS mounts on single-host clients. It’s simpler than AutoFS and prevents boot hangs when the NFS server is down.
Verify the automount unit is active:
systemctl status mnt-server\\x2dmedia.automountExpected output should show Active: active (waiting).
How it works: systemd creates an automount trigger at the mount point. The first time you access /mnt/server-media, systemd mounts the NFS share. After x-systemd.idle-timeout of inactivity, it unmounts automatically. If the NFS server is down at boot, the system boots normally, no hang.
Do not add x-systemd.requires=network-online.target, this causes systemd ordering cycles (per systemd.automount(5)). Keep fstab pass numbers at 0 0, running fsck on NFS at boot can hang.
Step 3: Advanced NFS configuration
AutoFS for on-demand mounting
AutoFS is still valid for complex setups with multiple mount maps. Install it:
sudo apt install autofs -yConfigure the master map:
sudo nano /etc/auto.masterAdd this line:
/mnt/auto /etc/auto.nfs --timeout=60 --ghostCreate the AutoFS map file:
sudo nano /etc/auto.nfsConfigure your auto-mounts:
media     -fstype=nfs,nfsvers=4.2,rw,hard,timeo=600   192.168.1.100:/srv/nfs/media
backups   -fstype=nfs,nfsvers=4.2,rw,hard,timeo=600   192.168.1.100:/srv/nfs/backups
documents -fstype=nfs,nfsvers=4.2,ro,hard,timeo=600   192.168.1.100:/srv/nfs/documents
Start and enable AutoFS:
sudo systemctl restart autofs
sudo systemctl enable autofs
Note: use -fstype=nfs,nfsvers=4.2, the old -fstype=nfs4 syntax is deprecated per the nfs(5) man page.
NFSv4.2 features and the root export
NFSv4.2 adds several features over 4.1:
- Sparse file operations (SEEK/HOLE): efficient handling of files with holes
- Server-side copy/clone:
copy_file_range()works on the server, great for rsync and cp on the same share - Space reservation:
fallocate()support - Labeled NFS: security labels for mandatory access control
The fsid=0 root export shown earlier lets clients mount shorter paths. With this export:
# Instead of:
sudo mount -t nfs 192.168.1.100:/srv/nfs/media /mnt/server-media

# You can mount:
sudo mount -t nfs 192.168.1.100:/media /mnt/server-media
The crossmnt option follows mount points within the export. Without it, subdirectories that are separate filesystems (like LVM volumes) won’t be visible.
Performance tuning
Modern defaults are fast
Modern Linux kernels negotiate 1 MiB read/write buffers automatically. Forcing lower values (like the old rsize=8192 advice) actually reduces throughput. Leave rsize/wsize unset unless you have a specific reason to limit them.
Multi-connection TCP (nconnect): For higher single-client throughput on modern NICs, add nconnect=4 (up to 16) to your mount options:
192.168.1.100:/srv/nfs/media /mnt/server-media nfs _netdev,nfsvers=4.2,hard,timeo=600,retrans=2,nconnect=4 0 0Note: nconnect is set at first mount and cannot be changed without remounting.
Server threads: The default is 8 nfsd worker threads. For multiple clients, raise to 16 or higher in /etc/nfs.conf:
[nfsd]
threads=16
Async exports: Using async instead of sync in /etc/exports can improve performance on spinning disks, but risks data loss if the server crashes. Only use it for non-critical data like media caches.
Secure NFS with Kerberos, TLS, and VPNs
NFS has no user authentication
Plain NFS (AUTH_SYS) trusts client-supplied UIDs and IP addresses. There is no user authentication, any machine on the allowed network can claim any UID. This is why you should never expose NFS to the public internet.
Kerberos: For real authentication and encryption, NFS supports sec=krb5, sec=krb5i (integrity), and sec=krb5p (privacy). This requires a Kerberos KDC, nfs/<server-fqdn> principal, keytab extraction, and gssproxy/rpc-gssd setup on both server and clients. It’s the right choice for production environments but complex for home networks. See Ubuntu’s official NFS with Kerberos guide for the full procedure.
NFS-over-TLS: Available since Linux kernel 6.4 (RFC 9289, RPC-with-TLS). Requires ktls-utils/tlshd and certificates. RHEL 9.6+ officially supports it. Still maturing for general use.
WireGuard VPN (recommended for home networks): The simplest way to secure NFS across untrusted networks. Run NFS inside a WireGuard tunnel, all traffic is encrypted, and only VPN peers can reach port 2049. If you need a cheap VPS as a WireGuard relay or offsite backup node, Hetzner Cloud VPS starts at a few euros per month in EU datacenters.
VPS prices jumped across the board in 2026 — if you’re rethinking a rented box, see what changed and when a mini PC wins.
Container UID/GID mapping
When running Docker containers that access NFS shares, you need to match the container’s UID to the export’s ownership.
Using all_squash with PUID/PGID:
Export with explicit UID/GID:
/srv/nfs/appdata 192.168.1.0/24(rw,sync,no_subtree_check,all_squash,anonuid=1000,anongid=1000)For linuxserver.io images (Jellyfin, Plex, etc.), set PUID=1000 and PGID=1000 to match.
Named NFS volume in Docker Compose:
services:
  jellyfin:
    image: jellyfin/jellyfin
    volumes:
      - media:/media:ro
      - ./config:/config

volumes:
  media:
    driver: local
    driver_opts:
      type: nfs
      o: addr=192.168.1.100,rw,nfsvers=4.2,hard,timeo=600,retrans=2
      device: ":/srv/nfs/media"
This is better than a host bind-mount because the named volume survives multi-host setups and the NFS options are declared in the compose file.
Step 4: Monitor and maintain NFS
Check NFS status and exports
# Check NFS server status
sudo systemctl status nfs-kernel-server

# View active exports with options
sudo exportfs -v

# Check active connections on port 2049
sudo ss -tuln | grep :2049
NFS statistics and logs
# Server statistics
nfsstat -s

# Client statistics
nfsstat -c

# Real-time I/O statistics (install nfs-common if not present)
nfsiostat 1

# NFS-related kernel messages
dmesg | grep -i nfs

# Server logs
sudo journalctl -u nfs-kernel-server

# Verify effective server configuration
sudo nfsconf --dump
Stay patched: recent NFS CVEs
Keep NFS updated
Two notable CVEs from 2025 to 2026 affect NFS:
CVE-2025-12801 (rpc.mountd, CVSS 6.5): An NFSv3 client can access any subtree of an exported directory regardless of permissions and regardless of root_squash/all_squash. Running NFSv4-only avoids this entirely since NFSv4 doesn’t use rpc.mountd.
CVE-2025-38571 (NFS-over-TLS client, CVSS 5.5): A remote NFS server can crash the client via a crafted TLS alert. Only affects NFS-over-TLS configurations.
Keep nfs-utils and your kernel updated. Running NFSv4-only (disabling v2/v3) eliminates the rpc.mountd attack surface.
Troubleshooting common NFS issues
Connection refused
Common error: Connection refused
This usually means the firewall is blocking port 2049 or the NFS service isn’t running.
Fix checklist:
- Verify NFS services are running:
sudo systemctl status nfs-kernel-server - Check firewall rules: only TCP 2049 is needed for NFSv4, see checking remote ports with the nc command
- Test network connectivity:
ping 192.168.1.100between server and client - Verify exports:
sudo exportfs -von server - Check if rpcbind is masked: if you masked rpcbind for NFSv4-only,
showmountwill fail but mounts should still work
mount.nfs: access denied by server
Symptom: mount.nfs: access denied by server when trying to mount.
Cause: Export syntax error, IP/subnet mismatch, or the client’s IP isn’t in the export list.
Fix:
# On the server, check what's actually exported
sudo exportfs -v

# Verify /etc/exports syntax (no missing parentheses, correct IPs)
cat /etc/exports

# Re-apply after fixing
sudo exportfs -arv
Permission denied (UID/GID mapping)
Symptom: You can mount the share but get “Permission denied” when writing.
Cause: The classic UID/GID mismatch. With nobody:nogroup ownership and chmod 755, a normal user (UID 1000) on the client becomes “others” with read+execute only.
Fix:
# Check your UID on the client
id

# Option 1: Match UIDs, create the same user on the server
sudo useradd -u 1000 myuser

# Option 2: Use all_squash in /etc/exports
/srv/nfs/media  192.168.1.0/24(rw,sync,no_subtree_check,all_squash,anonuid=1000,anongid=1000)
sudo exportfs -arv
Stale file handle
Symptom: Stale file handle error when accessing files.
Cause: The server filesystem was replaced (LVM snapshot restore, btrfs rollback) or the export was removed and recreated while clients had it mounted.
Fix:
# On the client, lazy unmount and remount
sudo umount -l /mnt/server-media
sudo mount -a
Protocol not supported
Symptom: mount.nfs: Protocol not supported
Cause: NFS version mismatch, the client requests a version the server doesn’t support (or vice versa).
Fix:
# Check supported versions on the server
cat /proc/fs/nfsd/versions

# Explicitly set the version in fstab
nfsvers=4.2
Slow performance or boot hangs
Boot hangs: The NFS server isn’t reachable at boot and the mount blocks. Fix: use x-systemd.automount or add nofail to fstab options.
Slow performance:
# Check negotiated buffer sizes and version
grep server-media /proc/mounts

# Try adding nconnect for parallel TCP connections
# In /etc/fstab: add nconnect=4

# Real-time I/O stats
nfsiostat 1
NFS in a home server setup
Media server directory structure
/srv/nfs/media/
├── movies/
├── tv-shows/
├── music/
└── photos/
This structure works well with Jellyfin, Plex, or Emby. The N100 mini PC serves these files across the network, any machine with an NFS mount can access the full media library. If you’re looking for a compact mini PC for your home server, there are plenty of low-power options that handle NFS and Docker without breaking a sweat.
Backup strategy with NFS
Combined with adding a new drive to Ubuntu LVM for storage expansion:
# Backup scripts can target NFS shares
rsync -av /home/user/documents/ /mnt/server-backups/user-docs/

# Exclude unnecessary files, see [excluding files and directories with rsync](https://www.bitdoze.com/exclude-directories-files-copy-remote-machine/)
rsync -av --exclude='.cache' --exclude='node_modules' /home/user/ /mnt/server-backups/user-home/
NFS is not a backup
A client rm -rf on an NFS mount is instant and permanent. NFS shares should be backed up on the server side to a separate location. Consider offsite or encrypted backups for critical data. The NFS server is also a single point of failure, there’s no built-in HA (pNFS is beyond this guide’s scope).
Container integration with Docker
For running Docker containers for a home server that need shared media:
services:
  jellyfin:
    image: jellyfin/jellyfin
    environment:
      - PUID=1000
      - PGID=1000
    volumes:
      - media:/media:ro
      - ./config:/config
    ports:
      - 8096:8096

volumes:
  media:
    driver: local
    driver_opts:
      type: nfs
      o: addr=192.168.1.100,rw,nfsvers=4.2,hard,timeo=600,retrans=2
      device: ":/srv/nfs/media"
Match the PUID/PGID values to the anonuid/anongid in your exports if using all_squash.
Best practices and security considerations
Security best practices
- Use NFSv4.2, disable NFSv2/v3 in
/etc/nfs.confto eliminate rpc.mountd exposure - Use
root_squashby default (it’s the default, don’t override it) - Restrict exports by IP, use
/32for single clients or/24for the LAN - Firewall: TCP 2049 only, NFSv4 doesn’t need ports 111, mountd, or statd
- Never expose NFS to the public internet, use WireGuard for remote access
- Keep nfs-utils and kernel patched, watch for CVEs in rpc.mountd and sunrpc
- Check logs for suspicious activity with
journalctl -u nfs-kernel-server - Consider Kerberos for production environments where IP-based trust isn’t enough
Backup and redundancy
NFS is not a backup
The NFS server is a single point of failure. Back up shared data on the server side to a separate disk or offsite location. A client rm -rf on an NFS share is immediate, there’s no trash, no undo. Plan your backup strategy accordingly.
Network considerations
- Use wired connections when possible, NFS over WiFi works but is less reliable
- Set up network monitoring, see the full server monitoring guide
- Consider network segmentation for security, isolate NFS traffic on a VLAN if your switch supports it
- No encryption by default, NFS traffic is plaintext on the wire. Use WireGuard if crossing untrusted networks
Conclusion
NFS on Linux gives you fast, kernel-level file sharing across your network. I’ve been running it on my N100 mini PC alongside Jellyfin, and it handles media streaming, backups, and document sharing without issues.
Start with the basics: install nfs-kernel-server, set up /etc/exports with root_squash, and mount from your clients. Once that works, add systemd automount to prevent boot hangs and lock down to NFSv4-only for better security. The whole setup takes under 30 minutes.
For more on building out your home server, see best mini PCs for home servers, Docker containers for a home server, and why you need a home server in 2026.
Start Building Your NFS Setup