Arcane Docker Install: Self-Hosted Container Manager
Step-by-step guide to install Arcane with Docker Compose. Covers basic setup, socket proxy security, OIDC authentication, reverse proxy config, and remote…

Updated Published 17 min read

I’ve been running Arcane on my servers for months now. It replaced Portainer, and I haven’t looked back. The whole thing runs on Go, which means it’s fast, light on memory, and doesn’t need a complicated runtime.
If you’re looking for a comparison with another newer Docker manager, check out my Arcane vs Dockhand article. But if you’ve already decided on Arcane and just want it running, this guide covers everything from basic install to socket proxy security.
This guide was updated on 2026-09-23 for Arcane 2.x. If you followed an older version: the image moved from ghcr.io/getarcaneapp/arcane to ghcr.io/getarcaneapp/manager, JWT_SECRET is gone, and the headless agent is now arcane-agent. Details below.
Affiliate Disclosure
Some links in this guide are affiliate links. If you buy through them, we may earn a small commission at no extra cost to you. This helps us keep testing and updating these recommendations.
What Arcane actually does
Arcane is a web-based Docker management UI. You get container management, compose stack editing, real-time logs, a web terminal, and GitOps all in one interface. It runs as a single container.
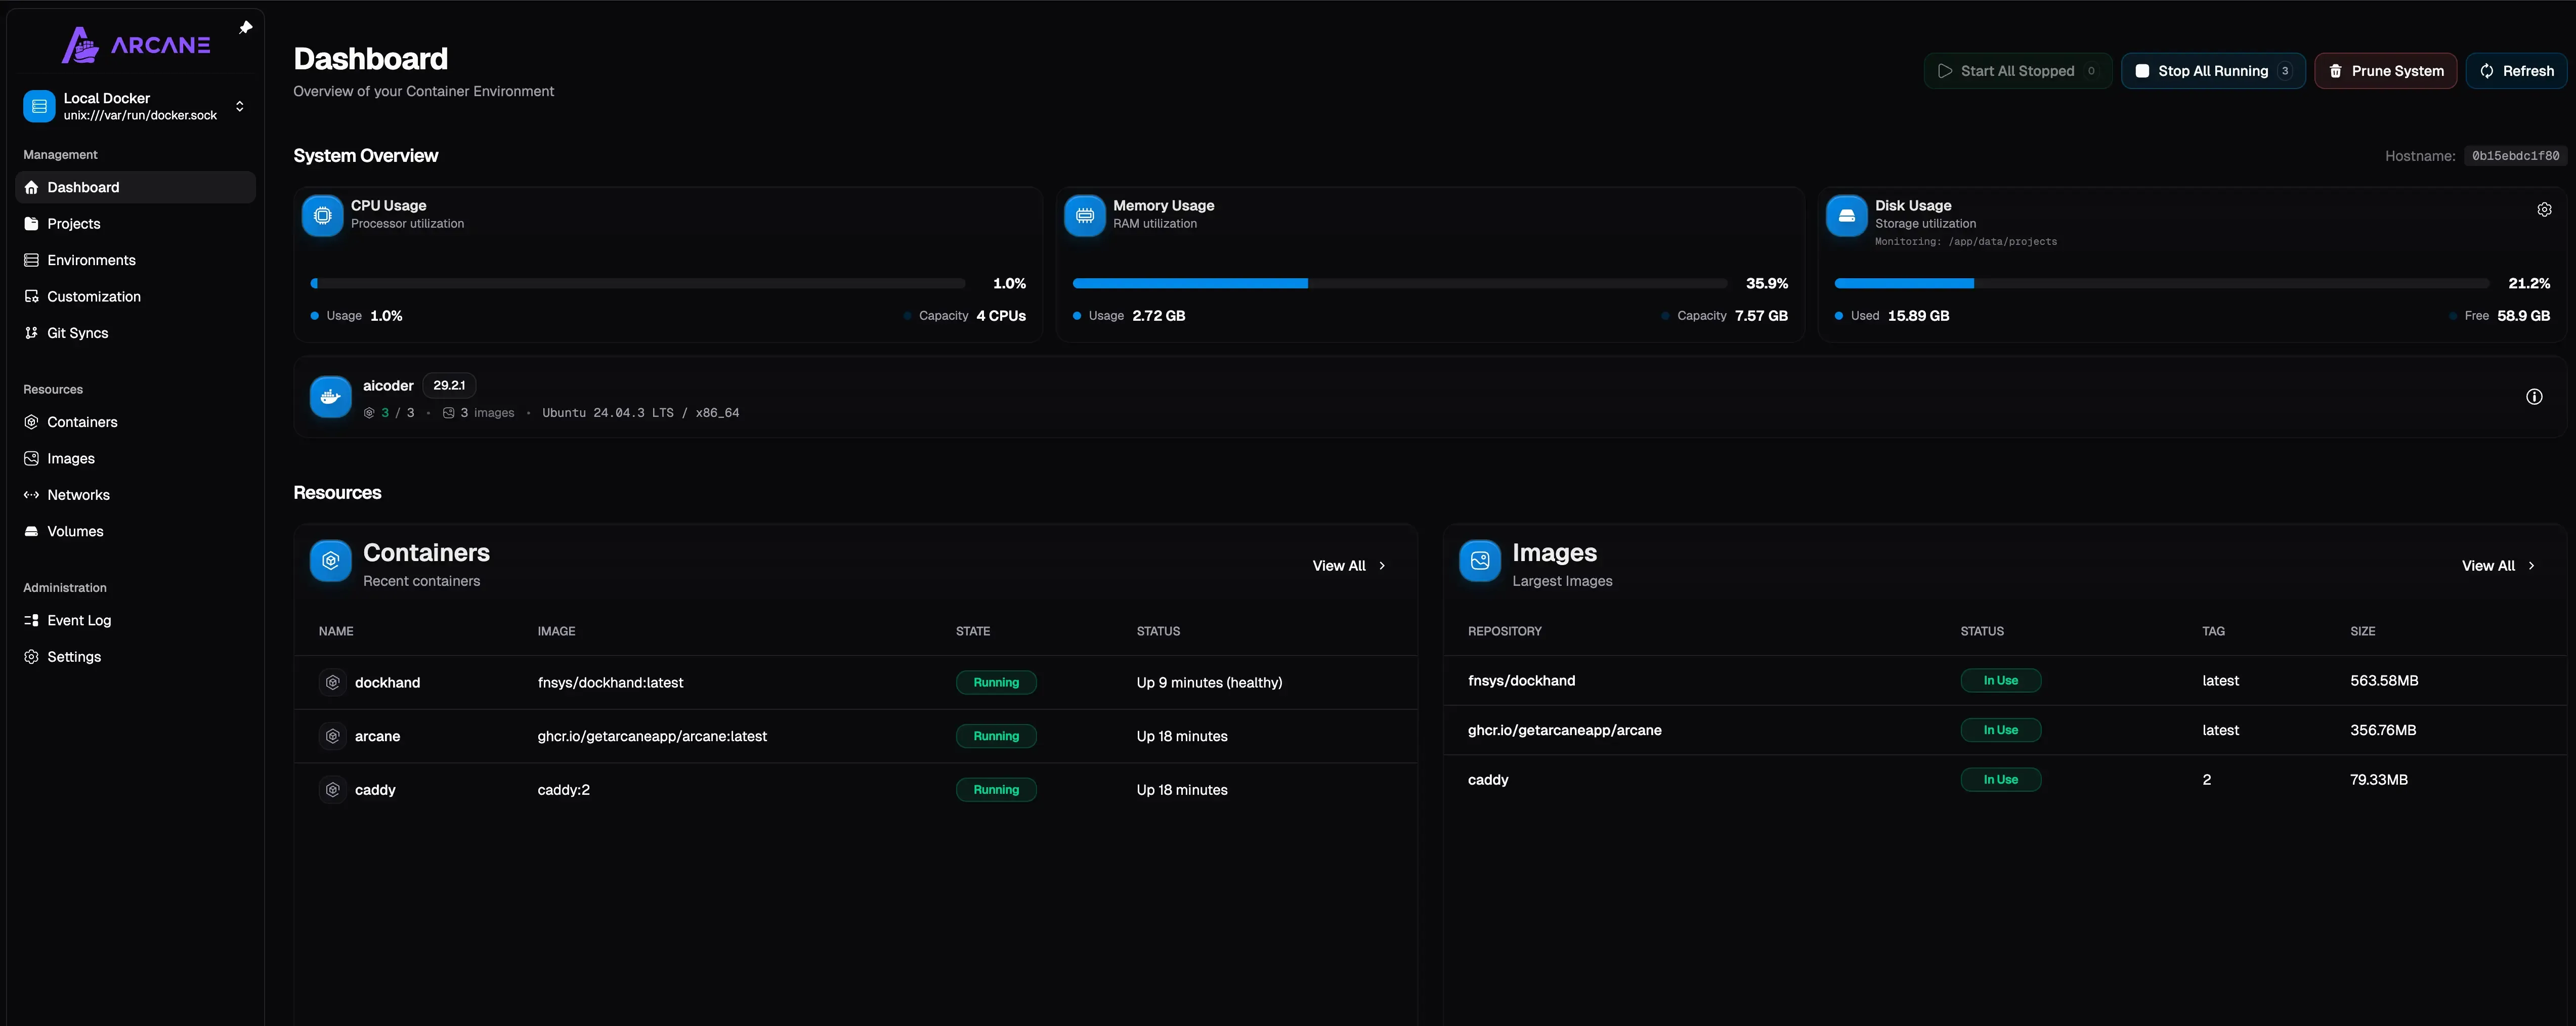
A few things that stood out to me after using it:
- REST API that you can script against directly
- CLI tool for terminal-based management alongside the web UI
- GitOps built in, not as an afterthought. Point it at a repo and your stacks sync automatically
- OIDC/SSO plus passkeys and MFA, all free
- Trivy vulnerability scanning in the UI, Copacetic image patching, and scheduled S3/volume backups (all added in the 2.9-2.12 releases)
- Tag-based container auto-updates
- Remote host management via the arcane-agent binaries, with an mTLS edge tunnel for hosts behind NAT
- BSD-3-Clause license. Free, no paid tiers, no feature locks
The project sits at around 7,500 GitHub stars with ~84 contributors, and has shipped over 100 releases since the current repo was created in April 2025. The pace is real.
Prerequisites
Before you start, you need:
- A Linux server (VPS or local machine). I recommend Hetzner, Hostinger for VPS hosting
- Docker and Docker Compose installed
- Basic terminal knowledge
VPS prices jumped across the board in 2026 — if you’re rethinking a rented box, see what changed and when a mini PC wins.
Hetzner VPS Hostinger VPS DigitalOcean $100 Free Vultr $100 FreeOr use a Mini PC as home server.
Install Docker
If you don’t have Docker yet:
sudo apt-get update
sudo apt-get install ca-certificates curl gnupg lsb-release
sudo mkdir -p /etc/apt/keyrings
curl -fsSL https://download.docker.com/linux/debian/gpg | sudo gpg --dearmor -o /etc/apt/keyrings/docker.gpg
echo \
  "deb [arch=$(dpkg --print-architecture) signed-by=/etc/apt/keyrings/docker.gpg] https://download.docker.com/linux/ubuntu \
  jammy stable" | sudo tee /etc/apt/sources.list.d/docker.list > /dev/null
sudo apt-get update
sudo apt-get install docker-ce docker-ce-cli containerd.io docker-compose-plugin docker-compose
Full walkthrough: Install Docker & Docker-compose for Ubuntu.
Install Arcane with Docker Compose
There are two ways to install Arcane. The convenience script is the fastest, but I prefer the compose method because you can see and control exactly what’s happening.
Quick install (convenience script)
If you want to get running in 30 seconds:
curl -fsSL https://getarcane.app/install.sh | bashThis pulls the image, generates secrets, and starts the container. Good for testing, but I wouldn’t use it for a permanent setup because you don’t control the compose file.
Docker Compose install (recommended)
First, create a directory for Arcane:
mkdir -p /opt/arcane
cd /opt/arcane
Generate the ENCRYPTION_KEY. The easiest way is openssl:
openssl rand -hex 32Now create your compose.yaml:
services:
  arcane:
    image: ghcr.io/getarcaneapp/manager:latest
    container_name: arcane
    ports:
      - "3552:3552"
    volumes:
      - /var/run/docker.sock:/var/run/docker.sock
      - arcane-data:/app/data
      - /opt/stacks:/opt/stacks
    environment:
      - APP_URL=http://localhost:3552
      - PUID=1000
      - PGID=1000
      - ENCRYPTION_KEY=your-generated-encryption-key
      - PROJECTS_DIRECTORY=/opt/stacks
    cgroup: host
    restart: unless-stopped
volumes:
  arcane-data:
Replace ENCRYPTION_KEY with the value you generated. Set APP_URL to your actual server address if you’re accessing it remotely. The cgroup: host line lets Arcane detect its own container ID, which matters for self-upgrades.
What happened to JWT_SECRET?
Arcane 2.x signs session tokens with an ML-DSA-87 key it generates and stores itself, so JWT_SECRET is no longer used. If your compose file still sets it, Arcane logs a warning at startup. Remove it. Same story for the image name: ghcr.io/getarcaneapp/arcane is the old name, ghcr.io/getarcaneapp/manager is the current one.
Start it up:
docker compose up -dOpen http://your-server-ip:3552 in your browser. Default login credentials are arcane / arcane-admin. Change the password immediately.
Volume paths matter
If you want Arcane to manage existing compose projects on your server, mount the directory with matching paths inside and outside the container. For example, if your stacks live at /opt/stacks, mount it as /opt/stacks:/opt/stacks, NOT as /opt/stacks:/app/data/projects. Compose files use relative paths, and they’ll break if the mount point doesn’t match. Set PROJECTS_DIRECTORY to the same absolute path so resolution works on startup.
Hardening: Docker socket proxy
Mounting the Docker socket directly gives Arcane full control over your Docker daemon. That’s a security risk. If Arcane gets compromised somehow, an attacker has root-equivalent access to your host.
The fix is a socket proxy that filters which Docker API calls Arcane can make.
Why use a socket proxy?
The Docker socket (/var/run/docker.sock) is essentially a root-level API. Any container with access to it can create privileged containers, mount the host filesystem, or run arbitrary commands as root on the host.
A socket proxy sits between Arcane and the Docker daemon. It intercepts API calls and only allows the ones you’ve explicitly permitted. You get the management functionality without handing over the keys to the kingdom.
This setup is recommended for any internet-facing server, and it’s the layout Arcane’s own docs suggest for SELinux and hardened hosts. For a homelab behind a firewall, direct socket mounting is probably fine.
Here’s a compose setup with Tecnativa’s docker-socket-proxy, using the allowlist from Arcane’s official docs:
services:
  arcane:
    image: ghcr.io/getarcaneapp/manager:latest
    container_name: arcane
    ports:
      - "3552:3552"
    volumes:
      - arcane-data:/app/data
      - /opt/stacks:/opt/stacks
    environment:
      - APP_URL=http://localhost:3552
      - PUID=1000
      - PGID=1000
      - ENCRYPTION_KEY=your-generated-encryption-key
      - PROJECTS_DIRECTORY=/opt/stacks
      - DOCKER_HOST=tcp://docker-socket-proxy:2375
    cgroup: host
    depends_on:
      - docker-socket-proxy
    networks:
      - arcane-net
    restart: unless-stopped

  docker-socket-proxy:
    image: tecnativa/docker-socket-proxy
    container_name: arcane-socket-proxy
    volumes:
      - /var/run/docker.sock:/var/run/docker.sock:ro
    environment:
      - EVENTS=1
      - PING=1
      - VERSION=1
      - AUTH=0
      - SECRETS=0
      - POST=1
      - BUILD=0
      - COMMIT=0
      - CONFIGS=0
      - CONTAINERS=1
      - DISTRIBUTION=0
      - EXEC=1
      - IMAGES=1
      - INFO=1
      - NETWORKS=1
      - NODES=0
      - PLUGINS=0
      - SERVICES=0
      - SESSION=0
      - SWARM=0
      - SYSTEM=0
      - TASKS=0
      - VOLUMES=1
    networks:
      - arcane-net
    restart: unless-stopped

networks:
  arcane-net:
    driver: bridge

volumes:
  arcane-data:
Notice that Arcane no longer mounts the Docker socket directly. Instead, it connects to the proxy via DOCKER_HOST=tcp://docker-socket-proxy:2375. The socket is mounted read-only on the proxy container, and both containers sit on an internal bridge network.
The environment variables on the proxy control which Docker API endpoints are accessible. This set is what Arcane’s docs recommend, with Swarm, auth, and secrets endpoints off. If you use Arcane’s Swarm read access, flip SWARM, SERVICES, TASKS, and NODES to 1.
Setting up OIDC/SSO
If you’re already running an identity provider like Authentik, Keycloak, or Authelia, you can hook Arcane into it for single sign-on.
Via the web UI
Go to Settings → Authentication in Arcane. Enter your client ID, client secret, and issuer URL (no trailing slash). Arcane discovers the endpoints from the provider’s .well-known/openid-configuration page. The redirect URI is:
https://your-arcane-url/auth/oidc/callbackSave and test the connection. Users who authenticate via OIDC are auto-provisioned on first login, and you can disable local password login entirely once it works.
Via environment variables
Add these to your compose file:
environment:
  - OIDC_ENABLED=true
  - OIDC_CLIENT_ID=your-client-id
  - OIDC_CLIENT_SECRET=your-client-secret
  - OIDC_ISSUER_URL=https://your-idp.example.com
  - OIDC_SCOPES=openid email profile groups
  - OIDC_GROUPS_CLAIM=groups
  - OIDC_ROLE_MAPPINGS=[{"claimValue":"arcane-admins","roleId":"role_admin"}]
OIDC_GROUPS_CLAIM tells Arcane where group membership lives in the token (realm_access.roles for Keycloak, memberOf for Azure AD). OIDC_ROLE_MAPPINGS binds a claim value to an Arcane role, with an optional environmentId to scope it. Mappings set this way are reconciled on every boot and are read-only in the UI; it also supports the _FILE suffix for Docker secrets.
Older guides mention OIDC_ADMIN_CLAIM and OIDC_ADMIN_VALUE. Those are gone in 2.x, replaced by the role-mappings setup above.
Reverse proxy setup
You’ll want a reverse proxy in front of Arcane for SSL and a clean domain name. Arcane uses WebSockets for real-time updates, so your proxy config needs to support that.
Nginx
server {
    listen 443 ssl http2;
    server_name arcane.yourdomain.com;

    ssl_certificate /path/to/cert.pem;
    ssl_certificate_key /path/to/key.pem;

    location / {
        proxy_pass http://127.0.0.1:3552;
        proxy_http_version 1.1;
        proxy_set_header Upgrade $http_upgrade;
        proxy_set_header Connection "upgrade";
        proxy_set_header Host $host;
        proxy_set_header X-Real-IP $remote_addr;
        proxy_set_header X-Forwarded-For $proxy_add_x_forwarded_for;
        proxy_set_header X-Forwarded-Proto $scheme;
    }
}
The key lines are proxy_http_version 1.1 and the Upgrade / Connection headers. Without them, WebSocket connections fail and the UI won’t get live updates.
Traefik
If you’re already running Traefik (and you probably should be for Docker setups), add labels to your Arcane service:
labels:
  - "traefik.enable=true"
  - "traefik.http.routers.arcane.rule=Host(`arcane.yourdomain.com`)"
  - "traefik.http.routers.arcane.entrypoints=websecure"
  - "traefik.http.routers.arcane.tls.certresolver=letsencrypt"
  - "traefik.http.services.arcane.loadbalancer.server.port=3552"
Traefik handles WebSocket upgrade automatically. Full Traefik setup guide: How to use Traefik as a reverse proxy in Docker.
Cloudflare Tunnels
If you don’t want to expose ports at all, Cloudflare Tunnels work well. Point a tunnel at http://localhost:3552 and Cloudflare handles SSL and routing. WebSocket support is automatic.
This is what I use on my homelab since I don’t want to open any ports on my router.
Update the APP_URL environment variable in your compose file to match your actual domain (e.g., https://arcane.yourdomain.com).
Managing remote hosts
Arcane can manage Docker on other machines through the Arcane Agent. This is useful if you have multiple servers but want one dashboard. If you installed an older version of this stack, the agent used to be called arcane-headless; the image is now ghcr.io/getarcaneapp/agent and the old name still works as an alias.
There are two connection modes. Direct means the manager reaches out to the agent on TCP port 3553. Edge means the agent dials out to the manager over an mTLS tunnel, so the remote host needs no open inbound port. Edge is the one you want for anything behind NAT or a firewall.
Either way, create the environment first: open Environments → Add Environment in the Arcane UI, pick Direct or Edge, and it generates the token and a ready-to-run snippet for you. The Edge compose looks like this:
services:
  arcane-edge-agent:
    image: ghcr.io/getarcaneapp/agent:latest
    container_name: arcane-edge-agent
    environment:
      - EDGE_AGENT=true
      - EDGE_TRANSPORT=poll
      - AGENT_TOKEN=arc_your-generated-token
      - MANAGER_API_URL=https://arcane.yourdomain.com
    volumes:
      - /var/run/docker.sock:/var/run/docker.sock
      - arcane-data:/app/data
    restart: unless-stopped
volumes:
  arcane-data:
EDGE_TRANSPORT=poll makes the agent check in periodically instead of holding a tunnel open; set it to auto for a continuous gRPC/WebSocket tunnel. The agent can also run as a standalone binary if you don’t want a container on the remote host.
One nice ops detail: Environments → Update All upgrades the agents first, then the manager, so fleet upgrades are a single click instead of a per-host chore.
Environment variables reference
Here are the most useful environment variables you can set:
| Variable | Default | What it does |
|---|---|---|
APP_URL |
http://localhost:3552 |
Public URL for the instance |
PUID / PGID |
built-in non-root user | User/group ID for file permissions |
ENCRYPTION_KEY |
none | Required. 32-byte key for encrypting sensitive data |
PROJECTS_DIRECTORY |
/app/data/projects |
Where Arcane looks for compose projects |
DOCKER_HOST |
unix:///var/run/docker.sock |
Docker connection. Use tcp:// for socket proxy |
DATABASE_URL |
SQLite | External database connection string |
GPU_MONITORING_ENABLED |
false |
Enable NVIDIA/AMD GPU stats |
GPU_TYPE |
none | nvidia or amd |
LOG_LEVEL |
info |
Logging verbosity |
UI_CONFIGURATION_DISABLED |
false |
Force config via env vars only |
JWT_SECRET still exists in the env list but is unused in 2.x. Leave it unset.
Troubleshooting
Arcane can't see my existing compose stacks
This is almost always a volume mount path mismatch. If your compose files live at /opt/stacks/myapp/compose.yaml, mount that exact path:
volumes:
  - /opt/stacks:/opt/stacks
Not /opt/stacks:/some/other/path. The paths inside and outside the container must match. Also set PROJECTS_DIRECTORY=/opt/stacks in the environment.
WebSocket errors or UI not updating live
Your reverse proxy isn’t forwarding WebSocket connections. Make sure you have the upgrade headers set. For Nginx, you need:
proxy_http_version 1.1;
proxy_set_header Upgrade $http_upgrade;
proxy_set_header Connection "upgrade";
Permission denied on Docker socket
Either add your user to the docker group (sudo usermod -aG docker $USER) or make sure the PUID/PGID values in the compose file match a user with Docker access.
Still using the old image or JWT_SECRET
If your compose references ghcr.io/getarcaneapp/arcane or sets JWT_SECRET, update to ghcr.io/getarcaneapp/manager and drop the JWT line. Arcane starts anyway but logs warnings, and the old image won’t pick up new releases forever.
What I like and what’s missing
After months with Arcane, here’s where I’ve landed.
The GitOps integration is genuinely good. I keep my compose files in a private Git repo, and when I push changes, Arcane picks them up and redeploys. No webhook config, no CI pipeline needed. It just works.
The REST API is another strong point. I wrote a small script that checks container health and restarts anything that’s unhealthy. Took about 20 minutes because the API is straightforward.
The gaps I complained about in the first version of this guide have mostly closed: Trivy scanning, scheduled auto-updates, and backups all shipped in the 2.9-2.12 releases. What’s still missing is Dockhand-style scan-before-swap gating, where an update only proceeds if the new image scans clean, and a proper file browser inside containers. Neither is a dealbreaker, but they’d make Arcane the complete package.
If you want those specific features today, take a look at how to install Dockhand. And for the wider field, my Portainer alternatives comparison covers Sencho, Dockge, Komodo, and the rest.
Related articles
- Best Portainer alternatives in 2026 - the full Docker management UI comparison
- Arcane vs Dockhand - side-by-side comparison of both tools
- Install Dockhand - the other Docker manager worth trying
- Install Dockge - another Docker management UI
- Best Docker containers for home server - what to run once your manager is set up
- Best self-hosted panels - server management panels compared
- Traefik reverse proxy for Docker - proper reverse proxy setup
- Docker auto-update with Tugtainer - keep containers updated
- Server monitoring tools - monitoring your Docker host